

How to Automatically Create System Restore Point at Startup in Windows 10
System protection (if turned on) is a feature that allows you to perform a system restore that takes your PC back to an earlier point in time, called a system restore point. This can be handy if your PC isn't working well and you recently installed an app, driver, or update.
Each restore point contains the necessary information needed to restore the system to the chosen state. Restore points are automatically generated when you install a new app, driver, or Windows update, and generated when you create a restore point manually. Restoring wont affect your personal files in your %UserProfile% folder, but it will remove apps, drivers, and updates installed after the restore point was created.
See also:
- System Restore | Microsoft Docs
- Monitored File Name Extensions | Microsoft Docs (Files with these extensions are monitored by System Restore.)
- Restoring the System | Microsoft Docs ("To restore a system, System Restore undoes file changes made to monitored files, recapturing the file state at the time of the selected restore point.")
This tutorial will show you how to create an elevated task to automatically create a system restore point at startup in Windows 10.
You must be signed in as an administrator with a password to be able to create the elevated task in Task Scheduler.
System protection must be turned on for your Windows drive (ex: C: ) for this task to work.
You must have UAC set to its default setting for this task to work.
Contents
- Option One: Add or Remove Task using a BAT file to Automatically Create System Restore Point at Startup
- Option Two: Add or Remove Task in Task Manager to Automatically Create System Restore Point at Startup
Special thanks to Matthew for providing this option.
1 Do step 2 (add) or step 3 (remove) below for what you would like to do.
A) Click/tap on the Download button below to download the BAT file below, and go to step 4 below.
Create_System_Restore_Point_at_Startup.bat
Download
This is the default setting.
A) Click/tap on the Download button below to download the BAT file below, and go to step 4 below.
Delete_the_scheduled_task.bat
Download
4 Save the .bat file to your desktop.
5 Unblock the downloaded .bat file.
6 If prompted by (UAC), click/tap on Yes to approve.
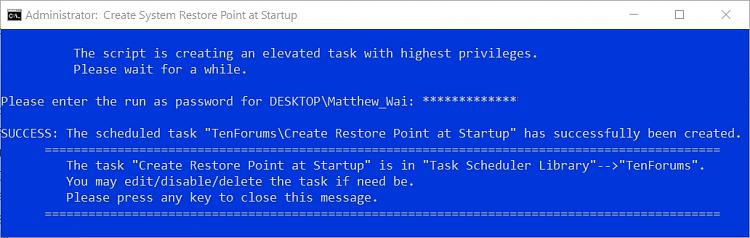
7 If adding, enter your account's password when prompted, and press any key to close the command prompt when it has finished. (see screenshot below)
8 When finished, you can now delete the downloaded .bat file if you like.
1 If you haven't already, you will need to change the SystemRestorePointCreationFrequency DWORD value to 0 in Registry Editor for this task to work properly.
2 Press the Win + R keys to open the Run dialog, type taskschd.msc into Run, and click/tap on OK to open Task Scheduler.
3 Click/tap on Task Scheduler Library in the left pane of Task Scheduler, and click/tap on Create Task in the right Actions pane. (see screenshot below)
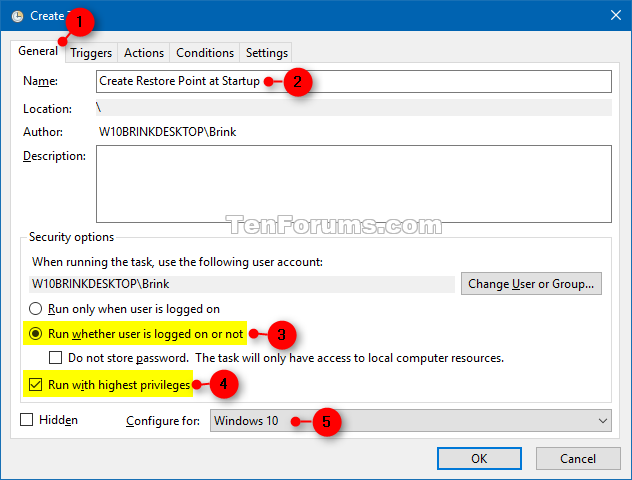
4 In the Create Task wizard: (see screenshot below)
A) Click/tap on the General tab.
B) Type a Name (ex: "Create Restore Point at Startup") you want for this task.
C) Select (dot) Run whether user is logged on or not.
D) Check the Run with highest privileges box.
E) Select Windows 10 in the Configure for drop down menu.
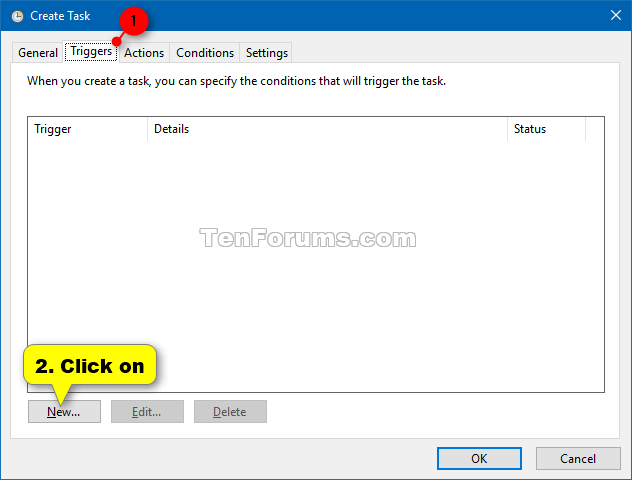
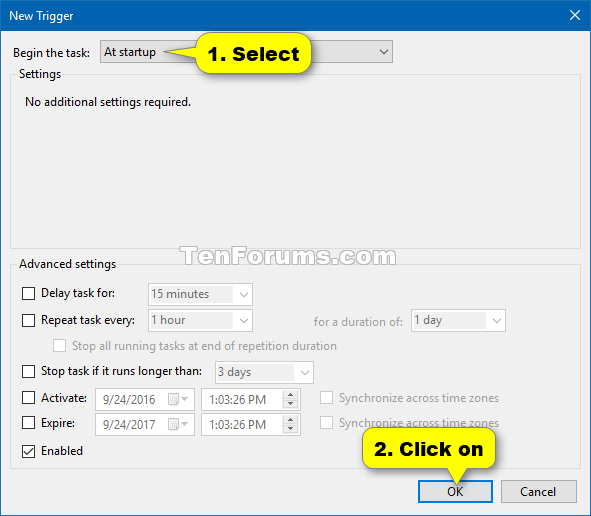
5 Click/tap on the Triggers tab, and click/tap on the New button. (see screenshot below)
6 Select At startup in the Begin the task drop down menu, and click/tap on OK. (see screenshot below)
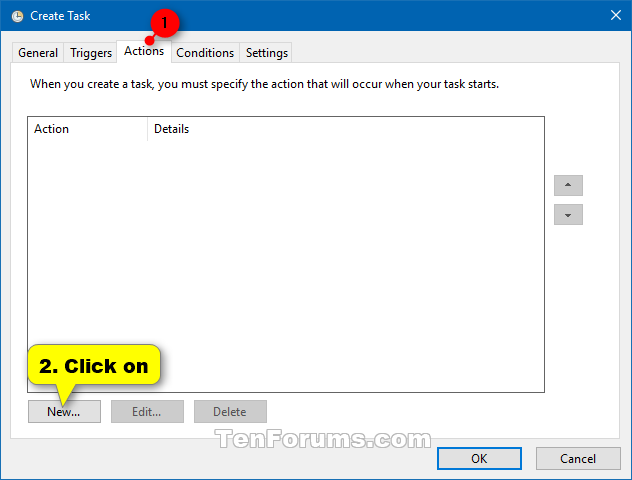
7 Click/tap on the Actions tab, and click/tap on the New button. (see screenshot below)
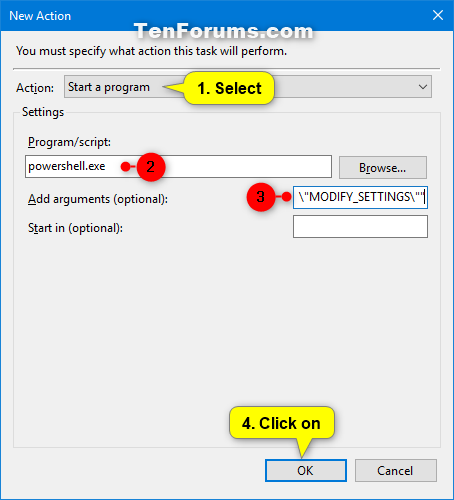
8 In the New Action wizard: (see screenshot below)
A) Select Start a program in the Action drop down menu.
B) Type powershell.exe in the Program/script field.
C) Copy and paste the command below into the Add arguments field.
-ExecutionPolicy Bypass -Command "Checkpoint-Computer -Description \"Automatic Restore Point\" -RestorePointType \"MODIFY_SETTINGS\""
D) Click/tap on OK.
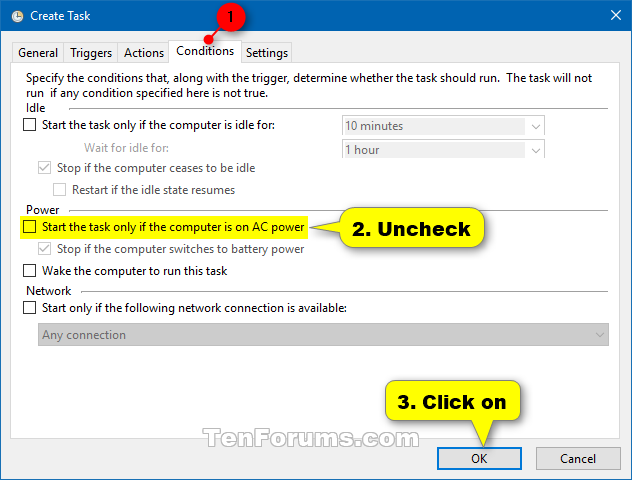
9 Click/tap on the Conditions tab, uncheck the Start the task only if the computer is on AC power box, and click/tap on OK. (see screenshot below)
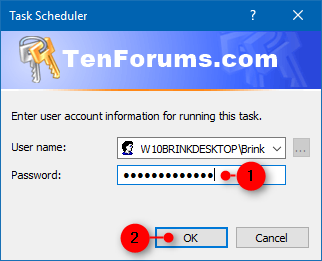
10 Enter your account's password, and click/tap on OK. (see screenshot below)
11 You will now see this new task (ex: "Create Restore Point at Startup") listed in the Task Scheduler Library. You can now close Task Scheduler if you like. (see screenshot below)
If you should want to remove this task in the future, right click on this task (ex: "Create Restore Point at Startup"), click/tap on Delete, and click/tap on Yes to approve.
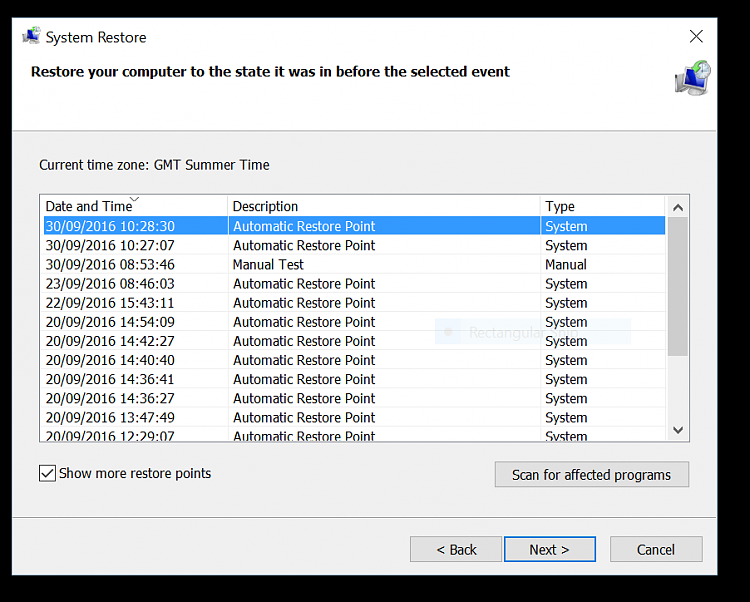
12 A new restore point named Automatic Restore Point will now automatically be created at each startup. (see screenshots below)
That's it,
Shawn
Related Tutorials
- How to Enable or Disable System Restore in Windows 7, Windows 8, and Windows 10
- How to Enable or Disable System Restore Configuration in Windows 7, Windows 8, and Windows 10
- How to Turn On or Off System Protection for Drives in Windows 10
- How to Do a System Restore of Windows 10
- How to Undo a System Restore in Windows 10
- How to Create a System Restore Point in Windows 10
- How to See List of All Available System Restore Points in Windows
- How to Delete System Restore Points in Windows 10
- How to Add a 'Create Restore Point' Context Menu in Windows 10
- How to Make a 'Create System Restore Point' Shortcut in Windows 10
- How to Create System Protection shortcut in Windows 10
- How to Automatically Create System Restore Point on Schedule in Windows 10
- How to Change System Restore Point Creation Frequency in Windows 10
- How to Add System Protection Context Menu in Windows 10
Automatically Create System Restore Point at Startup in Windows 10
-
New #1
-
New #2
Lumbco,
Double check the steps again, and make sure that System Protection is still turned on for your C: drive.
-
New #3
-
New #4
It sounds like you should be an administrator, but you can use an option in the tutorial below to verify.
Account Type - Determine in Windows 10 - Windows 10 Forums
As a test, run the command below in an elevated command prompt to see if it works for you to create a restore point. It's what the tutorial uses for the task.
Code:wmic /Namespace:\\root\default Path SystemRestore Call CreateRestorePoint "Automatic Restore Point", 100, 7
Please go ahead and post screenshots showing your task settings from the tutorial to see if anything may stand out, and also post screenshots showing your list of restore points in system protection.
-
New #5
Restore Point
Thank you Brink.
I used your tutorial and confirmed that I am registered as administrator.
I then ran the wmic command as an administrator and confirmed that it generates a restore repoint. To make sure I ran it again, screen shot attached.
Having looked at the post from psperson , I think that he may have a point. To test this I switched the PC off and on again and checked the Restore Point 'current usage', it was 8.15 Gb.
I made a manual RP and the usage went up to 8.16 Gb so it appears that each point consumes 0.01Gb.
I switched the PC off and on and the usage went up to 8.17Gb, but no extra RP was listed.
I repeated this and the usage went up to 8.18GB, still no additional RP was listed.
To be extra sure I wanted to disable System Protection on my C drive and repeat the switch off/on. This should have resulted in no increase in usage, but a message warned me that all restore points would be deleted.
Could this mean that your procedure to create a RP at switch on does work, but on my PC the newly created restore point cannot be displayed?Last edited by Brink; 30 Sep 2016 at 09:21. Reason: attached your image
-
New #6
Windows will only allow the creation of a certain amount of restore points each day. You may have used your allotment. Change registry as in code to allow unlimited restore points in Windows.Code:[HKEY_LOCAL_MACHINE\SOFTWARE\Microsoft\Windows NT\CurrentVersion\SystemRestore] "SystemRestorePointCreationFrequency"=dword:00000000
-
New #7
Actually I was able to create the restore point by running task within scheduler, but it does not run at startup.
-
New #8
The task is not limited by how many restore points it can create. It will always create a restore point at startup. If your set maximum storage size in system protection runs out, then the oldest restore point will automatically be deleted to free up space for a new one.
Just to verify. "Startup" is after a restart or shutdown, and not for resume from sleep or hibernate.
-
-
New #9
It looks like you had restore points created from your screenshot. The created restore point by this task at startup is only displayed in the location of your screenshot.
When you turn off system protection, it will delete all restore points by default. This is why you got the warning message.

Automatically Create System Restore Point at Startup in Windows 10
How to Automatically Create System Restore Point at Startup in Windows 10Published by Shawn BrinkCategory: Backup & Restore
05 Mar 2021


 Quote
Quote
Tutorial Categories

Related Discussions
