

How to Change the Time in Windows 10
Your PC's system clock is used to record the time whenever you create or modify files on your PC. You can change the clock's time and time zone.
Time is a measure in which events can be ordered from the past through the present into the future, and also the measure of durations of events and the intervals between them.
This tutorial will show you different ways on how to change the time on the system clock for all users in Windows 10.
You must be signed in as an administrator to be able to change the time.
Contents
- Option One: To Change Time in Settings
- Option Two: To Change Time in Control Panel
- Option Three: To Change Time in Command Prompt
- Option Four: To Change Date and Time in PowerShell
- Option Five: To Turn On or Off Set Time Automatically using a REG file
1 Open Settings, and click/tap on the Time & Language icon.
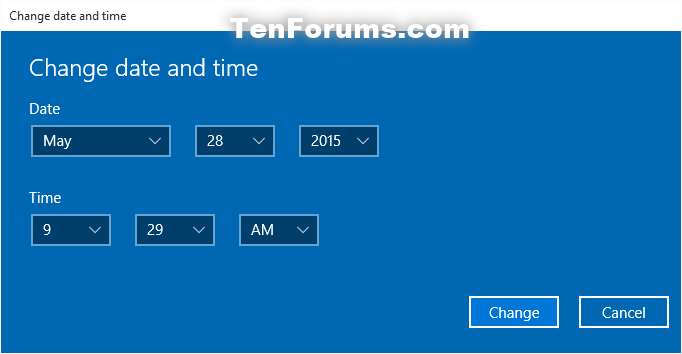
2 Click/tap on Date & Time on the left side, turn off Set time automatically, and click/tap on the Change button under Set the date and time manually on the right side. (see screenshot below)
3 Change the time to the correct current hour, minute, and AM/PM, and then click/tap on Change to apply. (see screenshot below)
4 If you like, turn back on Set time automatically to have Windows automatically synchronize the system clock time with internet time servers. (see screenshot below)
5 When finished, you can close Settings if you like.
1 Open the Control Panel (icons view), and click/tap on the Date and Time icon.
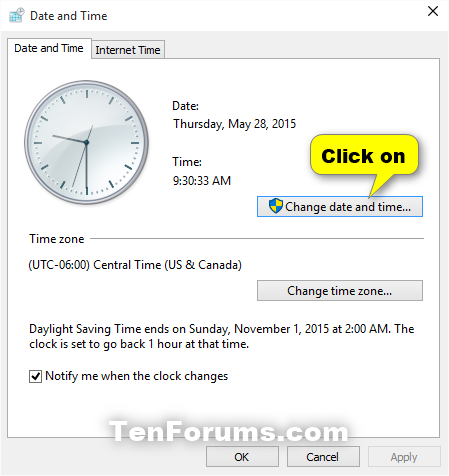
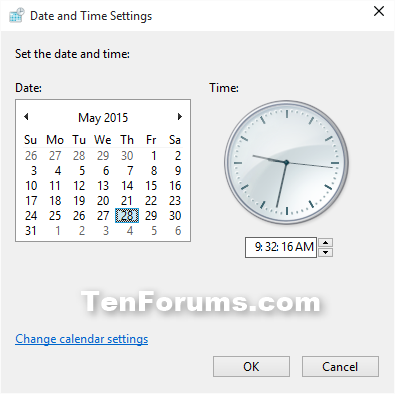
2 Click/tap on the Change date and time button. (see screenshot below)
3 If prompted by UAC, click/tap on Yes.
4 Change the time to the correct current hour, minute, and AM/PM, and then click/tap on OK to apply. (see screenshot below)
5 Click/tap on OK. (see screenshot below step 2)
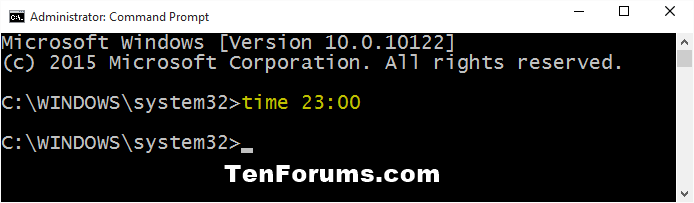
1 Open an elevated command prompt.
2 Type the command below you want to use into the elevated command prompt, and press Enter. (see screenshot below)
(Set time using 24 hour time)
time HH:MM
OR
(Set time with AM)
time HH:MM AM
OR
(Set time with PM)
time HH:MM PM
Substitute HH in the command above with the actual hour numbers or hours for a 24-hour clock.
Substitute MM in the command above with the actual minute numbers.
For example: I would type the command below for 11:00 PM for a 24-hour clock.
time 23:00
3 When finished, you can close the elevated command prompt if you like.
To see more usage options for the Set-Date command, see: Set-Date - Microsoft Developer Network
1 Open an elevated PowerShell.
2 Type the command below you want to use into the elevated PowerShell, and press Enter. (see screenshot below)
(Set time using 24 hour time)
Set-Date -Date "MM/DD/YYYY HH:MM"
OR
(Set time with AM)
Set-Date -Date "MM/DD/YYYY HH:MM AM"
OR
(Set time with PM)
Set-Date -Date "MM/DD/YYYY HH:MM PM"
Substitute MM in the command above with the actual month numbers.
Substitute DD in the command above with the actual day numbers.
Substitute YYYY in the command above with the actual year numbers.
Substitute HH in the command above with the actual hour numbers.
Substitute MM in the command above with the actual minute numbers.
For example: I would type either command below for July 21st 2017 4:39 PM.
Set-Date -Date "07/21/2017 16:39"
OR
Set-Date -Date "07/21/2017 04:39 PM"
3 When finished, you can close the elevated PowerShell if you like.
The downloadable .reg files below will modify the string value in the registry key below.
HKEY_LOCAL_MACHINE\SYSTEM\CurrentControlSet\Services\W32Time\Parameters
Type string value
NTP = On
NoSync = Off
1 Do step 2 (on) or step 3 (off) below for what you would like to do.
This is the default setting.
A) Click/tap on the Download button below to download the file below, and go to step 4 below.
Turn_ON_Set_time_automatically.reg
Download
A) Click/tap on the Download button below to download the file below, and go to step 4 below.
Turn_OFF_Set_time_automatically.reg
Download
4 Save the .reg file to your desktop.
5 Double click/tap on the downloaded .reg file to merge it.
6 When prompted, click/tap on Run, Yes (UAC), Yes, and OK to approve the merge.
7 You can now delete the downloaded .reg file if you like.
That's it,
Shawn Brink
Related Tutorials
- How to Allow or Prevent Users and Groups to Change Time in Windows 10
- How to Change the Date in Windows 10
- How to Change the Time Zone in Windows 10
- How to Synchronize Clock with an Internet Timer Server in Windows 10
- How to Change Internet Time Server in Windows
- How to Add and Remove Internet Time Servers in Windows
- How to Change Date and Time Formats in Windows 10
- How to Change Taskbar Clock to 12 hour or 24 hour Format in Windows 10
- How to Change Lock Screen Clock to 12 hour or 24 hour Format in Windows 10
- How to Hide or Show Seconds on Taskbar Clock in Windows 10
- How to Create Date and Time Shortcut in Windows 10
- How to Create a Sync Clock Time shortcut in Windows 10
- How to Add or Remove Additional Clocks for Different Time Zones on Taskbar in Windows 10
- How to Turn On or Off Adjust for Daylight Saving Time Automatically in Windows 10
Change Time in Windows 10
-
New #1
Thanks :)
And how to bring back the old Date and Time in Windows 10 version 1607?
This method doesn't work anymore: Get the old Windows 7-like Calendar and Date pane in Windows 10

Last edited by Brink; 05 Aug 2016 at 09:39. Reason: removed link
-
New #2
Don't forget to include a bit about the atomic clock because it's not obvious and people might want to change the time server to a more local one.
-
-
New #4
Hello RiP2, and welcome to Ten Forums. :)
Yes, that method no longer works, and is why we retired (removed) our tutorial for it. If you like, you can use the tutorial below to remove the Calendar agenda from the current clock to help clean it up more.
https://www.tenforums.com/tutorials/5...dows-10-a.html
-
-
New #6
Tutorial updated to add Option 5 to turn on or off "Set time automatically" using a .reg file.
Change Time in Windows 10
How to Change the Time in Windows 10Published by Shawn BrinkCategory: General Tips
14 Sep 2021


 Quote
Quote
Tutorial Categories

Related Discussions
