

Windows Update helps keep your PC safer and your software current by automatically downloading and installing important and critical updates for Windows from Microsoft via the Internet.
This tutorial will show you how to add or remove a Windows Update Settings desktop context menu for all users to quickly check for updates, view update history, set restart options, and set advanced options in Windows 10.
While you must be signed in as an administrator to be able to add or remove the Windows Update Settings context menu, all users will be able to use the context menu.
For a Windows 11 version of this tutorial, see:
Add Windows Update Context Menu in Windows 11
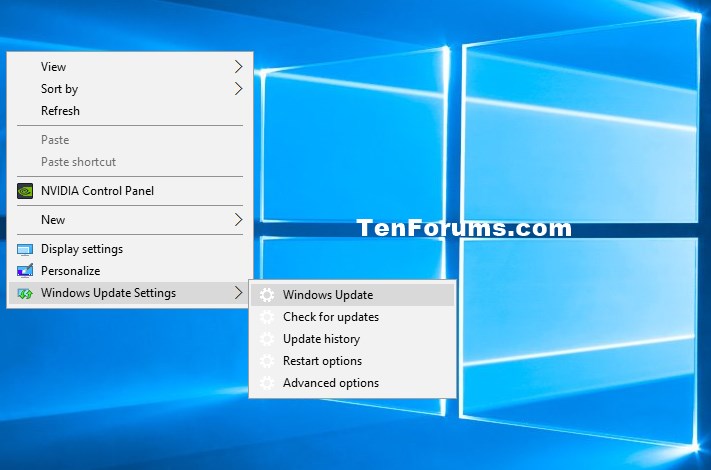
EXAMPLE: Windows Update Settings context menu
Here's How:
1. Do step 2 (add) or step 3 (remove) below for what you would like to do.
A) Click/tap on the Download button below to download the file below, and go to step 4 below.
Add_Windows_Update_Settings_to_desktop_context_menu.reg
Download
NOTE: This is the default setting.
A) Click/tap on the Download button below to download the file below, and go to step 4 below.
Remove_Windows_Update_Settings_from_desktop_context_menu.reg
Download
4. Save the .reg file to your desktop.
5. Double click/tap on the downloaded .reg file to merge it.
6. If prompted, click on Run, Yes (UAC), Yes, and OK to approve the merge.
7. You can now delete the downloaded .reg file if you like.
That's it,
Shawn Brink
Related Tutorials
- How to Open Settings in Windows 10
- How to Check for and Install Windows Updates in Windows 10
- How to Enable or Disable Check for Windows Updates in Windows 10
- How to Add Windows Update to Control Panel in Windows 10
- How to Create a Windows Update Shortcut in Windows 10
- How to Create a Check for updates in Windows Update shortcut in Windows 10
- How to Add or Remove Settings context menu in Windows 10
Add Windows Update Settings context menu in Windows 10
-
-
-
-
-
New #5
What I was looking for is the old way settings. Windows 7 way
Download updates but let me choose to install.
Is that method gone in Windows 10?
Jack
-

Add Windows Update Settings context menu in Windows 10
How to Add or Remove Windows Update Settings context menu in Windows 10Published by Shawn BrinkCategory: Windows Update & Activation
17 Aug 2022


 Quote
Quote

Tutorial Categories

Related Discussions
