

How to Manually Create a File History Backup in Windows 10
File History was first introduced in Windows 8, and has been improved in Windows 10.
You can use File History to automatically back up versions of your files on a schedule to a location you select to save to. You can select to save backups to an internal hard drive, externally connected drive (ex: USB drive), or you can save to a drive on a network. You can add, remove, and exclude folders to be backed up by File History.
The default folders in your "C:\Users\(user name)" profile folder are added by default to be backed up by File History.
Over time, you'll have a complete history of your files. If the originals are lost, damaged, or deleted, you can restore them. You can also browse and restore different versions of your files.
When you turn on File History, you can also manually create a backup of your files on demand.
This tutorial will show you how to manually create a back up of your files and folders on demand with File History in Windows 10.
File History adds 26 characters to each file name as it backs up. The maximum total full path length of any file that it backs up is 210 characters, including these 26 characters. Thus any original file with a full path length of 185 or more characters is ignored and will not be included in the back up.
Contents
- Option One: To Manually Create File History Backup in Settings
- Option Two: To Manually Create File History Backup in Control Panel
1 Open Settings, and click/tap on the Update & security icon.
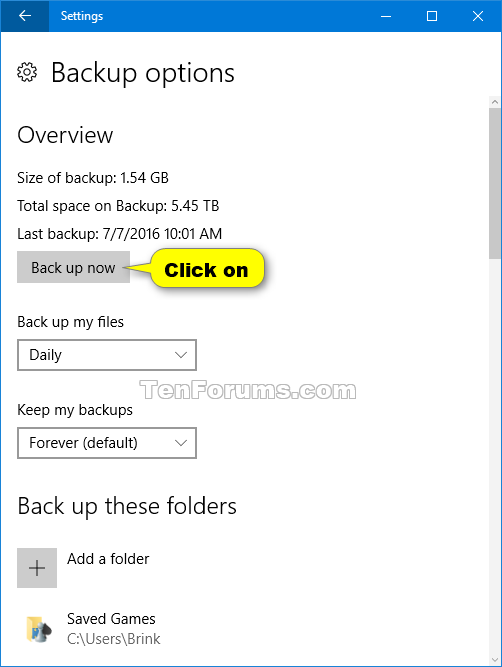
2 Click/tap on Backup on the left side, and click/tap on the More options on the right side. (see screenshot below)
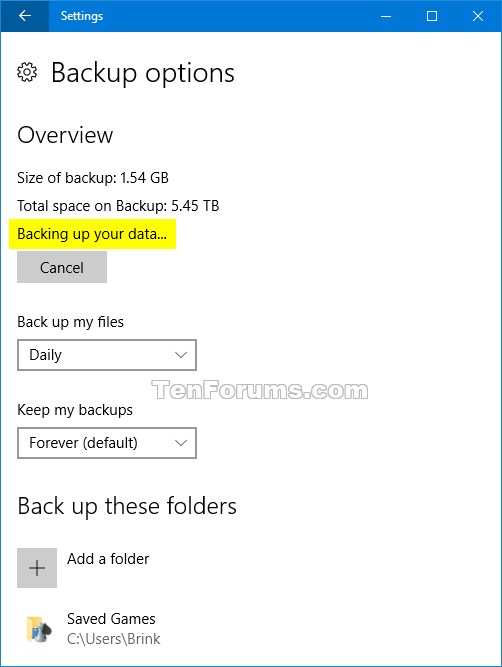
3 Click/tap on the Back up now button. (see screenshot below)
4 File History will now create a new backup version of your files from your added folders. (see screenshot below)
5 When finished, you can close Settings if you like.
1 Open the Control Panel (icons view), and click/tap on the File History icon.
2 Click/tap on the Run link under your selected drive. (see screenshot below)
3 File History will now create a new backup version of your files from your added folders. (see screenshot below)
4 When finished, you can close the File History control panel if you like.
That's it,
Shawn
Related Tutorials
- How to Reset File History to Default in Windows 10
- How to Turn On or Off File History in Windows 10
- How to Select a File History Drive in Windows 10
- How to Exclude Folders from File History in Windows 10
- How to Add or Remove Folders to be Backed Up by File History in Windows 10
- How to Change how Often to Save File History in Windows 10
- How to Change how Long to Keep File History in Windows 10
- How to Restore Files or Folders using File History in Windows 10
- How to Delete Older Versions of File History in Windows 10
- How to Recommend File History Drive to Homegroup in Windows 10
- How to Add or Remove a Windows Backup and Restore context menu in Windows 10
- How to Add History to Context Menu in Windows 10
- How to Create File History shortcut in Windows 10
Backup Files and Folders with File History in Windows 10
-
New #1
working well in W10-1803 (17134.238) and very efficient
I have set it to backup "My Documents".
Set it & Forget it
warning : if a file is opened (as example outlook.pst), it is not backed up
-
New #2
Is this statement correct Making new backups with File History is no longer supported starting with Windows 10 build 16215?
I bought a new laptop last October now on v1909 and File History works.
-
-
-
New #5
Hi Shawn. I have started to use this and am I correct in saying that once a backup has been carried out, future backups are on an incremental basis? I just want to ensure it is working ok for all users of this desktop - is there any one place I can check to see if the days backup has been carried out?
-
New #6
Hello,
The file history of a file will be saved as versions.
You can check by going through the process to restore File History below to see if versions of the file(s) are available.
Restore Files or Folders from File History in Windows 10
You can also check Previous Versions on the Properties page of the file(s) to see what's available.
Restore Previous Versions of Files, Folders, and Drives in Windows 10
-
New #7
G'day, Shawn!
Just finishing up my first backup using the method described in this thread. I do have a couple of questions, though.
1. I see the warning about the ">184 path length". Is there an easy method to search through the source disks and find if any "185+" path lengths exist? (I am assuming, from your warning, that Windows won't warn me about such not-backed-up files.)
2. This backup method seems like it would work for multiple source disks (one or more being externals) being backed up to one large external; I'm thinking about an 8GB USB3 drive. But what might happen if one or more of the source disks aren't mounted when it's time for Backup to auto-launch? I guess I can try it but was hoping that someone might either disabuse me of the notion or confirm that Backup would get to the missing disk(s) then next time they are mounted and Backup runs again.
Thanks very much! Stay safe!
Barry
- - - Updated - - -
Found an app that checks pathname lengths. Checked one of my source drives and found 12,000+ files and folders that have just such too-long pathnames (and were not backed up with no warnings from the Backup utility). So the Windows File History Backup utility is worthless. What a disappointment. I'll go back to using SyncBackSE as it doesn't have that limitation. Why Microsoft would provide such a crippled app is a mystery. It isn't like someone just pulled the idea of long pathnames out of their behind yesterday. I seem to recall Microsoft making a big deal about that once we hit 64-bit (and maybe earlier).
-
-
-
New #9
Thanks. I used Pathlengthchecker which is similar.
Backup Files and Folders with File History in Windows 10
How to Manually Create a File History Backup in Windows 10Published by Shawn BrinkCategory: Backup & Restore
02 Jun 2020


 Quote
Quote
Tutorial Categories

Related Discussions
