

How to Delete Older Versions of File History in Windows 10
File History was first introduced in Windows 8, and has been improved in Windows 10.
You can use File History to automatically back up versions of your files on a schedule to a location you select to save to. You can select to save backups to an internal hard drive, externally connected drive (ex: USB drive), or you can save to a drive on a network. You can add, remove, and exclude folders to be backed up by File History.
Over time, you'll have a complete history of your files. If the originals are lost, damaged, or deleted, you can restore them. You can also browse and restore different versions of your files.
You can set how long you want to keep saved versions of your files backed up by File History before automatically being deleted.
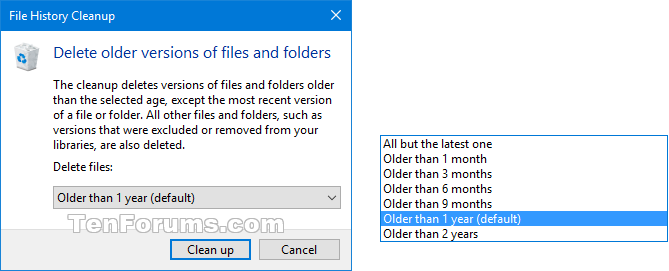
You can also use File History Cleanup at any time to delete versions of files and folders older than a selected age, except the most recent version of a file or folder. All other files and folders, such as versions that were excluded or removed from your libraries, are also deleted from your File History.
This tutorial will show you how you to use File History Cleanup to delete older backed up versions of files and folders for your account in Windows 10.
File History adds 26 characters to each file name as it backs up. The maximum total full path length of any file that it backs up is 210 characters, including these 26 characters. Thus any original file with a full path length of 185 or more characters is ignored and will not be included in the back up.
Contents
- Option One: To Delete Older File History Versions of Files and Folders in File History Cleanup
- Option Two: To Delete Older File History Versions of Files and Folders in Command Prompt
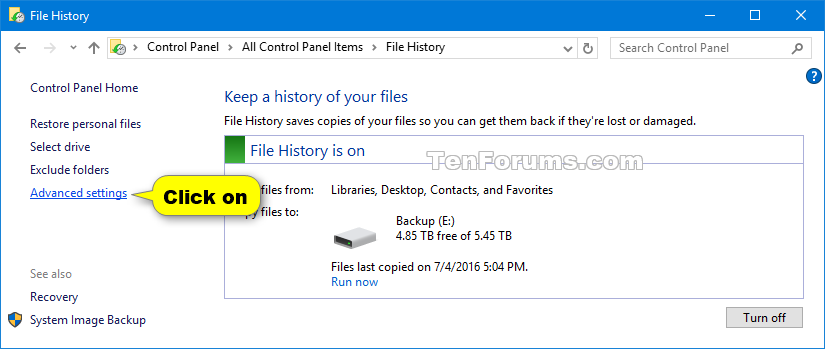
1 Open the Control Panel (icons view), and click/tap on the File History icon.
2 Click/tap on the Advanced settings link on the left side. (see screenshot below)
3 Click/tap on the Clean up versions link in the Versions section. (see screenshot below)
The Clean up versions link will not be available if you do not have any File History versions available on the currently selected drive.
4 Select the time period of versions you want to delete, and click/tap on Clean up. (see screenshot below)
5 File History Cleanup will now start discovering items for the specified time period, and delete them if available. (see screenshot below)
6 If it didn't find any versions of your files that were that old, click/tap on Close, and repeat step 4 above using a shorter time period if you like. (see screenshot below)
7 If the cleanup completed successfully, click/tap on OK. (see screenshot below)
8 You can now close the File History control panel if you like.
1 Open a command prompt.
2 Copy and paste the command below for the time period of versions you want to delete into the command prompt, and press Enter. (see screenshots below)
The -quite switch option in the commands below is used to not get a message dialog after deleting older files and folders.
For more details on the FhManagew.exe command, see: FhManagew.exe (Windows)
All but the latest one
FhManagew.exe -cleanup 0
FhManagew.exe -cleanup 0 -quiet
Older than 1 month
FhManagew.exe -cleanup 30
FhManagew.exe -cleanup 30 -quiet
Older than 3 months
FhManagew.exe -cleanup 90
FhManagew.exe -cleanup 90 -quiet
Older than 6 months
FhManagew.exe -cleanup 180
FhManagew.exe -cleanup 180 -quiet
Older than 9 months
FhManagew.exe -cleanup 270
FhManagew.exe -cleanup 270 -quiet
Older than 1 year (default)
FhManagew.exe -cleanup 360
FhManagew.exe -cleanup 360 -quiet
Older than 2 years
FhManagew.exe -cleanup 720
FhManagew.exe -cleanup 720 -quiet
3 If it didn't find any versions of your files that were that old, click/tap on Close, and repeat step 2 above using a shorter time period if you like. (see screenshot below)
You will not see this message dialog if you used the -quite switch in the command.
4 If the cleanup completed successfully, click/tap on OK. (see screenshot below)
You will not see this message dialog if you used the -quite switch in the command.
5 You can now close the command prompt if you like.
That's it,
Shawn
Related Tutorials
- How to Reset File History to Default in Windows 10
- How to Turn On or Off File History in Windows 10
- How to Select a File History Drive in Windows 10
- How to Exclude Folders from File History in Windows 10
- How to Manually Create a File History Backup in Windows 10
- How to Add or Remove Folders to be Backed Up by File History in Windows 10
- How to Change how Often to Save File History in Windows 10
- How to Change how Long to Keep File History in Windows 10
- How to Restore Files or Folders using File History in Windows 10
- How to Recommend File History Drive to Homegroup in Windows 10
- How to Add History to Context Menu in Windows 10
- How to Create File History shortcut in Windows 10
Delete Older Versions of File History in Windows 10
-
New #1
it does work very well in Windows 1803
I am using it more and more
FhManagew.exe | Microsoft Docs
-
-
New #3
I have never used File history but intend to try it out soon.
What 'format' are the backed up files in? Are they possibly simple file copies that I could browse to in File explorer then copy [or, in other words, would test.xlsx still be test.xlsx in the backed up drive & therefore capable of being directly opened by Excel?]
Denis
-
New #4
Hello Denis,
File History copies the files to the selected backup drive. I don't see any difference between the original and the File History backups.
-
New #5
Thanks for clarifying that. Since they are copies that makes them very flexible in use.
I'm just waiting for the postman to deliver a pair of 128GB SD cards for two computers {that have hardly-ever-used SD card readers} so I can experiment with using this utility for my main Documents folders with enough spare room left for [robo]copying new audio & video recordings inbetween main backups of the whole lot.
Denis
-
New #6
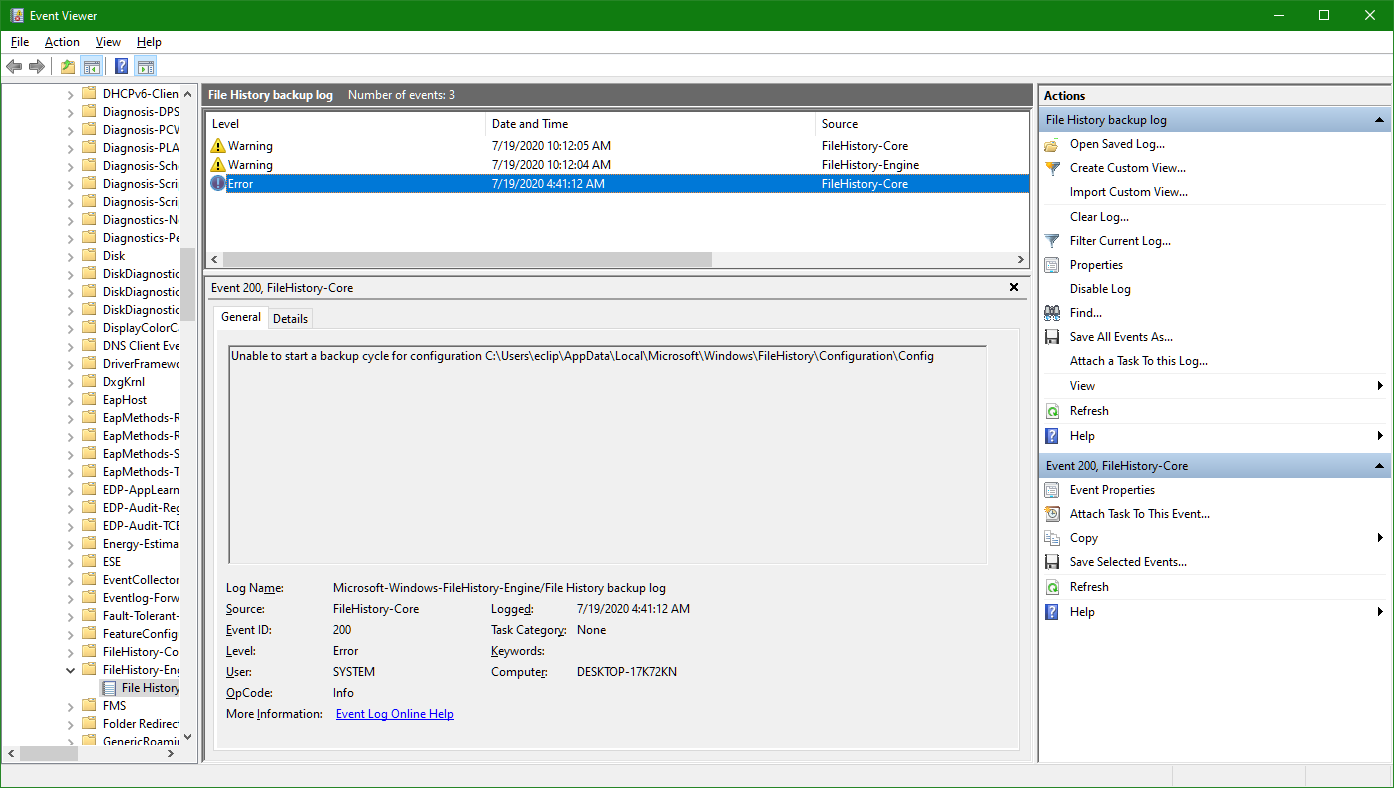
Element not found
Don't know what I broke on here but now this is appearing when I try to clean up my old File History snapshots:

This kind of thing makes me want to forego backing up altogether, unless there's a fix somewhere...
This is the last "error" event recorded in Event Viewer...
-
New #7
Hello mate,
This usually means that it couldn't find the location of where File History is saved to in order to clear it.
Just to verify, is the File History drive connected and turned on?
If so, I suppose you could reset File History to default to set it up again.
Reset File History to Default in Windows 10
-
New #8
Hi Shawn:
I got the same message that HoneycombWX got. I save my file history to a thumb drive, which has free. I reset the file history to the default, using your bat file. I turned file history off & back on. I can't clean up any files. I tried FhManagew.exe -cleanup 90 at an administrative command prompt, but got the same message.
File history is still copying files,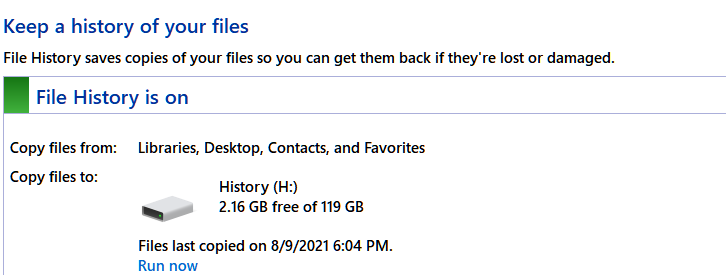 , but I wouldn't mind getting rid of everything that's older than 90 days. (I suppose I could try another thumb drive & name it "History" & use it as Drive H & after 90 days, just format the current thumbdrive. Any suggestions?
Thanks in advance!
-
-
Delete Older Versions of File History in Windows 10
How to Delete Older Versions of File History in Windows 10Published by Shawn BrinkCategory: Backup & Restore
02 Jun 2020


 Quote
Quote
Tutorial Categories

Related Discussions
