

How to Add or Remove Folders to be Backed Up by File History in Windows 10
File History was first introduced in Windows 8, and has been improved in Windows 10.
You can use File History to automatically back up versions of your files on a schedule to a location you select to save to. You can select to save backups to an internal hard drive, externally connected drive (ex: USB drive), or you can save to a drive on a network. You can add, remove, and exclude folders to be backed up by File History.
The default folders in your "C:\Users\(user name)" profile folder are added by default to be backed up by File History.
Over time, you'll have a complete history of your files. If the originals are lost, damaged, or deleted, you can restore them. You can also browse and restore different versions of your files.
This tutorial will show you how to add or remove folders to be backed up by File History for your account in Windows 10.
File History adds 26 characters to each file name as it backs up. The maximum total full path length of any file that it backs up is 210 characters, including these 26 characters. Thus any original file with a full path length of 185 or more characters is ignored and will not be included in the back up.
Contents
- Option One: To Add Folders to be Backed Up by File History
- Option Two: To Remove Folders from being Backed Up by File History
1 Open Settings, and click/tap on the Update & security icon.
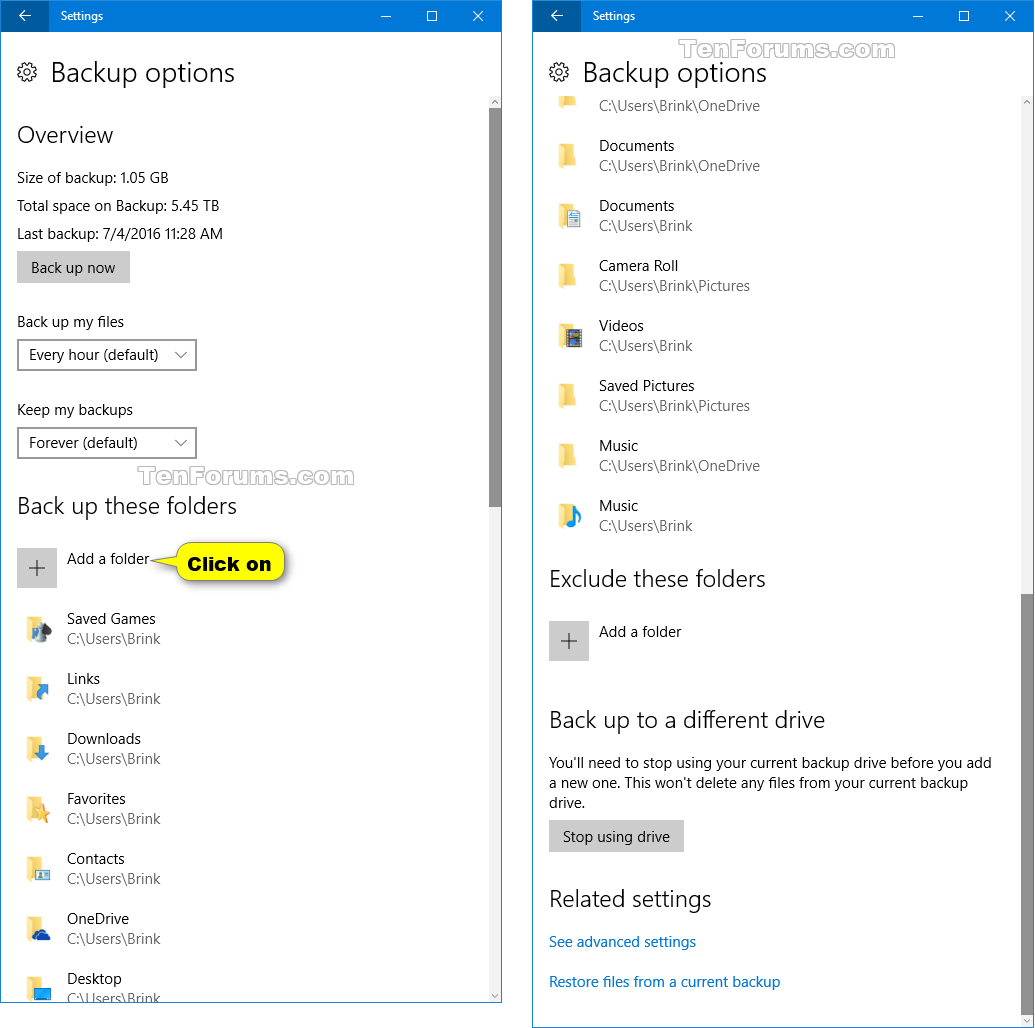
2 Click/tap on Backup on the left side, and click/tap on the More options on the right side. (see screenshot below)
3 Scroll down to the Back up these folders section, and click/tap on Add a folder. (see screenshot below)
4 Browse to and select a drive, folder, or library you want to back up, and click/tap on Choose this folder. (see screenshot below)
5 Repeat steps 3 and 4 above if you want to add any other folders to be backed up.
6 When finished, you can close Settings if you like.
1 Open Settings, and click/tap on the Update & security icon.
2 Click/tap on Backup on the left side, and click/tap on the More options on the right side. (see screenshot below)
3 Scroll down to the Back up these folders section, and click/tap on an added folder you want to remove. (see screenshot below)
4 Click/tap on Remove. (see screenshot below)
5 Repeat steps 3 and 4 above if you want to remove any other folders from being backed up.
6 When finished, you can close Settings if you like.
That's it,
Shawn
Related Tutorials
- How to Reset File History to Default in Windows 10
- How to Turn On or Off File History in Windows 10
- How to Select a File History Drive in Windows 10
- How to Exclude Folders from File History in Windows 10
- How to Change how Often to Save File History in Windows 10
- How to Change how Long to Keep File History in Windows 10
- How to Restore Files or Folders using File History in Windows 10
- How to Delete Older Versions of File History in Windows 10
- How to Manually Create a File History Backup in Windows 10
- How to Recommend File History Drive to Homegroup in Windows 10
- How to Add History to Context Menu in Windows 10
- How to Create File History shortcut in Windows 10
Add or Remove Folders for File History in Windows 10
-
New #1
I'm a bit confused by the warning. Do we know if File History is going to be dropped or not?
It isn't on the list for deprecated features for fall update.
-
New #2
File History will eventually be replaced by the new "Timeline" feature in Windows 10.
Microsoft disabled File History in build 16215 to get ready to add "Timeline" in the next build, but "Timeline" wasn't ready, so Microsoft enabled File History again in build 16226.
-
New #3
File History "disabled" But WORKS IF... W-10 v-1709 Build 16299.248
File History CAN be made to WORK PROPERLY, but with some difficulty, at least with W-10 v-1709 Build 16299.248.
Microsoft in their infinite wisdom decided to NOT bother telling any users with the new creator's version, but instead just quietly changed two things (at least) in file history:
- DISABLED the task scheduler for file history, which ensures it won't save ANY MORE data whatsoever (see work-around below).
- REMOVED the ability to ADD folders to file history (through their UI).
To FIX this :
- MANUALLY invoke "Run Now" from the File History UI WHILE connected to your backup
- RE-enable (or recreate) task manager to invoke "Run Now"
 Make sure you have some type of ERROR DETECTION so when Microsoft decides to quietly just break it again, you will know about it.
- ADD folders, by merely Creating a NEW LIBRARY for that folder, using right click in Explorer. Make sure you check "show libraries" in folders view, and then look to see if Windows did add it.
- Make sure you look to see exactly what is included: For instance, if you include: C:\Users\CURRENT-USER\ it will work, until it fills that new 10 TB drive you thought would never run out of space.
RANT: (Since many folks were RELYING on File History to protect their files, Microsoft is now among those that seemingly don't care to protect my stuff, when they easily could have, or at least warned anyone that (obviously to my Windows installation) was DEPENDING on and STILL USING it. As an absurd example, reminds me of someone calling "their fire dept.", only to learn that the number is now DISCONNECTED, since the county just turned over fire control to the city!)
Forcing changes in backups might be fine, especially if made better. But not migrating backups for current users AUTOMATICALLY is unacceptable, when it is technically possible. Certainly not informing users how to migrate easily and quickly, and that they MUST CHANGE NOW or they lose data is the minimum they must do.
-
New #4
Is this feature will be depreciated or timeline really haven't there yet? Ugh..
-
Add or Remove Folders for File History in Windows 10
How to Add or Remove Folders to be Backed Up by File History in Windows 10Published by Shawn BrinkCategory: Backup & Restore
02 Jun 2020


 Quote
Quote
Tutorial Categories

Related Discussions
