

How to Add Kill All Not Responding Tasks Context Menu in Windows 10
The Kill all not responding tasks desktop context menu item will allow users to be able to quickly kill any "not responding" task processes all at once.
This tutorial will show you how to add or remove the 'Kill all not responding tasks' desktop context menu for all users in Windows 10.
While you must be signed in as an administrator to add or remove the context menu, all users can use the context menu.
You will see a No tasks running with the specified criteria message below when using the context menu if there are currently no "not responding" tasks running.
If there were any not responding tasks running, then they would be listed as being killed instead.
For a Windows 11 version of this tutorial, see:
Add "Kill all not responding tasks" Context Menu in Windows 11
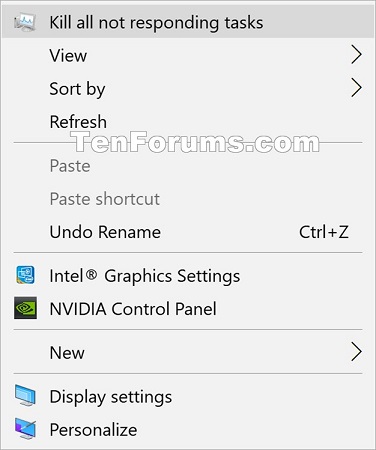
EXAMPLE: "Kill all not responding tasks" desktop context menu
Here's How:
1 Do step 2 (add) or step 3 (remove) below for what you would like to do.
A) Click/tap on the Download button below to download the file below, and go to step 4 below.
Add_Kill_all_not_responding_tasks_to_context_menu.reg
Download
This is the default setting.
A) Click/tap on the Download button below to download the file below, and go to step 4 below.
Remove_Kill_all_not_responding_tasks_from_context_menu.reg
Download
4 Save the .reg file to your desktop.
5 Double click/tap on the downloaded .reg file to merge it.
6 When prompted, click/tap on Run, Yes (UAC), Yes, and OK to approve the merge.
8 You can now delete the downloaded .reg file if you like.
That's it,
Shawn Brink
Add Kill All Not Responding Tasks Context Menu in Windows 10
-
New #1
A suggested change
Thanks! There have been many times I've needed this.
Here's a suggested change:
Change the last line to:
@="CMD /C taskkill /f /fi "status eq Not Responding" & ECHO; & PAUSE"
Instead of leaving the command window open, it will pause to allow you to see the result, then close the command window when you're done.
-
New #2
I'm happy to hear the context menu was able to help @SpacemanSam.
The command in the context menu has now been updated as requested.
-
New #3
Typo in my last post
Oops!
Somehow, when I posted my revised code to this forum, the backslashes disappear from the code I posted.
There's supposed to be a backslash in front of each of the quotes around the ""status eq Not Responding" string.
I keep trying to edit the post, and the backslashes keep disappearing!Last edited by SpacemanSam; 05 Dec 2019 at 23:35. Reason: backslashes keep disappering
-
-
-
-
New #7
Admin
It doesn't come up with admin priveleges

-
New #8
Hello Eddie,
In that case, you could open an elevated command prompt, copy and paste the command below into the command prompt, and press Enter to manually run it as admin.
taskkill.exe /f /fi "status eq Not Responding"
-
-
New #9
That worked just fine, thanks

Add Kill All Not Responding Tasks Context Menu in Windows 10
How to Add Kill All Not Responding Tasks Context Menu in Windows 10Published by Shawn BrinkCategory: Performance & Maintenance
12 Aug 2022


 Quote
Quote
Tutorial Categories

Related Discussions
