

How to Hide or Show Windows Ink Workspace Button on Taskbar in Windows 10
Starting with Windows 10 build 14328, you can try out the new Windows Ink experience for yourself. Windows Ink puts the power of Windows in the tip of your pen, enabling you to write on your device as you do on paper, creating sticky notes, drawing on a whiteboard, and easily sharing your analog thoughts in the digital world. Windows Ink is also integrated into apps like Maps, Microsoft Edge, and Office.
If you have a device with an active pen like the Surface Pro 4 or Surface Book Windows Ink Workspace is enabled by default and accessible via the pen button in the notification area of your taskbar. You wont see this button if your device does not have an active pen paired with it. However, for those of you who dont have a device with an active pen but want to try out Windows Ink Workspace, you can still manually enable the Windows Ink Workspace button.
Starting with Windows 10 build 14342, Microsoft has updated the Windows Ink Workspace icon on the taskbar. The new icon shows a more expressive ink stroke and is more consistent with other icons in the notification area. The new icon also looks better at wider range of sizes.
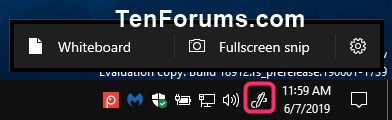
Starting with Windows 10 build 18912 mentioned in build 18917, some Insiders may notice that Windows Ink Workspace has changed on their PC. Thats because we are improving Windows Ink Workspace experience. As part of that, they will notice that Windows Ink Workspace is smaller with a direct link to our Microsoft Whiteboard app, providing you with rich ideation and collaboration capabilities. If you used Sketchpad, dont worry. We saved the sketch you were working on (in your Pictures folder). In addition, the Windows Ink Workspace allows you to quickly capture your screen and annotate it with the improved Snip and Sketch app. We heard your feedback and we have streamlined the Windows Ink Workspace for you. Stay tuned as we continue to evolve!
For more information about Windows Ink, see:
- A closer look at Windows Ink | Windows Experience Blog
- Windows 10 Anniversary Update brings New Experiences and Developer Opportunity | Windows Experience Blog
- Windows 10 Anniversary Update Available August 2 | Windows Experience Blog
- Create, ideate, and collaborate: Build apps powered by Windows Ink | Building Apps for Windows
- Windows 10 Tip: Getting started with the Windows Ink Workspace | Windows Experience Blog
This tutorial will show you how to hide or show the Windows Ink Workspace button on your taskbar in Windows 10.
Contents
- Option One: To Hide or Show Windows Ink Workspace Button in Taskbar Context Menu
- Option Two: To Hide or Show Windows Ink Workspace Button in Settings
- Option Three: To Hide or Show Windows Ink Workspace Button in Taskbar Settings
- Option Four: To Hide or Show Windows Ink Workspace Button using a BAT file
EXAMPLE: Windows Ink Workspace
This option is no longer available starting with Windows 10 build 21337 and higher.
1 Right click or press and hold on the taskbar, and click/tap on Show Windows Ink Workspace button to toggle it to show (checked) or hide (unchecked). (see screenshots below)
(Tablet mode off)
(Tablet mode on)
1 Turn on or off the Windows Ink Workspace system icon for what you want. (see screenshot below)
For how, see: How to Turn Taskbar Notification Area System Icons On or Off in Windows 10
This option is only available starting with Windows 10 build 21337 and higher.
1 Open Settings, and click/tap on the Personalization icon.
2 Click/tap on Taskbar on the left side. (see screenshot below)
3 Turn on (default) or off Show Windows Ink Workspace button on the right side for what you want.
4 You can now close Settings if you like.
The downloadable .bat files below will modify the DWORD value in the registry key below.
HKEY_CURRENT_USER\SOFTWARE\Microsoft\Windows\CurrentVersion\PenWorkspace
PenWorkspaceButtonDesiredVisibility DWORD
0 = Hide
1 = Show
1 Do step 2 (show) or step 3 (hide) below for what you would like to do.
A) Click/tap on the Download button below to download the BAT file below, and go to step 4 below.
Show_Windows_Ink_Workspace_button_on_taskbar.bat
Download
A) Click/tap on the Download button below to download the BAT file below, and go to step 4 below.
Hide_Windows_Ink_Workspace_button_on_taskbar.bat
Download
4 Save the .bat file to your desktop.
5 Unblock the .bat file.
6 Run the .bat file.
7 You will now notice your screen flicker and a command prompt quickly opens and closes as explorer is restarted to apply the registry changes.
8 When finished, you can delete the downloaded .bat file if you like.
That's it,
Shawn
Related Tutorials
- How to Enable or Disable Windows Ink Workspace in Windows 10
- How to Enable or Disable Suggested Apps in Windows Ink Workspace in Windows 10
- How to Hide or Show Search Box or Cortana Icon on Taskbar in Windows 10
- How to Hide or Show Cortana Button on Taskbar in Windows 10
- How to Hide or Show Task View Button on Taskbar in Windows 10
- How to Hide or Show Touch Keyboard Button on Taskbar in Windows 10
- How to Hide or Show Touchpad Button on Taskbar in Windows 10
Hide or Show Windows Ink Workspace Button on Taskbar in Windows 10
-
New #1
Starting with Windows 10 Insider Preview Build 14342, Microsoft has updated the Windows Ink Workspace icon on the taskbar. The new icon shows a more expressive ink stroke and is more consistent with other icons in the notification area. The new icon also looks better at wider range of sizes.
-
New #2
Starting with Windows 10 build 18912, some Insiders may notice that Windows Ink Workspace has changed on their PC. That’s because we are improving Windows Ink Workspace experience. As part of that, they will notice that Windows Ink Workspace is smaller with a direct link to our Microsoft Whiteboard app, providing you with rich ideation and collaboration capabilities. If you used Sketchpad, don’t worry. We saved the sketch you were working on (in your Pictures folder). In addition, the Windows Ink Workspace allows you to quickly capture your screen and annotate it with the improved Snip and Sketch app. We heard your feedback and we have streamlined the Windows Ink Workspace for you. Stay tuned as we continue to evolve!

Hide or Show Windows Ink Workspace Button on Taskbar in Windows 10
How to Hide or Show Windows Ink Workspace Button on Taskbar in Windows 10Published by Shawn BrinkCategory: Customization
21 Mar 2021


 Quote
QuoteTutorial Categories

Related Discussions
