

How to Create a Custom Power Plan in Windows 10
A power plan is a collection of hardware and system settings that manages how computers use and conserve power. A power plan is also known as a power scheme. You can create custom power plans that are optimized for specific computers.
By default, Windows 10 includes three built-in power plans: Balanced, Power Saver, and High Performance. You can customize these existing plans for your systems, create new plans that are based on the existing plans, or create a new power plan from scratch.
This tutorial will show you how to create a new custom power plan that can be used by all users on the Windows 10 PC.
If your computer supports Modern Standby, you will only have the Balanced power plan available by default.
Contents
- Option One: To Create Custom Power Plan in Power Options
- Option Two: To Create Custom Power Plan in Command Prompt
1 Do step 2, step 3, or step 4 below for how you would like to open Power Options.
2 Right click or press and hold on the Power icon in the notification area, click/tap on Power options, and go to step 5 below. (see screenshot below)
3 Open the Control Panel (icons view), click/tap on the Power Options icon, and go to step 5 below.
4 Open the Win+X Quick Link menu, click/tap on Power Options, click/tap on the Additional power settings link, and go to step 5 below.
5 Click/tap on the Create a power plan link on the left side. (see screenshot below)
6 Select (dot) an existing power plan to base the new custom plan on, type in a plan name you want, and click/tap on Next. (see screenshot below)
7 Click/tap on Create. (see screenshot below)
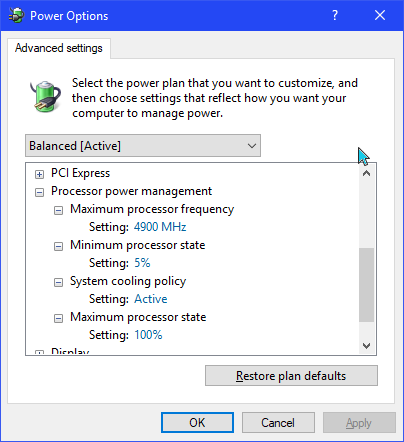
8 Your new custom power plan is now your current active plan. Click/tap on Change plan settings to make any changes you want to the new custom power plan. (see screenshot below)
1 Open a command prompt.
2 Copy and paste thepowercfg /listcommand into the command prompt, and press Enter. This will give you a list of all existing power plans on the PC along with their GUID. Make note of the GUID of the power plan (ex: high performance) you want to base the new custom plan on. (see screenshot below)
3 Type the command below into the command prompt, and press Enter to create a new custom power plan. (see screenshot below)
powercfg -duplicatescheme GUID
Substitute GUID in the command above with the actual GUID you chose from step 2 above.
For example:powercfg -duplicatescheme 8c5e7fda-e8bf-4a96-9a85-a6e23a8c635c
4 Make note of the given GUID (ex: 48569655-ebee-4428-b456-512f207cddc2) for the new custom power plan. (see screenshot above)
5 Type the command below into the command prompt, and press Enter to rename the custom power plan to what you want. (see screenshot below)
powercfg -changename GUID "name"
Substitute GUID in the command above with the actual GUID given for the custom power plan in step 4 above.
Substitute name in the command above with the name you want for the custom power plan.
For example:powercfg -changename 48569655-ebee-4428-b456-512f207cddc2 "My Custom Plan 1"
6 Type the command below into the command prompt, and press Enter to make this new custom power plan your active plan. (see screenshot below)
powercfg -setactive GUID
Substitute GUID in the command above with the actual GUID given for the custom power plan in step 4 above.
For example:powercfg -setactive 48569655-ebee-4428-b456-512f207cddc2
7 When finished, you can close the command prompt if you like.
8 You can now change the settings of the custom power plan to what you want.
That's it,
Shawn
Related Tutorials
- How to See Your Current Active Power Plan Scheme in Windows 10
- How to Choose a Power Plan Scheme in Windows 10
- How to Change Power Plan Settings in Windows 10
- How to Add or Remove 'Choose Power Plan' context menu in Windows 10
- How to Rename a Power Plan in Windows 10
- How to Export and Import a Power Plan in Windows 10
- How to Delete a Power Plan in Windows 10
- How to Reset and Restore Power Plans to Default Settings in Windows 10
- How to Add or Remove Power Options Context Menu in Windows 10
- How to Specify a Default Active Power Plan in Windows 10
- How to Add or Remove Ultimate Performance Power Plan in Windows 10
- How to Restore Missing Default Power Plans in Windows 10
- How to View All Power Plan Settings in a Text File in Windows
Create Custom Power Plan in Windows 10
-
New #1
Something just came to mind for users that want or need to overclock for specific programs, but don't need all that horsepower all the time.
Create a power plan like Balanced, but instead of 5%min and 100%max, they can set it to 5%min and 85 or 95%max, depending how high they are overclocked.
That way they won't have to switch between OC profiles in their BIOS/UEFI, and they conserve electricity for daily use, and keep their systems a tad cooler too.
-
New #2
I just tried creating a custom power plan to run my 4.9GHz OC at 4.5GHz max.
It doesn't work
I tested with CPU-Z and set the min & max to 92%, which should run a little more than 4.5GHz,
but the custom plan stays at 4.0GHz(BIOS default for the 6700K).
It seems making changes in percentage to the max freq in all plans uses the default CPU freq and downclocks.
In my case instead of 4.5GHz, no matter the plan, 92% gives only 3.6GHz
Am I missing something?
Or am I stuck using my OC Profiles in UEFI/BIOS, if I want to set the OC to run a slower.
Note: Balanced runs as it should, between 0.800 and 4.9, it's just changing the max freq in power plan that screws everything up
Last edited by Cliff S; 04 Apr 2017 at 03:31.
-
New #3
Hi,
I use for more than a year now a script that I have created, to set and edit a power plan in 2 clicks.
This one aims to deactivate all Sleeps, and disable turn off or going to sleep with hardware buttons.
If it can help anyone, I'm glad :)Code:powercfg -SETACTIVE 8c5e7fda-e8bf-4a96-9a85-a6e23a8c635c powercfg -SETACVALUEINDEX 8c5e7fda-e8bf-4a96-9a85-a6e23a8c635c SUB_SLEEP STANDBYIDLE 0 powercfg -SETDCVALUEINDEX 8c5e7fda-e8bf-4a96-9a85-a6e23a8c635c SUB_SLEEP STANDBYIDLE 0 powercfg -SETACVALUEINDEX 8c5e7fda-e8bf-4a96-9a85-a6e23a8c635c SUB_SLEEP HIBERNATEIDLE 0 powercfg -SETDCVALUEINDEX 8c5e7fda-e8bf-4a96-9a85-a6e23a8c635c SUB_SLEEP HIBERNATEIDLE 0 powercfg -SETACVALUEINDEX 8c5e7fda-e8bf-4a96-9a85-a6e23a8c635c SUB_SLEEP HYBRIDSLEEP 0 powercfg -SETDCVALUEINDEX 8c5e7fda-e8bf-4a96-9a85-a6e23a8c635c SUB_SLEEP HYBRIDSLEEP 0 powercfg -SETACVALUEINDEX 8c5e7fda-e8bf-4a96-9a85-a6e23a8c635c SUB_DISK DISKIDLE 0 powercfg -SETDCVALUEINDEX 8c5e7fda-e8bf-4a96-9a85-a6e23a8c635c SUB_DISK DISKIDLE 0 powercfg -SETACVALUEINDEX 8c5e7fda-e8bf-4a96-9a85-a6e23a8c635c SUB_BUTTONS LIDACTION 0 powercfg -SETDCVALUEINDEX 8c5e7fda-e8bf-4a96-9a85-a6e23a8c635c SUB_BUTTONS LIDACTION 0 powercfg -SETACVALUEINDEX 8c5e7fda-e8bf-4a96-9a85-a6e23a8c635c SUB_BUTTONS PBUTTONACTION 0 powercfg -SETDCVALUEINDEX 8c5e7fda-e8bf-4a96-9a85-a6e23a8c635c SUB_BUTTONS PBUTTONACTION 0 powercfg -SETACVALUEINDEX 8c5e7fda-e8bf-4a96-9a85-a6e23a8c635c SUB_BUTTONS SBUTTONACTION 0 powercfg -SETDCVALUEINDEX 8c5e7fda-e8bf-4a96-9a85-a6e23a8c635c SUB_BUTTONS SBUTTONACTION 0 powercfg -SETACVALUEINDEX 8c5e7fda-e8bf-4a96-9a85-a6e23a8c635c SUB_BUTTONS UIBUTTON_ACTION 2 powercfg -SETDCVALUEINDEX 8c5e7fda-e8bf-4a96-9a85-a6e23a8c635c SUB_BUTTONS UIBUTTON_ACTION 2 powercfg -SETACVALUEINDEX 8c5e7fda-e8bf-4a96-9a85-a6e23a8c635c SUB_SLEEP RTCWAKE 0 powercfg -SETDCVALUEINDEX 8c5e7fda-e8bf-4a96-9a85-a6e23a8c635c SUB_SLEEP RTCWAKE 0 powercfg -SETACVALUEINDEX 8c5e7fda-e8bf-4a96-9a85-a6e23a8c635c SUB_PCIEXPRESS ASPM 0 powercfg -SETDCVALUEINDEX 8c5e7fda-e8bf-4a96-9a85-a6e23a8c635c SUB_PCIEXPRESS ASPM 0 powercfg -SETACVALUEINDEX 8c5e7fda-e8bf-4a96-9a85-a6e23a8c635c SUB_VIDEO VIDEOIDLE 900 powercfg -SETDCVALUEINDEX 8c5e7fda-e8bf-4a96-9a85-a6e23a8c635c SUB_VIDEO VIDEOIDLE 900 powercfg -SETACVALUEINDEX 8c5e7fda-e8bf-4a96-9a85-a6e23a8c635c SUB_VIDEO 17aaa29b-8b43-4b94-aafe-35f64daaf1ee 0 powercfg -SETDCVALUEINDEX 8c5e7fda-e8bf-4a96-9a85-a6e23a8c635c SUB_VIDEO 17aaa29b-8b43-4b94-aafe-35f64daaf1ee 0 powercfg -h off
I read a lot of good things on this forum, I wanted to give something back, as small as it is.
Thanks :)
-
New #4
Huh?
With the creators update, we can choose our max Freq?
That's funny that it shows up after I made the above post about the percent's not working right.
-
-
New #6
Mine was at 0 too, maybe that is just for default of what is in BIOS, until you change it.
But I did try setting mine to 4700(my daily OC is 4900) and ran Disk Cleanup, Update cleanup and the whole shebang, which always maxes my CPU for a short burst, and it went no higher than 4.7GHz.
I need to try it benchmarking to really test it> my project for the weekend I guess.
-
-
-
-
Create Custom Power Plan in Windows 10
How to Create a Custom Power Plan in Windows 10Published by Shawn BrinkCategory: Performance & Maintenance
20 Jun 2020


 Quote
Quote

Tutorial Categories

Related Discussions
