

How to Show Current Custom Recovery Image used to Refresh Windows 10
Warning
Information
If you're having problems with Windows 10 on your PC, you can try to refresh, reset, or restore it.
By default, here's what happens when you refresh your PC:
- Your files and personalization setting won't change.
- Your PC settings will be changed back to their defaults.
- Apps from the Windows Store will be kept.
- Apps you installed from discs or websites will be removed. Basically all installed desktop apps.
The recimg.exe command line tool lets you configure a custom recovery image for Windows to use when you refresh your PC. When you create a custom recovery image, it will contain the desktop apps you've installed, and the Windows system files in their current state. Recovery images do not contain your documents, personal settings, user profiles, or apps from Windows Store, because that information is automatically preserved at the time you refresh your PC.
Basically, a custom recovery image let's you refresh Windows 10 as usual with your current Windows, but also lets you keep your desktop apps and Windows system files as they were when the recovery image was created.
When you create a custom recovery image, recimg will store it in the specified directory, and set it as the active recovery image. If a custom recovery image is set as the active recovery image, Windows will use it when you refresh your PC instead of the default OEM recovery image (if present) or Windows installation media. All recovery images have the filename CustomRefresh.wim. If no CustomRefresh.wim file is found in the active recovery image directory, Windows will fall back to using the OEM recovery image or Windows installation media when you refresh your PC.
This tutorial will show you how to display the path of the folder in which the current active custom recovery image, used to refresh Windows 10 when you refresh your PC, is stored.
You must be signed in as an administrator to be able to set a custom recovery image as active.
CONTENTS:
- Option One: Show Current Active Custom Image Location using "recimg" Command
- Option Two: Show Current Active Custom Image Location using "reagentc" Command
1. Open an elevated command prompt.
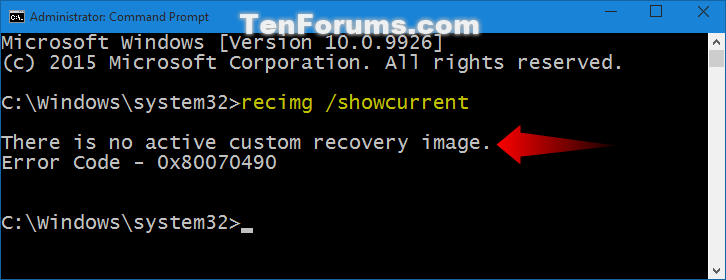
2. In the elevated command prompt, copy and paste the command below, and press Enter. (see screenshots below)
recimg /showcurrent
3. If there currently is not a custom recovery image set as active, then you will see this below.
4. If there is a custom recovery image set as active, then you will see this below showing you the full path of the folder containing the CustomRefresh.wim file of the current active recovery image.
5. See the yellow tip box below for more details on the path.
1. Open an elevated command prompt.
2. In the elevated command prompt, copy and paste the command below, and press Enter. (see screenshots below)
3. If there currently is not a custom recovery image set as active, then you will see this below to the right of Custom image location.
4. If there is a custom recovery image set as active, then you will see this below to the right of Custom image location showing you the full path of the folder containing the CustomRefresh.wim file of the current active recovery image.
5. See the yellow tip box below for more details on the path.
Tip
To help make sense of the location path from Option One and Option Two above, you can open Disk Management (diskmgmt.msc).
Looking at the displayed path above, the CustomRecoveryImage\02-19-2015 folder is saved to partition 1 on hard disk 1. In this example, partition 1 on hard disk 1 is the F: drive.
This gives you the full path as F:\CustomRecoveryImage\02-19-2015.
That's it,
Shawn
Related Tutorials
- How to Refresh Windows 10
- How to Create a Custom Recovery Image used to Refresh Windows 10
- How to Set a Custom Recovery Image as Active to use to Refresh Windows 10
- How to Deregister Current Custom Recovery Image used to Refresh Windows 10
Show Current Refresh Custom Recovery Image in Windows 10

Show Current Refresh Custom Recovery Image in Windows 10
How to Show Current Custom Recovery Image used to Refresh Windows 10Published by Shawn Brink
06 Mar 2017


Tutorial Categories

Related Discussions
