

How to Cancel a Scheduled Chkdsk at Boot in Windows 10
Checking your drives for errors every once in a while can help fix some performance issues. Drive errors can usually be caused by bad sectors, improper shutdowns, bad software, corruption, physical damage, etc...
If you schedule a drive (ex: "chkdsk /F" for Windows drive) to be checked with Chkdsk, the drive will be checked at boot the next time you restart the computer.
This tutorial will show you different ways on how to exclude a drive or cancel a scheduled Chkdsk from running at boot for a drive in Windows 10.
You must be signed in as an administrator to be able to exclude a drive or cancel a scheduled Chkdsk at boot.
If a drive is always getting checked at boot despite canceling it, then the drive may be going bad leaving you at risk of losing all data on the drive. It is recommended to back up the data on the drive to separate disk to be safe, then check the health of the drive with a diagnostic tool (ex: SeaTools) from the drive's manufacturer.
Contents
- Option One: To See if a Drive has been Scheduled to be Checked at Next Reboot
- Option Two: To Skip Disk Checking at Boot
- Option Three: To Exclude a Drive from Default Boot-Time Check
- Option Four: To Cancel Scheduled Disk Check at Boot and Restore Default Behavior in Command Prompt
- Option Five: To Cancel Scheduled Disk Check at Boot and Restore Default Behavior in Registry Editor
EXAMPLE: Schedule Windows drive to be checked at boot
1 Open an elevated command prompt.
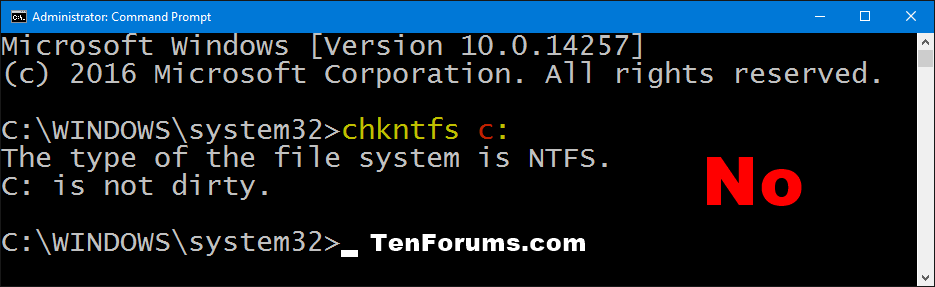
2 Type the command below into the elevated command prompt, and press Enter. (see screenshots below)
chkntfs <drive letter>:
Substitute <drive letter> with the actual drive letter of the drive you want to see has been scheduled to run Chkdsk for on next reboot.
For example:chkntfs C:
If you schedule (ex: "chkdsk /F") a drive to be checked with Chkdsk at boot, you will have 8 seconds by default to press a key within to be able to skip disk checking the next time you restart the computer.
1 Press any key at boot when you see the To skip disk checking, press any key within 8 second(s) message. (see screenshot below)
This option will exclude a specified drive from the default boot-time check.
When you exclude a drive, any previously excluded drive will no longer be excluded.
1 Open an elevated command prompt.
2 Type the command below into the elevated command prompt, and press Enter. (see screenshots below)
chkntfs /x <drive letter>:
Substitute <drive letter> with the actual drive letter of the drive you want to exclude.
For example:chkntfs /x C:
This option restores the machine to the default behavior; all drives are checked at boot time and chkdsk is run on those that are dirty.
This is done by canceling any scheduled disk check at boot, and any excluded drive will no longer be excluded.
This does the same thing as Option Five below.
1 Open an elevated command prompt.
2 Copy and paste thechkntfs /dcommand into the elevated command prompt, and press Enter. (see screenshots below)
This option restores the machine to the default behavior; all drives are checked at boot time and chkdsk is run on those that are dirty.
This is done by canceling any scheduled disk check at boot, and any excluded drive will no longer be excluded.
This does the same thing as Option Four above.
1 Press the Win + R keys to open Run, type regedit into Run, and click/tap on OK to open Registry Editor.
2 If prompted by UAC, click/tap on Yes.
3 In the left pane of Registry Editor, browse to the key location below. (see screenshot below)
HKEY_LOCAL_MACHINE\SYSTEM\CurrentControlSet\Control\Session Manager
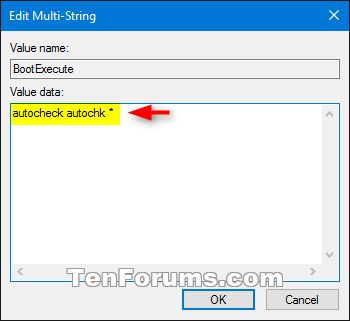
4 In the right pane of the Session Manager key, double click/tap on the BootExecute MULTI-SZ value to modify it. (see screenshot above)
5 Copy and paste the autocheck autochk * value data into the Edit Multi-String dialog, and click/tap on OK. (see screenshot below)
6 When finished, you can close Registry Editor if you like.
That's it,
Shawn
Related Tutorials
- How to Check a Drive for Errors in Windows 10
- How to Read Event Viewer Log for Chkdsk (Check Disk) in Windows 10
- How to Change Chkdsk AUTOCHK Initiation Countdown Time at Boot in Windows 10
Cancel a Scheduled Chkdsk at Boot in Windows 10
Cancel a Scheduled Chkdsk at Boot in Windows 10
How to Cancel a Scheduled Chkdsk at Boot in Windows 10Published by Shawn Brink
02 Oct 2020


Tutorial Categories

Related Discussions
