

How to Add 'Lock Drive' to Context Menu of BitLocker Encrypted Drives in Windows 10
You can use BitLocker Drive Encryption to help protect your files on an entire drive. BitLocker can help block hackers from accessing the system files they rely on to discover your password, or from accessing your drive by physically removing it from your PC and installing it in a different one. You can still sign in to Windows and use your files as you normally would.
BitLocker can encrypt the drive Windows is installed on (the operating system drive) as well as fixed data drives (such as internal hard drives). You can also use BitLocker To Go to help protect all files stored on a removable data drive (such as an external hard drive or USB flash drive).
You can choose how you want to unlock an encrypted data drive: with a password or a smart card. For removable data drives encrypted with BitLocker To Go, you can set the drive to automatically unlock when you sign in to the PC. For fixed data drives, you can also set the drive to automatically unlock when you unlock the PC, if you prefer, as long as the operating system drive is BitLocker-protected.
To lock a fixed data drive encrypted by BitLocker, you could restart the computer unless you set the drive to automatically unlock when you sign in next.
To lock a removable data drive encrypted by BitLocker, you could disconnect the drive or restart the computer unless you set the drive to automatically unlock when you connect the drive or sign in next.
This tutorial will show you how to add Lock Drive to the context menu of all unlocked fixed and removable drives encrypted by BitLocker to be able to lock the drive on demand in Windows 10.
You must be signed in as an administrator to add, use, or remove the "Lock Drive" context menu.
The Lock Drive context menu can be handy since it allows you to lock the drive without having to disconnect it or restart the computer. The drive will remain locked until you manually unlock it.
If you turn on automatically unlock for a fixed data drive or removable data drive encrypted by BitLocker, then the drive cannot be locked until you turn off automatically unlock for the drive.
Contents
- Option One: To Add Lock Drive to Context Menu of Encrypted Fixed and Removable Data Drives
- Option Two: To Remove Lock Drive from Context Menu of Encrypted Fixed and Removable Data Drives
EXAMPLE: "Lock Drive" context menu
1 Click/tap on the Download button below to download the file below.
2 Save the .zip file to your desktop.
3 Unblock the .zip file.
4 Open the .zip file, and extract (drag and drop) the Add_lock-bde.reg and lock-bde.vbs files to your desktop.
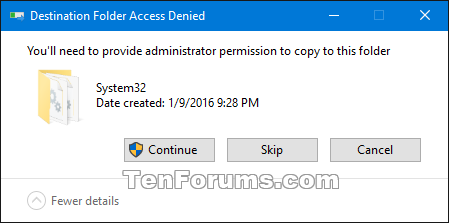
5 Move the lock-bde.vbs file into the C:\Windows\System32 folder, and click/tap on Continue to approve. (see screenshot below)
6 Double click/tap on the Add_lock-bde.reg file to merge it.
7 When prompted, click/tap on Run, Yes (UAC), Yes, and OK to approve the merge.
8 You can now delete any remaining files on your desktop if you like.
1 Click/tap on the Download button below to download the file below.
2 Save the .reg file to your desktop.
3 Double click/tap on the downloaded .reg file to merge it.
4 When prompted, click/tap on Run, Yes (UAC), Yes, and OK to approve the merge.
5 You can now delete the downloaded .reg file if you like.
6 Open the C:\Windows\System32 folder, and delete the lock-bde.vbs file.
That's it,
Shawn
Related Tutorials
- How to Lock BitLocker Encrypted Drive in Windows
- How to Unlock a Fixed or Removable BitLocker Drive in Windows
- How to Turn On or Off BitLocker for Fixed Data Drives in Windows 10
- How to Turn On or Off BitLocker for Removable Data Drives in Windows 10
- How to Check Status of BitLocker Drive Encryption for Drive in Windows 10
- How to Turn On or Off Auto-unlock for BitLocker Drive in Windows 10
- How to Add or Remove Change BitLocker Password Context Menu in Windows 10
- How to Add or Remove Change BitLocker PIN Context Menu in Windows 10
- How to Add or Remove 'Manage BitLocker' Context Menu from Drives in Windows
- How to Add or Remove Resume BitLocker Protection Context Menu in Windows 10
- How to Add or Remove 'Turn off BitLocker' Context Menu from Drives in Windows
- How to Add or Remove 'Turn on BitLocker' Context Menu from Drives in Windows 10
- How to Add or Remove Unlock Drive Context Menu in Windows
- How to Add 'Suspend BitLocker protection' to Context Menu of Drives in Windows
- How to Create BitLocker Encrypted Container File with a VHD or VHDX File in Windows
Add Lock Drive to Context Menu of BitLocker Drives in Windows 10
-
New #1
Great thread! Found some other links online, but only this worked properly on my Win 10. Many thanks!
The only tiny thing I'd modify (if you want to be consistent with Windows nomenclature) is changing context menu text to "Lock Drive" without three dots (...) at the end, because they indicate that some dialog or window will open (which here isn't the case, as it is with "Unlock Drive...", where the dialog pops out for password entry).
-
-
New #3
1803
Love this script, thanks! Seems like every creator's update breaks it, though, and 1803 is no different.
-
New #4
You're most welcome Frank, and welcome to Ten Forums.
Yeah, Windows Update like to reset things back to default.
-
New #5
hi brink... i registered here because i would use this trick :)
i have a small problem.... i used this method on a virtualbox machine with win 10 pro but i don't remember which version... maybe 1703 or 1709, and IT WORKED 100%. then i deleted the VM.... and now just 2 weeks later i'm ready to make the same thing on my 1803 real OS, but it DOES NOT WORK anymore. what is the problem in your opinion?
i made the procedure several times, precisely as i did in the VM but when i click on lock drive nothing happens. the only 1 method i can use now is the bat file with "manage-bde -lock E:" but your solution is WAY BETTER. is it maybe incompatible since win 1803?
-
New #6
Hello @realista87, and welcome to Ten Forums.
If you haven't already, double check to make sure the .vbs file from option 1 is unblocked and in the System32 folder. The context menu will not work without it.
-
New #7
yes i unblocked the 2 files right after i extracthed them into the desktop.
ps: i found the problem...... it was COMODO internet secority the problem! i uninstalled it because i hate it! it is not the first fime that causes me something wrong... because it blocks everything, it makes a great job but like in this time NO PROMPT of something blocked.... so i uninstalled to migrate to kaspersky free, and now the LOCK DRIVE works....Last edited by realista87; 20 Feb 2019 at 02:02.
-
New #8
Great news @realista87. You may be able to add the files to a white list in Kaspersky if you wanted to keep it.
-
-
New #9
Great thread. Just what I have been looking for during the last week. Works on my W10 Pro v. 1809 just fine.
Brian
Add Lock Drive to Context Menu of BitLocker Drives in Windows 10
How to Add 'Lock Drive' to Context Menu of BitLocker Encrypted Drives in Windows 10Published by Shawn BrinkCategory: Customization
18 Apr 2020


 Quote
QuoteTutorial Categories

Related Discussions
