

How to Customize Delete Confirmation Dialog Prompt Details in Windows
When you delete a single file or folder, the delete confirmation dialog displays basic details (metadata) like the file or folder name, date created, file type, and date modified by default, but will vary with each file type.
A prop: value indicates a individual property or metadata within the Windows Property System that can be set on files/folders. You can customize the prop: value for the delete confirmation dialog to show any file and folder details you like in the prompt. The details you set to show in the prompt will only show if the property or metadata is available for the deleted file or folder.
This tutorial will show you how to customize the delete confirmation dialog to show any file and folder details you want in the prompt for all users in Vista, Windows 7, Windows 8, and Windows 10.
You must be signed in as an administrator to be able to customize what file/folder details show in the delete confirmation dialog.
Contents
- Option One: To Customize Delete Confirmation Dialog Prompt Details using a REG file
- Option Two: To Customize Delete Confirmation Dialog Prompt Details in Registry Editor
EXAMPLE: File or Folder default and full details in Delete confirmation dialog
This option does the same thing as Option Two below, but automatically sets the prompt to show full details using the prop: values and order below:
System.PropGroup.FileSystem
System.ItemNameDisplay
System.ItemTypeText
System.ItemFolderPathDisplay
System.Size
System.DateCreated
System.DateModified
System.FileAttributes
System.OfflineAvailability
System.OfflineStatus
System.SharedWith
System.FileOwner
System.ComputerName
1 Do step 2 (full) or step 3 (default) below for what you would like to do.
A) Click/tap on the Download button below to download the file below, and go to step 4 below.
Show_Full_Details_to_Delete_Confirmation_Prompt.reg
Download
A) Click/tap on the Download button below to download the file below, and go to step 4 below.
Show_Default_Details_from_Delete_Confirmation_Prompt.reg
Download
4 Save the .reg file to your desktop.
5 Double click/tap on the downloaded .reg file to merge it.
6 When prompted, click/tap on Run, Yes (UAC), Yes, and OK to approve the merge.
8 You can now delete the downloaded .reg file if you like.
If you need any help with this option, then please feel free to post what you need help with in this tutorial thread. I'll be happy to help.
1 Press the Win + R keys to open Run, type regedit into Run, and click/tap on OK to open Registry Editor.
2 If prompted by UAC, click/tap on Yes.
3 In Registry Editor, browse to the key location below. (see screenshot below)
HKEY_CLASSES_ROOT\AllFilesystemObjects
4 Do step 5 (default) or step 6 (custom) below for what you would like to do.
A) In the right pane of the AllFilesystemObjects key, right click or press and hold on the FileOperationPrompt string value, and click/tap on Delete. (see screenshot below step 3)
B) Click/tap on Yes to confirm, and go to step 7 below. (see screenshot below)
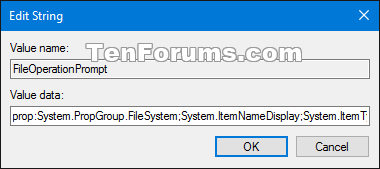
A) In the right pane of the AllFilesystemObjects key, double click/tap on the FileOperationPrompt string value to modify it. (see screenshot below step 3)
If you don't have the FileOperationPrompt string value (you don't by default), then right click or press and hold on an empty area in the right pane of the AllFilesystemObjects key, click/tap on New, click/tap on String Value, type FileOperationPrompt, and press Enter.
B) Type the data value below for the property values you want with each separated by a semicolon ; in the order you want them to show, click/tap on OK, and go to step 7 below. (see screenshot below)
prop:value 1;value 2; etc....
Substitute value # in the value above with the actual properties you want.
The link below at Microsoft will give you a full list of Windows properties that you can use. Click on a property type (ex: System) link at the link below to see a full list of individual properties (ex: System.ItemNameDisplay) for that type to use.
Windows Properties (Windows)
For example: The Show_Full_Details_to_Delete_Confirmation_Prompt.reg file from Option One above uses the data value below.
prop:System.PropGroup.FileSystem;System.ItemNameDisplay;System.ItemTypeText;System.ItemFolderPathDisplay;System.Size;System.DateCreated;System.DateModified;System.FileAttributes;System.OfflineAvailability;System.OfflineStatus;System.SharedWith;System.FileOwner;System.ComputerName
7 When finished, you can close Registry Editor if you like.
That's it,
Shawn
Related Tutorials
- How to Turn On or Off Recycle Bin Delete Confirmation in Windows 10
- How to Customize Details of Shortcut Infotips in Windows
- How to Customize Preview Details in Details Pane of File Explorer in Windows
- How to Add, Change, and Remove File Property Details in Windows 10
- Add or Remove Empty Recycle Bin Context Menu for Recycle Bin in Windows
- How to Add Show Recycle Confirmation to Recycle Bin Context Menu in Windows 10
Customize Delete Confirmation Dialog Prompt Details in Windows

Customize Delete Confirmation Dialog Prompt Details in Windows
How to Customize Delete Confirmation Dialog Prompt Details in WindowsPublished by Shawn Brink
18 Mar 2020


Tutorial Categories

Related Discussions
