

How to Change Workgroup in Windows 10
If your PC is on a large network at a workplace or school, it probably belongs to a domain. If your PC is on a home network, it belongs to a workgroup and might also belong to a homegroup.
When you set up a network, Windows automatically creates a workgroup and gives it the name WORKGROUP. You can join an existing workgroup on a network or create a new one. Workgroups provide a basis for file and printer sharing, but they don't actually set up sharing for you.
A workgroup is a group of PCs that are connected to a home or small office network and share resources, such as printers and files. When you set up a network, Windows automatically creates a workgroup and gives it a name.
- All PCs are peers; no PC has control over another PC.
- Each PC has a set of user accounts. To log on to any PC in the workgroup, you must have an account on that PC.
- There are typically no more than twenty PCs in a workgroup.
- A workgroup isn't protected by a password.
- All PCs must be on the same local network or subnet.
- All PCs in the workgroup must have a different computer name.
- If your PC was a member of a domain before you joined the workgroup, it will be removed from the domain and your computer account on that domain will be disabled.
This tutorial will show you how to change the workgroup on your Windows 10 PC to join an existing workgroup on a network or create a new one.
If your network includes PCs running Windows XP, you might need to change the workgroup name on those PCs to match the workgroup name on the PCs running later versions of Windows so that you can see and connect to all PCs on your network.
It is recommend that you use only Internet-standard characters in the workgroup name. The standard characters are the numbers 0 through 9, uppercase and lowercase letters from A through Z, and the hyphen (-) character. PC names cannot consist entirely of numbers, nor can they contain spaces. The name also cannot contain special characters, such as the following:
` ~ @ # $ % ^ & ( ) = + [ ] { } | ; : , . < > / ?
For a Windows 11 version of this tutorial, see:
Change Workgroup in Windows 11
Contents
- Option One: To Change Workgoup in System Properties
- Option Two: To Change Workgoup in Command Prompt
- Option Three: To Change Workgoup in PowerShell
EXAMPLE: Workgroup name displayed in Control Panel
1 Open the Control Panel (icons view), and click/tap on the System icon.
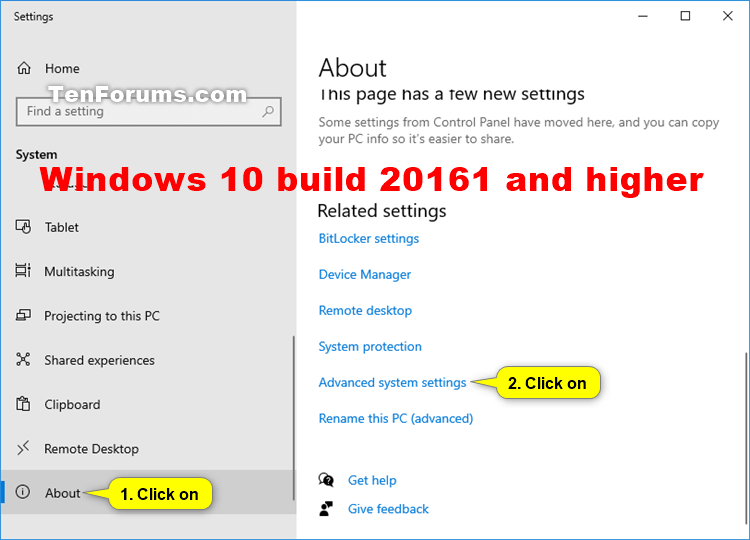
Starting with Windows 10 build 20161, you will need to open Settings instead, click/tap on the System icon, and click/tap on About on the left side.
If you like, you can also open Run (Win+R), type sysdm.cpl into Run, click/tap on OK, and go to step 3 below to open System Properties.
2 Click/tap on the Advanced system settings link on the left side, or click/tap on the Change settings link on the right side. (see screenshots below)

3 If prompted by UAC, then click/tap on Yes.
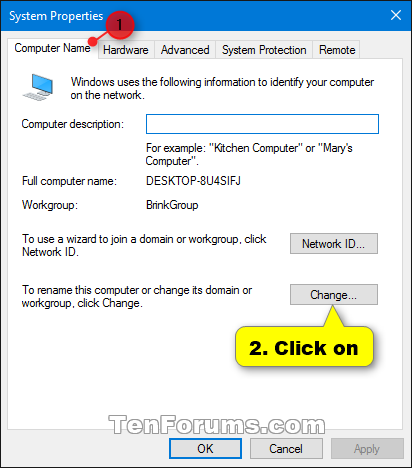
4 Click/tap on the Computer Name tab, and click/tap on the Change button. (see screenshot below)
5 Select (dot) Workgroup under Member of at the bottom, and then do one of the following: . (see screenshot below)
- To join an existing workgroup, enter the name of the workgroup that you want to join, and then click/tap OK.
- To create a new workgroup, enter the name of the workgroup that you want to create, and then click/tap OK.
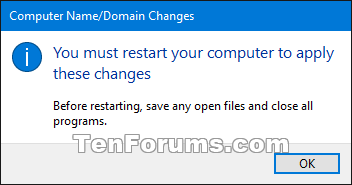
6 Click/tap on OK. (see screenshot below)
7 Click/tap on OK. (see screenshot below)
This does not restart the computer yet.
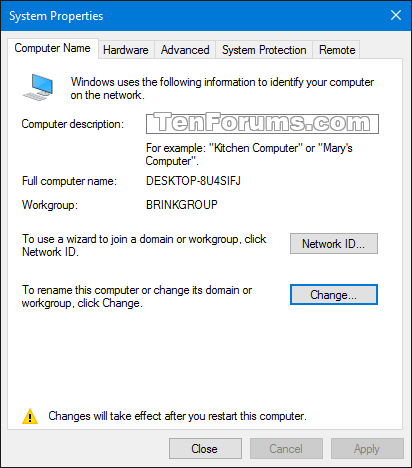
8 Verify your new workgroup name, and click/tap on Close. (see screenshot below)
9 Click/tap on Restart now to restart your PC and apply the workgroup name. (see screenshot below)
This will restart your PC immediately. Be sure that you save and close anything you have open first.
1 Open an elevated command prompt.
2 Type the command below into the elevated command prompt, and press Enter. (see screenshot below)
wmic computersystem where name="%computername%" call joindomainorworkgroup name="Workgroup-Name"
Substitute Workgroup-Name in the command above with the actual name of the workgroup you want to join or create within quotes.
For example:wmic computersystem where name="%computername%" call joindomainorworkgroup name="BrinkGroup"
3 When successfully finished, close the elevated command prompt, and restart the computer to apply.
1 Open an elevated PowerShell.
2 Type the command below into the elevated PowerShell, and press Enter. (see screenshot below)
Add-Computer -WorkGroupName "Name"
Substitute Name in the command above with the actual name of the workgroup you want to join or create within quotes.
For example:Add-Computer -WorkGroupName "BRINKGROUP"
3 When successfully finished, close the elevated PowerShell, and restart the computer to apply.
That's it,
Shawn Brink
Change Workgroup in Windows 10
-
New #1
Hello Shawn,
Thanks for these great tutorials! I wonder if you have the time to put together a tutorial on "How to set up sharing between PC's in a WORKGROUP". I have all the Windows 10 PCs in our house set up on our private network as WORKGROUP. I see from your Information section that to connect to the other PCs I need to have my Microsoft account set up on each PC. But what about if I just want to share a file or printer with another user on another PC in the WORKGROUP - a tutorial on how to do that would be very useful. Can it be done with the WORKGROUP or does this need the addition of a HOMEGROUP to make it work?
Many thanks,
Phil
-
New #2
Hello Phil, :)
While a homegroup does make it easier to share files between PCs on the same network, you can also share on the workgroup. The tutorial below for Windows 8 can help show you how to. It's the same in Windows 10.
File Sharing - in Windows 8
-
-
-
New #5
Brink, wanted to let you know your post is applicable to multiple Win 10 peer networking issues and should be linked to multiple threads in the forums. Here's why: I've had multiple PC's on my home network using peer networking, folder and file sharing, and printer sharing ever since Win 10 was released, but this month's patch Tuesday release from MS broke my network connections on 2 of my PC's. The computers all showed connected to my workgroup, but the file browser was unable to see the PCs, mapped drives and folders and shared printers were all dead. The ONLY thing that got my connections restored was your command prompt fix for joining a workgroup. Thanks for the fix, Cheers.
-
-
New #7
I believe, option 1 isn't available anymore in Windows 10 Home v1703, Build 15063.296.
I'm wrong?
Sorry, Update:
Using the command
you can still change it.Code:sysdm.cpl
-
-
-
New #9
@Brink: You are right, using the new point 1 instead of your previous steps:
1. Do step 2 or step 3 for how you want to open System Properties.
2. Open the Control Panel (icons view), click/tap on the System icon, and go to step 4 below.
3. Open the (Win+X) Quick Link menu, click/tap on System, and go to step 4 below.

Change Workgroup in Windows 10
How to Change Workgroup in Windows 10Published by Shawn BrinkCategory: Network & Sharing
07 Jan 2023


 Quote
QuoteTutorial Categories

Related Discussions
