

How to Change Owner of File, Folder, Drive, or Registry Key in Windows 10 and Windows 11
An owner is assigned to an object when that object is created. By default, the owner is the creator of the object. No matter what permissions are set on an object, the owner of the object can always change the permissions.
The owner of an object (ex: file, folder, drive, or registry key) has the right to allow or deny access to that resource. Although members of the Administrators group and other authorized users also have the right to allow or deny access, the owner has the authority to lock out non-administrator users, and then the only way to regain access to the resource is for an administrator or a member of the Restore Operators group to take ownership of it. This makes the file or folder owner important with respect to what permissions are allowed or denied for a given resource.
Ownership can be taken or transferred in several ways. The current owner of an object can transfer ownership to another user or group. A member of the Administrators group can take ownership of an object or transfer ownership to another user or groupeven if administrators are locked out of the resource according to the permissions. Any user with the "Take Ownership" permission on the object can take ownership, as can any member of the "Backup Operators" group (or anyone else with the "Restore Files And Directories" user right, for that matter).
This tutorial will show you different ways to change the owner (take ownership) of a file, folder, drive, or registry key to any user or group in Windows 10 and Windows 11.
You must be signed in as an administrator to be able to take ownership of an object.
Do not change the owner of your Windows drive (ex: C: ). Doing so could result in Windows becoming very unstable.
Contents
- Option One: To Take Ownership of File, Folder, or Drive using Context Menu
- Option Two: To Change Owner of File, Folder, or Drive using TAKEOWN Command
- Option Three: To Change Owner of File, Folder, or Drive using ICACLS Command
- Option Four: To Change Owner of File, Folder, Drive, or Registry Key in Advanced Security Settings Dialog
If you like, you could also type takeown /? in the elevated command prompt and press Enter to see a complete list of available switches and options that you could use with the takeown commands below.
1 Open an elevated command prompt, and do step 2, step 3, or step 4 below depending on what object you would like to change owner of.
A) In the elevated command prompt, type the command you want below, press Enter, and go to step 5 below.
(To change owner to currently logged on user)
takeown /F "full path of file with file extension"
OR
(To change owner to Administrators group)
takeown /F "full path of file with file extension" /A
Substitute full path of file with file extension with the actual full path of the file with it's file extension that you want to take ownership of within quotes.
For example:takeown /F "C:\Windows\file.exe" /A
A) In the elevated command prompt, type the command you want below, press Enter, and go to step 5 below.
(To change owner to currently logged on user)
takeown /F "full path of folder or drive\*.file extension"
OR
(To change owner to Administrators group)
takeown /F "full path of folder or drive\*.file extension" /A
Substitute full path of folder or drive with the full path of the folder or drive letter, and substitute file extension with the actual file extention that you want to take ownership of within quotes.
For example:takeown /F "C:\Windows\*.txt" /A
This command will take ownership of the folder or drive, and all files and subfolders in the folder or drive.
A) In the elevated command prompt, type the command you want below, press Enter, and go to step 5 below.
(To change owner to currently logged on user)
takeown /F "full path of folder or drive" /R /D Y
OR
(To change owner to Administrators group)
takeown /F "full path of folder or drive" /A /R /D Y
Substitute full path of folder or drive with the full path of the folder or drive letter that you want to take ownership of within quotes.
For example:
takeown /F "F:" /A /R /D Y

takeown /F "F:\Folder" /A /R /D Y
5 When finished, you can close the elevated command prompt if you like.
6. You will now need to set permissions to allow you access to this file, folder, or drive.
You could also type icacls /? in the elevated command prompt and press Enter to see a complete list of availble switches and options that you could use with the icacls commands below.
1 Open an elevated command prompt, and do step 2, step 3, step 4, step 5 below depending on what object you would like to change owner of.
A) In the elevated command prompt, type the command you want below, press Enter, and go to step 6 below.
(To change owner to any user)
icacls "full path of file with file extension" /setowner "user name" /T /C
OR
(To change owner to Administrators group)
icacls "full path of file with file extension" /setowner "Administrators" /T /C
OR
(To change owner to TrustedInstaller)
icacls "full path of file with file extension" /setowner "NT SERVICE\TrustedInstaller" /T /C
Substitute full path of file with file extension with the actual full path of the file with it's file extension that you want to take ownership of within quotes.
Substitute user name with the actual user name of the user account you want to set as owner within quotes. For a Microsoft account, you would use the email address as the user name.
For example:icacls "C:\Windows\file.exe" /setowner "Administrators" /T /C
A) In the elevated command prompt, type the command you want below, press Enter, and go to step 6 below.
(To change owner to any user)
icacls "full path of folder or drive\*.file extension" /setowner "user name" /T /C
OR
(To change owner to Administrators group)
icacls "full path of folder or drive\*.file extension" /setowner "Administrators" /T /C
OR
(To change owner to TrustedInstaller)
icacls "full path of folder or drive\*.file extension" /setowner "NT SERVICE\TrustedInstaller" /T /C
Substitute full path of folder or drive with the full path of the folder or drive letter, and substitute file extension with the actual file extension that you want to take ownership of within quotes.
Substitute user name with the actual user name of the user account you want to set as owner within quotes. For a Microsoft account, you would use the email address as the user name.
For example:icacls "C:\Windows\*.txt" /setowner "Administrators" /T /C
A) In the elevated command prompt, type the command you want below, press Enter, and go to step 6 below.
(To change owner to any user)
icacls "full path of folder or drive" /setowner "user name" /T /C
OR
(To change owner to Administrators group)
icacls "full path of folder or drive" /setowner "Administrators" /T /C
OR
(To change owner to TrustedInstaller)
icacls "full path of folder or drive" /setowner "NT SERVICE\TrustedInstaller" /T /C
Substitute full path of folder or drive with the full path of the folder or drive letter that you want to take ownership of within quotes.
Substitute user name with the actual user name of the user account you want to set as owner within quotes. For a Microsoft account, you would use the email address as the user name.
For example:icacls "C:\Windows\Folder" /setowner "Administrators" /T /C
A) In the elevated command prompt, type the command you want below, press Enter, and go to step 6 below.
(To change owner to any user)
icacls "full path of folder or drive" /setowner "user name" /C
OR
(To change owner to administrators group)
icacls "full path of folder or drive" /setowner "Administrators" /C
OR
(To change owner to TrustedInstaller)
icacls "full path of folder or drive" /setowner "NT SERVICE\TrustedInstaller" /C
Substitute full path of folder or drive with the full path of the folder or drive letter that you want to take ownership of within quotes.
Substitute user name with the actual user name of the user account you want to set as owner within quotes. For a Microsoft account, you would use the email address as the user name.
For example:icacls "C:\Windows\Folder" /setowner "Administrators" /C
6 When finished, you can close the elevated command prompt if you like.
7 You will now need to set permissions to allow you access to this file, folder, or drive.
1 Do step 2 or step 3 below depending on what object you would like to change owner of.
A) Right click or press and hold on the file, folder, or drive that you want to change owner of, click/tap on Properties, and go to step 4 below.
OR
B) Select a file, folder, or open a drive that you want to change owner of, click/tap on the Share tab, click/tap on the Advanced security button in the ribbon, and go to step 5 below. (see screenshot below)
A) In the left pane of Registry Editor (regedit), right click or press and hold on the registry key that you want to change owner of, click/tap on Permissions, and go to step 4 below. (see screenshot below)
4 Click/tap on the Security tab, and click/tap on the Advanced button. (see screenshots below)
If you see the left screenshot below, then it means that you have access to this item, and can change the owner to any user or group you like.
If you see the right screenshot below, then it means that your user account does not have at least Read permission for this object. Basically, no access rights. When you get to step 8 below, you will need to change the owner to your user account name, and set permissions to allow you account full control at step 13 below.
5 At the top and to the right of the current Owner, click/tap on the Change link. (see screenshots below)

6 If prompted by UAC, click/tap on Yes.
7 Click/tap on the Advanced button. (see screenshot below)
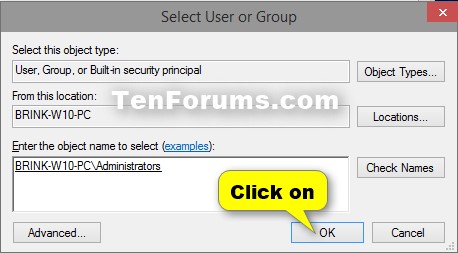
If you wanted to set the Administrators group as the owner, then type Administrators in the "Enter the object name to select" box, click/tap on Check Names to verify, and go to step 9 below instead.
If you wanted to set TrustedInstaller as the owner, then type this below in the "Enter the object name to select" box, click/tap on Check Names to verify, and go to step 9 below instead.
NT SERVICE\TrustedInstaller
8 Click/tap on the Find Now button. At the bottom under the Name column, select a user name (ex: Shawn Brink) or group (ex: Administrators) that you would like to change owner to, and click/tap on OK. (see screenshot below)
9 Click/tap on OK. (see screenshot below)
10 If this is a file, then click/tap on OK. (see screenshot below)
11 If this is a folder, drive, or registry key, then you will also have the option to check the Replace owner on subcontainers and objects box to also change the owner of the folder/drive contents or registry key subkeys as well if you like. Click/tap on OK. (see screenshot below)
12 If prompted, click/tap on Yes. (see screenshot below)
13 You will now need to set permissions to allow you access to this file, folder, drive, or registry key.
That's it,
Shawn Brink
Related Tutorials
- Change Permissions of File, Folder, Drive, or Registry Key for Users and Groups in Windows 10
- How to Add View Owner to Context Menu in Windows
- How to Add 'Take Ownership' to Context Menu in Windows 10
- How to Add Advanced security to context menu in Windows 8 and Windows 10
- How to Change Registered Owner and Organization of your Windows 10 PC
- How to Remove Security tab from Drives, Files, and Folders Properties in Windows 10
- How to Add or Remove Users from Groups in Windows 10
- How to Change User Rights Assignment Security Policy Settings in Windows 10
- Enable or Disable Inherited Permissions for Files and Folders in Windows
- How to Add Inherited Permissions Context Menu in Windows
- How to Add List Permissions Context Menu in Windows
- How to Backup and Restore Permissions of Files, Folders, or Drives in Windows 10
- How to Add Change Owner to Context Menu in Windows 10
Change Owner of File, Folder, Drive, or Registry Key in Windows 10
-
New #1
Not Working for Subkeys
Hi,
I followed tour tutorial to change some registry keys permissions, and found it very easy to follow because it is quite detailed and well explained as always with Brinhk's. However, I fill the case to "Replace owner on subcontainers and objects" (step 11). Under "Applies to" I can red "This key and subkeys", but it doesn't work, and I get an error message:Unable to set new owner on key name
Access is denied
For the change to be accepted, I have to empty the case to "Replace owner on subcontainers and objects".
Therefore, I have to repeat the same for each subcontainer, which takes me a very long time because I have to do that on several registry keys with many subkeys on different parts of the registry.
Does it have to be done in a special order? I start with "Owner Unable to display current owner. Change", and then go to the "Add" button.
How can I make it work, please?Last edited by Neophile; 26 Dec 2015 at 12:04.
-
New #2
Hello Neophile, :)
Did you change the owner to your account instead of "Administrators"?
If so, then see if changing the owner and permissions of the parent key first, then going back to "Replace owner on subcontainers and objects" may do the trick.
-
New #3
Hello Brink,
Many thanks for your quick reply. I am using (logged on with) the Administrator account. So all my trials are under Administrator, and I chose Administrators as the Owner. Now, after your reply, I tried to add also my account to the owners, but it does not accept more than one owner, So I left it on Administrators and still logged in as that, but no inheritance .
.
-
New #4
As a test, change the owner to "Administrator" and permissions to "Allow" "Full Control" of the parent key first.
Afterwards, go back to change owner again, but this time check Replace owner of subcontainers and objects and the inheritable permissions box at the bottom, and click OK to see if it applies then.
What key are you doing this with?
-
New #5
Eureka! It worked with your help, the priorities and coming back.
This is rather complicated. I didn't intend to make you waste your time reading all this, but if you ask here it goes.
I installed an old HP printer, but made a mistake with the letters at the ending of the model number. It appeared on "Devices and printers", but should have installed the right one (same model number, but different ending letters). I was an ass hole and installed the right one, without removing the other one. Then I started having printing problems. But I could not remove the first installed because it was no longer showing on "Devices and printers". So I started clearing al entries in the registry containing its name. All I could remove was only the last installed one, which was not working properly. This happened because I did not choose the right name. Windows 7 finds the printer and installs it itself, but with 10 I have to install it manually like in old times, from a list from manufacturers.
Now, it is done, but for one key, because it has an entry allowing the owner to read only:
HKEY_LOCAL_MACHINE\SYSTEM\CurrentControlSet\Enum\SWD\PRINTENUM\{A9862F5A-170C-4046-A6CE-1C78A158F95B}
This key has three permission entries: System, Owner Riights, and Everyone. The Owner Rights Access is set to Read only!
I put Administrators as the owner, and tried to clear the inheritances (MACHINE\SYSTEM\CurrentControlSet), as suggested on the error message, but it does not allow to save it that way, so I'm still blocked before reinstalling the printer with the right model name.
I will give you the final result later because I have to go out now for a couple of hours.
Thank you very much.
-
New #6
Great news. You should be able to change that last one to "Full Control" instead of "Read only".
-
New #7
That is exactly where my last provable lies. I can't do that change. The Edit button on those entries is not Edit, but View.
It seems that it doesn't accept any change, but I believe there must be a way that I ignore. Have you tried to take ownership of a printer subkey on your computer? I wonder. Any subkey under the following key is a printer of fax of any sort, as we can read on their FriendlyName values. It is one of those that I need to delete.
HKEY_LOCAL_MACHINE\SYSTEM\CurrentControlSet\Enum\SWD\PRINTENUM
I have changed quite a lot of permissions following your helping instructions. I am stuck with that one only. Sorry...
-
New #8
That is one stubborn key. See if you may be able to set permissions and delete the key while signed in to the built-in elevated Administrator account.
https://www.tenforums.com/tutorials/2...dows-10-a.html
-
-
New #9
Oh! I am so sorry I haven't told you before, that is the account I have been using all along this drama to avoid other problems.

Change Owner of File, Folder, Drive, or Registry Key in Windows 10
How to Change Owner of File, Folder, Drive, or Registry Key in Windows 10 and Windows 11Published by Shawn BrinkCategory: Security System
01 Jul 2023


 Quote
QuoteTutorial Categories

Related Discussions
