How to Enable or Disable Energy Saver Mode in Windows 10
Information
Windows 10 introduces a new Energy Saver mode power option to help conserve the battery when the battery level reaches a specified percentage and the user is away.
This tutorial will show you how to enable or disable Energy Saver mode for when the user is away and to specify the battery charge level at which Energy Saver is turned on in Windows 10.
Here's How:
1. Open your advanced power plan settings.
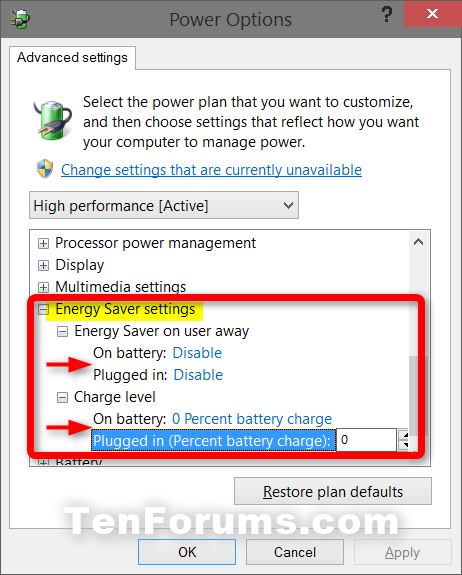
2. In Power Options, scroll down and expand open Energy Saving settings. (see screenshot below step 6)
3. Do step 4 or step 5 for what you would like to do.
4. To Disable Energy Saver Mode
NOTE: This is the default setting.
A) Under Energy Saver on user away, select Disable for On battery and/or Plugged in for what you want, and go to step 6 below.
NOTE: You would not have separate On battery and Plugged in options unless your PC (ex: tablet or laptop) has a battery.
5. To Enable Energy Saver Mode
A) Under Energy Saver on user away, select Enable for On battery and/or Plugged in for what you want.
B) Under Charge level, select or type the percentage of battery charge you want you want Battery Saver to be automatically turned on at for On battery and/or Plugged in for what you want, and go to step 6 below.
6. When finished, click/tap on OK. (see screenshot below)
That's it,
Shawn
Related Tutorials
Energy Saver Mode - Enable or Disable in Windows 10

Energy Saver Mode - Enable or Disable in Windows 10
How to Enable or Disable Energy Saver Mode in Windows 10Published by Shawn Brink
12 Oct 2015
Tutorial Categories


Related Discussions


