Customize Windows 10 Image in Audit Mode with Sysprep  

Page 51 of 70 FirstFirst ... 41495051525361 ... LastLast

  1. Posts : 33
    Windows 10 Pro for Workstations
       #500

    Also, you do not need to put the answer.xml on another drive like D or whatever.

    1) Go into %WINDIR%\Setup and create a folder called "Scripts."
    2) Right-click > New > Text Document within %WINDIR%\Setup\Scripts and name the new document SetupComplete.txt (it must have this name).
    3) Change the extension of the document from .txt to .cmd which will make it a single execution "script" after it's been used (so you will now have a SetupComplete.cmd file in your %WINDIR%\Setup\Scripts folder).
    4) Open SetupComplete.cmd with Notepad and inset the following script: del /Q /F c:\windows\system32\sysprep\unattend.xml
    5) The unattend.xml (change the name to whatever you name your answer file) is also automatically copied over to C:\Windows\Panther directory, so add a second line to your script in the same context, just for a different directory: del /Q /F c:\windows\panther\unattend.xml

    Now, once the unattend.xml has been utilized, and the deployment successful, the SetupComplete.cmd script runs and deletes the unattend.xml files. This allows you to keep them on the deployment distribution and not elsewhere, and also not have to worry about anyone gaining access to them and their sensitive material (passwords, etc.).

    This, for me, is quicker than keeping them off-site, so to speak, and having sysprep direct there for the answer file, and then I just run "cd sysprep," followed by "sysprep /generalize /oobe /unattend:unattend.xml /shutdown," in an elevated command prompt.
    Last edited by DrEmpiricism; 07 Sep 2016 at 09:53.
      My Computers


  2. Posts : 17,661
    Windows 10 Pro
    Thread Starter
       #501

    Note   Note
    Due resons related to my real life, mostly my neurological health issues, I have been quite inactive in this thread during the past weeks.

    Everything is looking better now and I am able to "get back in the saddle" , I will go through all unanswered posts within next 48 hours and will from now on reply to your posts faster.
    My apologies for delay and all inconvenience it has caused.

    Kari
      My Computer


  3. Posts : 17
    Windows 10
       #502

    Kari said:
    Note   Note
    Due resons related to my real life, mostly my neurological health issues, I have been quite inactive in this thread during the past weeks.

    Everything is looking better now and I am able to "get back in the saddle" , I will go through all unanswered posts within next 48 hours and will from now on reply to your posts faster.
    My apologies for delay and all inconvenience it has caused.

    Kari
    I'm glad everything is looking better and welcome back!
      My Computer


  4. Posts : 3
    Windows 7, Windows 10
       #503

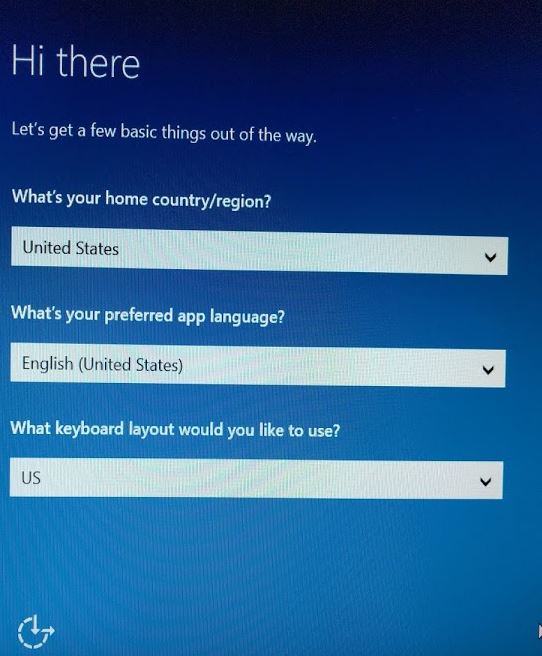
    I'm trying to create an unattend.xml file using WSIM to completely automate Windows 10 deployment so that no user intervention is required. I'm hitting a snag and still getting the following prompt.

    Does anyone know which settings control this?
    Customize Windows 10 Image in Audit Mode with Sysprep-capture.jpg

    Thanks in advance.
    KIWI
      My Computer


  5. Posts : 17,661
    Windows 10 Pro
    Thread Starter
       #504

    UkiwiS said:
    Does anyone know which settings control this?
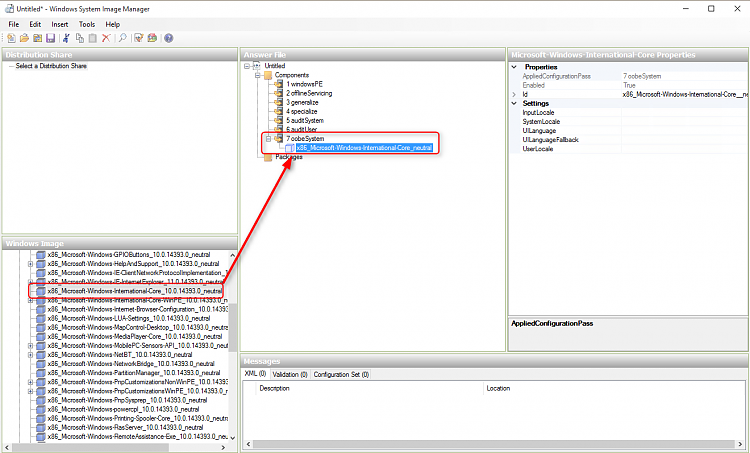
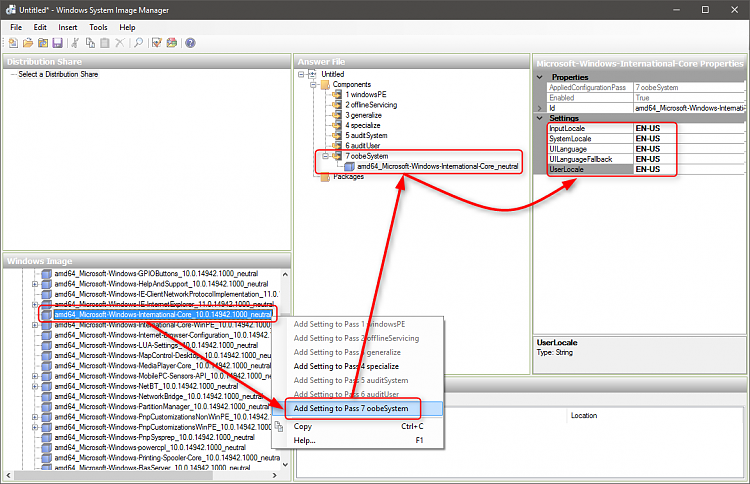
    Add component amd64_Microsoft-Windows-International-Core (replace amd64 with x86 if 32 bit Windows) to settings pass OobeSystem and fill in locales, EN-US in case of US English and region USA.
    Customize Windows 10 Image in Audit Mode with Sysprep-image.png
    (Click / tap to enlarge.)

    The region will be set automatically based on locales, for instance if I set all locales to SV-SE (Swedish in Sweden) region will be Sweden, but using SV-FI (Swedish in Finland) region will be Finland.

    If using other than default locales of the install media (install.wim), required languages need to be installed before Sysprep. For instance if using US English install media you want locales set as UK English, you need to install UK English language pack in Audit mode before sysprepping, then set all locales to EN-GB.

    Kari
      My Computer


  6. Posts : 3
    Windows 7, Windows 10
       #505

    Kari said:
    Add component amd64_Microsoft-Windows-International-Core (replace amd64 with x86 if 32 bit Windows) to settings pass OobeSystem and fill in locales, EN-US in case of US English and region USA.The region will be set automatically based on locales, for instance if I set all locales to SV-SE (Swedish in Sweden) region will be Sweden, but using SV-FI (Swedish in Finland) region will be Finland.

    If using other than default locales of the install media (install.wim), required languages need to be installed before Sysprep. For instance if using US English install media you want locales set as UK English, you need to install UK English language pack in Audit mode before sysprepping, then set all locales to EN-GB.

    Kari
    Thanks for the prompt reply. I have it working on 64 Bit System but not 32-bit Windows

    x86_Microsoft-Windows-International-Core is missing but there is
    x86_Microsoft-Windows-International-Core-WinPE or
    wow64_Microsoft-Windows-International-Core

    I tried adding en-US settings in the windowsPE pass using x86_Microsoft-Windows-International-Core-WinPE but that didn't work. I then tried to add it to OobeSystem pass using wow64_Microsoft-Windows-International-Core but that also did not work. I'm really just clutching at straws!
      My Computer


  7. Posts : 17,661
    Windows 10 Pro
    Thread Starter
       #506

    UkiwiS said:
    I have it working on 64 Bit System but not 32-bit Windows

    x86_Microsoft-Windows-International-Core is missing but there is
    x86_Microsoft-Windows-International-Core-WinPE or
    wow64_Microsoft-Windows-International-Core
    Naturally you cannot use a 64 bit install.wim to create a catalog file in WSIM for 32 bit Windows. Also, you cannot use WSIM on a 64 bit Windows to open 32 bit install.wim, if you try you will just get an error message:
    Customize Windows 10 Image in Audit Mode with Sysprep-image.png

    When WSIM, or rather Windows ADK (WSIM is just a module of ADK) is installed on a 64 bit Windows, you can only open 64 bit install.wim to create a catalog file, therefore most of the x86 components are not shown. To open 32 bit install.wim in WSIM it needs to be installed on 32 bit Windows.

    Like this:
    • WSIM installed in 64 bit Windows can only create catalog file from 64 bit install.wim
    • WSIM installed in 32 bit Windows can create catalog files from both 32 bit and 64 bit Windows

    When you have installed WSIM on a 32 bit Windows and opened a 32 bit install.wim, you will be able to create a correct catalog file and can find all 32 bit components:
    Customize Windows 10 Image in Audit Mode with Sysprep-image.png
    (Click / tap to enlarge.)

    A workaround in case you don't have a 32 Windows available to install WSIM, if WSIM is only available in 64 bit Windows is logical: make your answer file using 64 bit components, save it, open it in Notepad and replace all amd64 references with x86.


    UkiwiS said:
    I tried adding en-US settings in the windowsPE pass using x86_Microsoft-Windows-International-Core-WinPE but that didn't work. I then tried to add it to OobeSystem pass using wow64_Microsoft-Windows-International-Core but that also did not work. I'm really just clutching at straws!
    It's not a good idea to improvise with an answer file. Thinking "Instructions clearly state I should do it like that but I'll try this instead" is a sure way to catastrophe.

    Kari
      My Computer


  8. Posts : 3
    Windows 7, Windows 10
       #507

    Kari said:
    It's not a good idea to improvise with an answer file. Thinking "Instructions clearly state I should do it like that but I'll try this instead" is a sure way to catastrophe.

    Kari
    Thanks for the detailed reply. I truly do appreciate it and you've helped me to understand what's happening.
    Cheers
    KIWI
      My Computer


  9. Posts : 13
    Windows 10 Pro
       #508

    Hi, Love the details on this .. but I have something I hope you can help with.

    I am currently attempting to create an answer file that does the following;

    1. Remove the Store App shortcut from the taskbar - Succeeded
    2. Place my own shortcuts onto the taskbar - Succeeded
    3. Place my own group onto the tiles section and remove all other tiles - failed

    Here is my answer file so far (I have removed the activation key)

    Code:
    [<?xml version="1.0" encoding="utf-8"?>
    <unattend xmlns="urn:schemas-microsoft-com:unattend">
        <servicing></servicing>
        <settings pass="specialize">
            <component name="Microsoft-Windows-Shell-Setup" processorArchitecture="amd64" publicKeyToken="31bf3856ad364e35" language="neutral" versionScope="nonSxS" xmlns:wcm="http://schemas.microsoft.com/WMIConfig/2002/State" xmlns:xsi="http://www.w3.org/2001/XMLSchema-instance">
                <DesktopOptimization>
                    <GoToDesktopOnSignIn>true</GoToDesktopOnSignIn>
                    <ShowWindowsStoreAppsOnTaskbar>false</ShowWindowsStoreAppsOnTaskbar>
                </DesktopOptimization>
                <OEMInformation>
                    <Manufacturer>Smartbox</Manufacturer>
                    <Model>Gridpad</Model>
                    <SupportHours>9.00am - 5.30pm (Mon-Fri) 9.00am-5.00pm (Fri)</SupportHours>
                    <SupportPhone>+44 (0)1684 578868</SupportPhone>
                    <SupportURL>http:\\www.thinksmartbox.com</SupportURL>
                </OEMInformation>
                <WindowsFeatures>
                    <ShowInternetExplorer>true</ShowInternetExplorer>
                    <ShowMediaCenter>false</ShowMediaCenter>
                    <ShowWindowsMediaPlayer>false</ShowWindowsMediaPlayer>
                </WindowsFeatures>
                <ComputerName>Gridpad</ComputerName>
                <CopyProfile>true</CopyProfile>
                <ProductKey>*****-*****-*****-*****-*****</ProductKey>
                <SignInMode>1</SignInMode>
                <DoNotCleanTaskBar>false</DoNotCleanTaskBar>
            </component>
            <component name="Microsoft-Windows-IE-InternetExplorer" processorArchitecture="amd64" publicKeyToken="31bf3856ad364e35" language="neutral" versionScope="nonSxS" xmlns:wcm="http://schemas.microsoft.com/WMIConfig/2002/State" xmlns:xsi="http://www.w3.org/2001/XMLSchema-instance">
                <BlockPopups>yes</BlockPopups>
                <Home_Page>http:\\www.thinksmartbox.com</Home_Page>
                <CompanyName>Smartbox</CompanyName>
                <DisableFirstRunWizard>true</DisableFirstRunWizard>
            </component>
        </settings>
        <settings pass="generalize">
            <component name="Microsoft-Windows-PnpSysprep" processorArchitecture="amd64" publicKeyToken="31bf3856ad364e35" language="neutral" versionScope="nonSxS" xmlns:wcm="http://schemas.microsoft.com/WMIConfig/2002/State" xmlns:xsi="http://www.w3.org/2001/XMLSchema-instance">
                <PersistAllDeviceInstalls>true</PersistAllDeviceInstalls>
            </component>
        </settings>
        <settings pass="windowsPE">
            <component name="Microsoft-Windows-International-Core-WinPE" processorArchitecture="amd64" publicKeyToken="31bf3856ad364e35" language="neutral" versionScope="nonSxS" xmlns:wcm="http://schemas.microsoft.com/WMIConfig/2002/State" xmlns:xsi="http://www.w3.org/2001/XMLSchema-instance">
                <SetupUILanguage>
                    <UILanguage>en-GB</UILanguage>
                    <WillShowUI>Never</WillShowUI>
                </SetupUILanguage>
                <InputLocale>en-GB</InputLocale>
                <SystemLocale>en-GB</SystemLocale>
                <UILanguage>en-GB</UILanguage>
                <UILanguageFallback>en-US</UILanguageFallback>
                <UserLocale>en-GB</UserLocale>
            </component>
        </settings>
        <settings pass="oobeSystem">
            <component name="Microsoft-Windows-Shell-Setup" processorArchitecture="amd64" publicKeyToken="31bf3856ad364e35" language="neutral" versionScope="nonSxS" xmlns:wcm="http://schemas.microsoft.com/WMIConfig/2002/State" xmlns:xsi="http://www.w3.org/2001/XMLSchema-instance">
                <DesktopOptimization>
                    <GoToDesktopOnSignIn>true</GoToDesktopOnSignIn>
                    <ShowWindowsStoreAppsOnTaskbar>false</ShowWindowsStoreAppsOnTaskbar>
                </DesktopOptimization>
                <UserAccounts>
                    <LocalAccounts>
                        <LocalAccount wcm:action="add">
                            <Password>
                                <Value>UABhAHMAcwB3AG8AcgBkAA==</Value>
                                <PlainText>false</PlainText>
                            </Password>
                            <Description>Local Administrator Account</Description>
                            <DisplayName>GPUser</DisplayName>
                            <Group>Administrators</Group>
                            <Name>GPUser</Name>
                        </LocalAccount>
                    </LocalAccounts>
                </UserAccounts>
                <WindowsFeatures>
                    <ShowInternetExplorer>true</ShowInternetExplorer>
                    <ShowMediaCenter>false</ShowMediaCenter>
                    <ShowWindowsMediaPlayer>false</ShowWindowsMediaPlayer>
                </WindowsFeatures>
                <OOBE>
                    <HideEULAPage>true</HideEULAPage>
                    <HideLocalAccountScreen>true</HideLocalAccountScreen>
                    <HideOEMRegistrationScreen>true</HideOEMRegistrationScreen>
                    <HideOnlineAccountScreens>true</HideOnlineAccountScreens>
                    <HideWirelessSetupInOOBE>true</HideWirelessSetupInOOBE>
                    <ProtectYourPC>1</ProtectYourPC>
                </OOBE>
                <DoNotCleanTaskBar>false</DoNotCleanTaskBar>
                <TaskbarLinks>
                    <Link0>%ALLUSERSPROFILE%\Microsoft\Windows\Start Menu\Programs\Sensory Software\Grid 3.lnk</Link0>
                    <Link1>%ALLUSERSPROFILE%\Microsoft\Windows\Start Menu\Programs\Accessories\Internet Explorer.lnk</Link1>
                </TaskbarLinks>
                <FirstLogonCommands>
                    <SynchronousCommand wcm:action="add">
                        <CommandLine>c:\Windows\system32\cmd.exe copy c:\CustomStartLayout.xml C:\Users\GPUser\AppData\Local\Microsoft\Windows\Shell\</CommandLine>
                        <RequiresUserInput>false</RequiresUserInput>
                        <Order>1</Order>
                        <Description>Set Up Start Tiles</Description>
                    </SynchronousCommand>
                </FirstLogonCommands>
            </component>
            <component name="Microsoft-Windows-International-Core" processorArchitecture="amd64" publicKeyToken="31bf3856ad364e35" language="neutral" versionScope="nonSxS" xmlns:wcm="http://schemas.microsoft.com/WMIConfig/2002/State" xmlns:xsi="http://www.w3.org/2001/XMLSchema-instance">
                <InputLocale>eb-GB</InputLocale>
                <UILanguage>en-GB</UILanguage>
                <UILanguageFallback>en-US</UILanguageFallback>
                <UserLocale>en-GB</UserLocale>
            </component>
        </settings>
        <cpi:offlineImage cpi:source="wim:c:/windows/system32/sysprep/install.wim#img" xmlns:cpi="urn:schemas-microsoft-com:cpi" />
    </unattend>
    The highlighted part is where I had hoped to copy my custom layout to the user shell, but all I get is an open command interface .. the copying doesn't work.

    My custom layout file looks like this;

    Code:
    <LayoutModificationTemplate Version="1" xmlns="http://schemas.microsoft.com/Start/2...utModification">
      <LayoutOptions StartTileGroupCellWidth="6" />
      <DefaultLayoutOverride>
        <StartLayoutCollection>
          <defaultlayout:StartLayout GroupCellWidth="6" xmlns:defaultlayout="http://schemas.microsoft.com/Start/2...lDefaultLayout">
            <start:Group Name="Smartbox" xmlns:start="http://schemas.microsoft.com/Start/2014/StartLayout">
              <start:DesktopApplicationTile Size="2x2" Column="0" Row="0" DesktopApplicationLinkPath="%ALLUSERSPROFILE%\Microsoft\Windows\Start Menu\Programs\Sensory Software\Grid 3.lnk" />
              <start:DesktopApplicationTile Size="2x2" Column="0" Row="2" DesktopApplicationLinkPath="%ALLUSERSPROFILE%\Microsoft\Windows\Start Menu\Programs\Sensory Software\Utilities\Licence Manager.lnk" />
              <start:DesktopApplicationTile Size="2x2" Column="2" Row="0" DesktopApplicationLinkPath="%ALLUSERSPROFILE%\Microsoft\Windows\Start Menu\Programs\Sensory Software\Utilities\Smartbox Update.lnk" />
              <start:DesktopApplicationTile Size="2x2" Column="2" Row="2" DesktopApplicationLinkPath="%ALLUSERSPROFILE%\Microsoft\Windows\Start Menu\Programs\Sensory Software\Utilities\Smartbox Support.lnk" />
            </start:Group>
            <start:Group Name="" xmlns:start="http://schemas.microsoft.com/Start/2014/StartLayout">
              <start:DesktopApplicationTile Size="2x2" Column="0" Row="0" DesktopApplicationLinkPath="%APPDATA%\Microsoft\Windows\Start Menu\Programs\Accessories\Internet Explorer.lnk" />
              <start:Tile Size="2x2" Column="2" Row="0" AppUserModelID="Microsoft.WindowsCamera_8wekyb3d8bbwe!App" />
            </start:Group>
          </defaultlayout:StartLayout>
        </StartLayoutCollection>
      </DefaultLayoutOverride>
    </LayoutModificationTemplate>
    Would be grateful for any help.
      My Computer


  10. Posts : 17,661
    Windows 10 Pro
    Thread Starter
       #509

    I use exclusively the easiest possible method to customize Start tile layout:
    • In Audit Mode when all software is installed, manually edit Start (remove / add tiles)
    • Export Start layout with PowerShell
    • Use Group Policy to force this layout to all users

    I have to admit that I have never even tried to use any other Start layout customization method in Windows 10 because the easiness of the above mentioned method.

    You could check if these Microsoft articles could give you more precise information:
      My Computer


Tutorial Categories

Customize Windows 10 Image in Audit Mode with Sysprep Tutorial Index Network & Sharing Instalation and Upgrade Browsers and Email General Tips Gaming Customization Apps and Features Virtualization BSOD System Security User Accounts Hardware and Drivers Updates and Activation Backup and Restore Performance and Maintenance Mixed Reality Phone


  Related Discussions
Our Sites
Site Links
About Us
Windows 10 Forums is an independent web site and has not been authorized, sponsored, or otherwise approved by Microsoft Corporation. "Windows 10" and related materials are trademarks of Microsoft Corp.

© Designer Media Ltd
All times are GMT -5. The time now is 11:54.
Find Us


Windows 10 Forums