Customize Windows 10 Image in Audit Mode with Sysprep  

Page 69 of 70 FirstFirst ... 195967686970 LastLast

  1. Posts : 3
    windows 10 pro
       #680

    Customize Image in Audit Mode EROR Requires version 10.0.18362.1 of th


    Sorry I am new to forum can any body help i tried to follow the
    YouTube

    Windows 10 Install Image - Part 1: Customize Image in Audit Mode
    but i got some errors? using ISO use is windos 10 pro version 1909
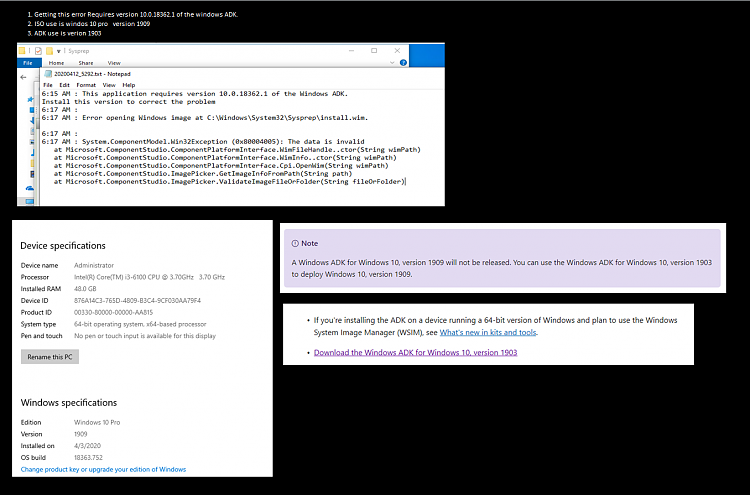
    1. Getting this error Requires version 10.0.18362.1 of the windows ADK.
    2. ISO use is windos 10 pro version 1909
    3. ADK use is verion 1903Customize Windows 10 Image in Audit Mode with Sysprep-win-10.png
      My Computer


  2. Posts : 2
    Windows 10 Pro
       #681

    Hi Kari, thanks for the work, i'm new to the forum and I have to do a work for this Monday and i'm in a worry.
    I just want to ask you if it's possible to use the Audit Mode into a newly bought Lenovo notebook to install a couple of piece of softwares and a couple of desktop shortcuts, i watched your tutorials and read some info from you and other users but every time the process is for making a customized Windows installation image to deploy on multiple machines but i just need to customize this unique installation on this unique notebook.
    It's quite clear how to install some software and also how to copy some shortcuts on desktop using the default user, but i really need to re-image a pre-customized Lenovo image? I just need to install two or three softwares and a couple of desktop shortcuts and leaving the final user going through the OOBE first setup, I don't want to go through the OOBE and creating the user, password, the three secret answers to the security questions.
    If i have to use the answerfile, as i read on some user thread where you answered, i was thinking to use this file:
    Code:
    <?xml version="1.0" encoding="utf-8"?><unattend xmlns="urn:schemas-microsoft-com:unattend">
    <settings pass="specialize">
    <component name="Microsoft-Windows-Shell-Setup" processorArchitecture="amd64" publicKeyToken="31bf3856ad364e35" language="neutral" versionScope="nonSxS" xmlns:wcm="http://schemas.microsoft.com/WMIConfig/2002/State" xmlns:xsi="http://www.w3.org/2001/XMLSchema-instance">
    <CopyProfile>true</CopyProfile>
    </component>
    </settings>
    </unattend>
    Is this right and enough for the software and shortcuts after i customized in audit mode or am I wrong?
    I also need to force the user to encrypt the hdd with bitlocker after he get onto the desktop for the first time but this will be optional if too hard to apply.
    Thanks in advance for the reply!
    Stefano
      My Computer


  3. Posts : 2
    Windows 10 Pro
       #682

    sputnikov said:
    Hi Kari, thanks for the work, i'm new to the forum and I have to do a work for this Monday and i'm in a worry.
    I just want to ask you if it's possible to use the Audit Mode into a newly bought Lenovo notebook to install a couple of piece of softwares and a couple of desktop shortcuts, i watched your tutorials and read some info from you and other users but every time the process is for making a customized Windows installation image to deploy on multiple machines but i just need to customize this unique installation on this unique notebook.
    It's quite clear how to install some software and also how to copy some shortcuts on desktop using the default user, but i really need to re-image a pre-customized Lenovo image? I just need to install two or three softwares and a couple of desktop shortcuts and leaving the final user going through the OOBE first setup, I don't want to go through the OOBE and creating the user, password, the three secret answers to the security questions.
    If i have to use the answerfile, as i read on some user thread where you answered, i was thinking to use this file:
    Code:
    <?xml version="1.0" encoding="utf-8"?><unattend xmlns="urn:schemas-microsoft-com:unattend">
    <settings pass="specialize">
    <component name="Microsoft-Windows-Shell-Setup" processorArchitecture="amd64" publicKeyToken="31bf3856ad364e35" language="neutral" versionScope="nonSxS" xmlns:wcm="http://schemas.microsoft.com/WMIConfig/2002/State" xmlns:xsi="http://www.w3.org/2001/XMLSchema-instance">
    <CopyProfile>true</CopyProfile>
    </component>
    </settings>
    </unattend>
    Is this right and enough for the software and shortcuts after i customized in audit mode or am I wrong?
    I also need to force the user to encrypt the hdd with bitlocker after he get onto the desktop for the first time but this will be optional if too hard to apply.
    Thanks in advance for the reply!
    Stefano
    I did all I needed without answer file, using the audit mode and putting everything in the public desktop and installing sw for all users, I also pre-encrypted the sys hdd and no recovery key was asked before or after OOBE.

    Bye!
      My Computer


  4. Posts : 3
    Win 7
       #683

    Hello,

    is it possible, to integrate/add VS and WDK to an offline image?

    I have created two life builds with Pre build PE SE and PXE.

    I did that based on win 10 1809 enterprise.

    If it is possible at all:
    Do i have to integrate in the original win10 1809 entrprise iso's ?
    Or could i do that in the allready created win 10 PE SE (and PXE) 1809 Enterprise iso's ?

    Many Thanks
      My Computer


  5. Posts : 45
    Windows 10 20H2
       #684

    There is any way to change default configuration on the web browsers? I mean, everytime I'm customizing Windows on Audit Mode, every browser changes doesn't apply when I create a new user or go through OOBE. I have to always customize individually every browser and I deploy that image.
      My Computer


  6. Posts : 144
    Windows 10 Pro x64
       #685

    Greets,

    Thanks for extensively detailing each & every aspect And making the things super easy!

    Please consider mentioning in ''Part Four : Customize Windows'' that "Some programs, drivers, updates, etc customizations may need restart to install completely & properly. Go ahead with restart as every time it will automatically boot into Audit mode till it is finalized by sysprep. ''

    Thanks & Regards. ...
      My Computer


  7. Posts : 5
    Windows 10 Pro
       #686

    Hello there, i have a problem with a windows installation created with the audit mode which i then want to install unattended.

    I have made a windows installation 10 (20H2) in audit mode, with all my programs and settings. This was done in Hyper-V and i created a snapshot _before_ i ran sysprep the first time.

    I ran sysprep with these parameters:
    C:\windows\system32\sysprep\sysprep.exe /generalize /shutdown /oobe /unattend:D:\install\copyprofile.xml
    because i wanted to set the copyprofile setting to true. I want that every user i created on the system has the same settings on desktop and (for example) all the same path variables.

    After that i have captured a .wim file from the installation with dism and made a bootable iso with oscdimg. When i use that image in another virtual machine as a bootable media, i can make a "normal" windows installation where i need to go manually through the settings (the winPE and the OOBE part, like typing in the Windows key and so on).

    When i do that i get the result i wanted with the copied profile settings and my desktop with the new users look exactly like i left them on the audit machine before the sysprep.

    The i thought "Why dont just customize the winPE and OOBE part in the autoanattend.xml so that the customized ISO (with "my" install.wim) can install completely unattended...what could go wrong?"

    Well, there i my problem: The installation works unattended but i dont get my customized desktop and/or path variables. It is just a clean windows profile but my installed apps are all there (from my audit machine).

    What did i miss? I thought that i only created a custom . wim file and there are all my programs _and_ my settings to the default profile, which are copied to every new user i might create (unattended or manually).

    My autounattend.xml in the root of my customized windows iso file looks like this (Note: I deleted the Produkt key and the name of the user in this one fyi. :) The windows iso should be used to be installed for MBR and GPD machines, that is why there are only 2 partitions).

    Code:
    <?xml version="1.0" encoding="utf-8"?>
    <unattend xmlns="urn:schemas-microsoft-com:unattend">
        <settings pass="windowsPE">
            <component name="Microsoft-Windows-International-Core-WinPE" processorArchitecture="amd64" publicKeyToken="31bf3856ad364e35" language="neutral" versionScope="nonSxS" xmlns:wcm="http://schemas.microsoft.com/WMIConfig/2002/State" xmlns:xsi="http://www.w3.org/2001/XMLSchema-instance">
                <SetupUILanguage>
                    <UILanguage>de-DE</UILanguage>
                </SetupUILanguage>
                <InputLocale>0407:00000407</InputLocale>
                <SystemLocale>de-DE</SystemLocale>
                <UILanguage>de-DE</UILanguage>
                <UserLocale>de-DE</UserLocale>
                <UILanguageFallback>en-US</UILanguageFallback>
            </component>
            <component name="Microsoft-Windows-Setup" processorArchitecture="amd64" publicKeyToken="31bf3856ad364e35" language="neutral" versionScope="nonSxS" xmlns:wcm="http://schemas.microsoft.com/WMIConfig/2002/State" xmlns:xsi="http://www.w3.org/2001/XMLSchema-instance">
                <DiskConfiguration>
                    <WillShowUI>OnError</WillShowUI>
                    <Disk wcm:action="add">
                        <CreatePartitions>
                            <CreatePartition wcm:action="add">
                                <Order>1</Order>
                                <Size>450</Size>
                                <Type>Primary</Type>
                            </CreatePartition>
                            <CreatePartition wcm:action="add">
                                <Extend>true</Extend>
                                <Order>2</Order>
                                <Type>Primary</Type>
                            </CreatePartition>
                        </CreatePartitions>
                        <ModifyPartitions>
                            <ModifyPartition wcm:action="add">
                                <Active>true</Active>
                                <Format>NTFS</Format>
                                <Label>System</Label>
                                <Order>1</Order>
                                <PartitionID>1</PartitionID>
                            </ModifyPartition>
                            <ModifyPartition wcm:action="add">
                                <Format>NTFS</Format>
                                <Label>Windows</Label>
                                <Letter>C</Letter>
                                <Order>2</Order>
                                <PartitionID>2</PartitionID>
                            </ModifyPartition>
                        </ModifyPartitions>
                        <DiskID>0</DiskID>
                        <WillWipeDisk>true</WillWipeDisk>
                    </Disk>
                </DiskConfiguration>
                <ImageInstall>
                    <OSImage>
                        <InstallTo>
                            <DiskID>0</DiskID>
                            <PartitionID>2</PartitionID>
                        </InstallTo>
                    </OSImage>
                </ImageInstall>
                <UserData>
                    <ProductKey>
                        <Key>[it is a secret :)]</Key>
                        <WillShowUI>OnError</WillShowUI>
                    </ProductKey>
                    <AcceptEula>true</AcceptEula>
                    <Organization></Organization>
                </UserData>
            </component>
        </settings>
        <settings pass="oobeSystem">
            <component name="Microsoft-Windows-International-Core" processorArchitecture="amd64" publicKeyToken="31bf3856ad364e35" language="neutral" versionScope="nonSxS" xmlns:wcm="http://schemas.microsoft.com/WMIConfig/2002/State" xmlns:xsi="http://www.w3.org/2001/XMLSchema-instance">
                <InputLocale>0407:00000407</InputLocale>
                <UILanguage>de-DE</UILanguage>
                <UILanguageFallback>en-US</UILanguageFallback>
                <UserLocale>de-DE</UserLocale>
                <SystemLocale>de-DE</SystemLocale>
            </component>
            <component name="Microsoft-Windows-Shell-Setup" processorArchitecture="amd64" publicKeyToken="31bf3856ad364e35" language="neutral" versionScope="nonSxS" xmlns:wcm="http://schemas.microsoft.com/WMIConfig/2002/State" xmlns:xsi="http://www.w3.org/2001/XMLSchema-instance">
                <OOBE>
                    <HideEULAPage>true</HideEULAPage>
                    <HideOEMRegistrationScreen>true</HideOEMRegistrationScreen>
                    <HideOnlineAccountScreens>true</HideOnlineAccountScreens>
                    <HideWirelessSetupInOOBE>true</HideWirelessSetupInOOBE>
                    <ProtectYourPC>3</ProtectYourPC>
                    <UnattendEnableRetailDemo>false</UnattendEnableRetailDemo>
                </OOBE>
                <UserAccounts>
                    <LocalAccounts>
                        <LocalAccount wcm:action="add">
                            <Password>
                                <Value>[it is a secret :)]</Value>
                                <PlainText>false</PlainText>
                            </Password>
                            <DisplayName></DisplayName>
                            <Group>Administrators</Group>
                            <Name>[anyUser]</Name>
                        </LocalAccount>
                    </LocalAccounts>
                </UserAccounts>
            </component>
        </settings>
    </unattend>
    
    Maybe someone can help me out there. I dont understand why it should be different when i put the information needed manually in the windows installations to the way i put everything in the autounattend.xml where i use the winpe and oobe party. Do i need to put the specialize in _this_ autounattend.xml too (like in the copyprofile.xml which used with sysprep). Or do i need to run sysprep with an xml file where i put the winpe and oobe part in there to to automate it?

    Help is greatly appreciated. :)
    Last edited by essenbe; 17 Mar 2022 at 01:27. Reason: Code box
      My Computer


  8. Posts : 3
    windows 10
       #687

    Hi Mam/Sir,

    Good day! I have problem to may windows 10 installer.
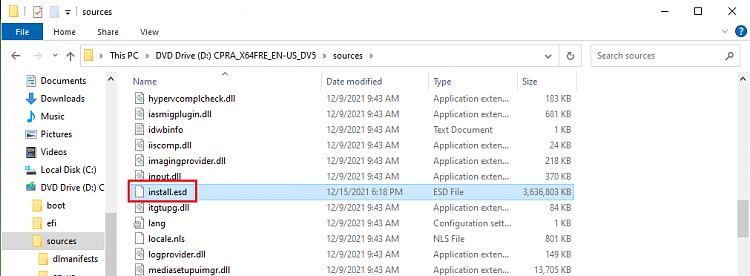
    Instead of "intall.wim", in my installer file is "install.esd"
    How fix or convert from .est to .wim?
    I home you can help me.

    Thank you so much!

    - - - Updated - - -

    Hi Mam/Sir,

    Good day! I have problem to may windows 10 installer.
    Instead of "intall.wim", in my installer file is "install.esd"
    How fix or convert from .est to .wim?
    I home you can help me.

    Customize Windows 10 Image in Audit Mode with Sysprep-install.png

    Thank you so much!
      My Computer


  9. Posts : 12,801
    Windows 11 Pro
       #688

    Hello and welcome to the Forums.

    An install.esd should work. However if you need an install.wim file instead try this tutorial, Convert ESD file to WIM using DISM in Windows 10. I hope that will help you.
      My Computer


  10. Posts : 3
    windows 10
       #689

    Hi Sir Essende,

    SLR, how to use install.esd in Windows System Image Manager?
    Customize Windows 10 Image in Audit Mode with Sysprep-wsim.png

    Thank you so much!
      My Computer


Tutorial Categories

Customize Windows 10 Image in Audit Mode with Sysprep Tutorial Index Network & Sharing Instalation and Upgrade Browsers and Email General Tips Gaming Customization Apps and Features Virtualization BSOD System Security User Accounts Hardware and Drivers Updates and Activation Backup and Restore Performance and Maintenance Mixed Reality Phone


  Related Discussions
Our Sites
Site Links
About Us
Windows 10 Forums is an independent web site and has not been authorized, sponsored, or otherwise approved by Microsoft Corporation. "Windows 10" and related materials are trademarks of Microsoft Corp.

© Designer Media Ltd
All times are GMT -5. The time now is 21:02.
Find Us


Windows 10 Forums