

How to Open and Use Disk Cleanup in Windows 10
You can use Disk Cleanup on a regular basis to reduce the number of unnecessary files on your drives, which can free up drive space and help your PC run better. It can delete temporary files and system files, empty the Recycle Bin, and remove a variety of other items that you might no longer need.
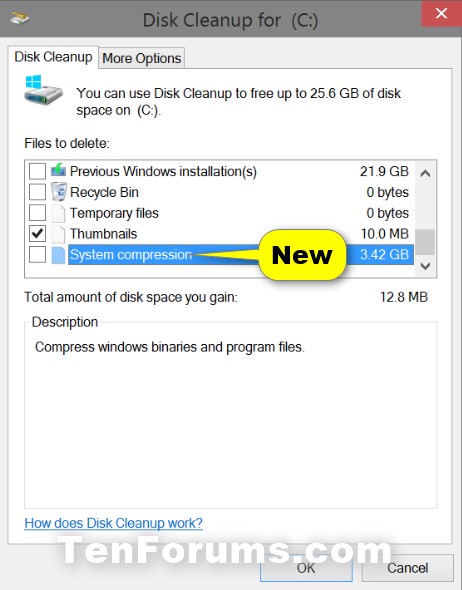
Windows 10 has added a new System compression option in Disk Cleanup that will compress Windows binaries and program files to save space on your Windows hard drive. This could be useful if you are limited on free space on your hard drive.
There's not much information available for this new System compression option, but it will most likely use NTFS compression. While compressing will save space on your Windows hard drive by how much is displayed for it Disk Cleanup, it may also decrease performance since it will take longer to read the compressed files as needed.
See also: How Compress or Uncompress Windows 10 with Compact OS
Starting with Windows 10 build 19018, Microsoft is removing the Downloads folder option from Disk Cleanup.
This tutorial will show you how to open and use Disk Cleanup and extended Disk Cleanup to help free up space by removing unneeded files in Windows 10.
Disk Cleanup will only delete Temporary files older than 7 days by default.
If you select (check) to delete the Previous Windows installation(s) item, you will no longer be able to go back to the previous version of Windows.
1 Press the Win + R keys to open the Run dialog, type cleanmgr or cleanmgr /lowdisk (all items checked) into Run, and click/tap on OK to open Disk Cleanup.
2 If you have more than one drive or partition on your PC, then select the Windows C: drive or the drive letter you wanted to clean, and click/tap on OK. (see screenshot below)
It may take a few minutes before this opens.
3 Do step 4, step 5, step 6, or step 7 below for what you wanted to do.
All users can use this option.
A) Check and uncheck the items you want, click/tap on OK, and go to step 8. (see screenshots below)
It may take a few minutes before this opens.
You must be signed in as an administrator to be able to use this option.
A) Click/tap on the Clean up system files button. (see screenshots below step 4)
B) If prompted by UAC, then click/tap on Yes.
C) Repeat step 2, and return.
D) Check and uncheck the items you want, click/tap on OK, and go to step 8. (see screenshots below)
You must be signed in as an administrator to be able to use this option.
A) Click/tap on the Clean up system files button to elevate (Run as administrator) Disk Cleanup. (see screenshots below step 4)
B) If prompted by UAC, then click/tap on Yes.
C) Repeat step 2, and return.
D) Click/tap on the More Options tab, and click/tap on the Clean up button under Programs and Features. (see screenshot below)
You must be signed in as an administrator to be able to use this option.
E) You can now close Disk Cleanup if you like.
F) You can now select to uninstall any desktop program that you no longer want. (see screenshot below)
You must be signed in as an administrator to be able to use this option.
A) Click/tap on the Clean up system files button to elevate (Run as administrator) Disk Cleanup. (see screenshots below step 4)
B) If prompted by UAC, then click/tap on Yes.
C) Repeat step 2, and return.
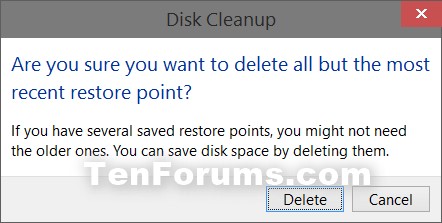
D) Click/tap on the More Options tab, and click/tap on the Clean up button under System Restore and Shadow Copies. (see screenshot below)
E) Click/tap on Delete to confirm. (see screenshot below)
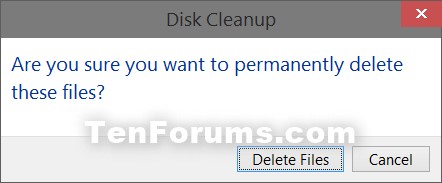
8 Click/tap on Delete Files to confirm. (see screenshot below)
9 Disk Cleanup will now delete the selected items, and close when finished. (see screenshot below)
You must be signed in as an administrator to be able to do this option.
1 Open an elevated command prompt.
2 Copy and paste the command below into the elevated command prompt, and press Enter. (see screenshot below)
The command prompt must be left open until Disk Cleanup has completely finished.
cmd.exe /c Cleanmgr /sageset:65535 & Cleanmgr /sagerun:65535
3 Check or uncheck the items you want, and click/tap on OK. (see screenshots below)
4 Disk Cleanup will now delete the selected items, and close when finished. (see screenshot below)
5 When Disk Cleanup has finished, you can close the command prompt if you like.
That's it,
Shawn Brink
Related Tutorials
- How to Create Disk Cleanup All Items Checked Shortcut in Windows 10
- Set Disk Cleanup to Have All Items Checked or Unchecked by Default in Windows 10
- How to Free Up Drive Space in Windows 10
- How to Turn On or Off Automatically Free Up Space in Windows 10
- How to Free Up Disk Space Now with Storage Sense in Windows 10
- How to View Storage Usage of Drives in Windows 10
- How to Add Cleanup to Context Menu of Drives in Windows 10
- How to Remove Temporary Files in Windows 10
- What is $GetCurrent folder and how to delete $GetCurrent folder in Windows 10
- What is $SysReset folder and how to delete $SysReset folder in Windows 10
- How to Delete Windows.old Folder in Windows 10
- How to Delete Windows10Upgrade Folder in Windows 10
- How to Clear and Reset the Thumbnail Cache in Windows 10
- How to Analyze Component Store (WinSxS folder) in Windows 10
- How to Clean Up Component Store (WinSxS folder) in Windows 10
Open and Use Disk Cleanup in Windows 10
-
New #1
Good one Shawn,
Found over 7 gigs of compression files
Cheers.
-
New #2
On a clean install of Win 10, I did a disk cleanup and found 3.28GB of System compression, should I check these for deletion ?
-
New #3
-
New #4
I thought if I put a checkmark in the box next to it, it would remove the files.
My thought was these were already compressed files. I need to know if it is safe to remove them.
-
New #5
Last edited by Brink; 04 Feb 2015 at 09:24. Reason: link
-
New #6
Thanks for the link. Looks promising but I will have to wait for the morning to make sense of it.
Getting too late here and I'm brain dead from doing work on this lappy for the past few hours.
-
New #7
Has anyone been brave enough to remove System compression files from Disk Cleanup ?
I noticed it is included in the amount of space you gain after running cleanup now, unless it was there before.
Are these safe to remove yet ?
Why was the link Edwin had removed ?

Last edited by COMPUTIAC; 17 Feb 2015 at 15:27.
-
New #8
-
-
New #9
Alright then, you checked the box for System compression ? Did they show up again ?
It wasn't your fault about the link. Not a big deal.
Open and Use Disk Cleanup in Windows 10
How to Open and Use Disk Cleanup in Windows 10Published by Shawn BrinkCategory: Performance & Maintenance
09 Jul 2022


 Quote
QuoteTutorial Categories

Related Discussions
