

Add or Remove Words in Spell Checking Dictionary in Windows 10
Windows 8 and 10 includes a spell checking feature for when you type words anywhere in Windows.
Dictionary Files:
The user-specific dictionaries for a language, which hold the content for the Added, Excluded, and AutoCorrect word lists, are located under %AppData%\Microsoft\Spelling\<language tag>. The filenames are default.dic (Added), default.exc (Excluded) and default.acl (AutoCorrect). The files are UTF-16 LE plaintext that must start with the appropriate Byte Order Mark (BOM). Each line contains a word (in the Added and Excluded word lists), or an autocorrect pair with the words separated by a vertical bar ("|") (in the AutoCorrect word list). Other .dic, .exc, and .acl files present in the directory will be detected by the spell checking service and added to the user word lists. These files are considered to be read-only and are not modified by the spell checking API.
Source: About the Spell Checking API (Windows)
The dictionary for your account is used to make better typing suggestions and improve handwriting recognition for each of the language you use.
When highlight misspelled words is turned on, your typed misspelled words that are not found in the dictionary will be highlighted with a red squiggly line under it. You can then right click on this highlighted misspelled word for more options.
If you add a word to the dictionary, it will no longer be highlighted as a misspelled word.
If you mistakenly add a word to the dictionary, then you can remove the word from the dictionary to have it highlighted as a misspelled word again.
This tutorial will show you how to view and add or remove words in the spell checking dictionary for your account in Windows 8 and Windows 10.
For a Windows 11 version of this tutorial, see:
Add Word to Custom Word List in Personal Dictionary in Windows 11
Contents
- Option One: To Add Highlighted Misspelled Words to Spell Checking Dictionary of Current Language
- Option Two: To Add or Remove Words in Spell Checking Dictionary default.dic file for a Language
- Option Three: To Clear All Words in Spell Checking Dictionary for a Language
- Option Four: To View and Clear User Dictionary in Settings
1 Right click on a highlighted misspelled word you typed, and click/tap on Add to dictionary. (see screenshot below)
1 Open File Explorer (Win+E).
2 Copy and paste the location below into the address bar, and press Enter. (see screenshot below)
%AppData%\Microsoft\Spelling
3 Open the folder (ex: en-US) of the dictionary for a language you want to customize. (see screenshot below)
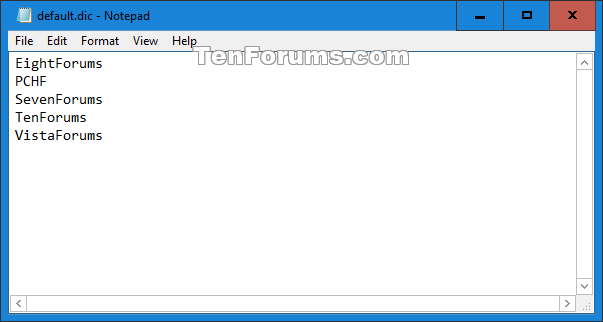
4 Open the default.dic file with Notepad. (see screenshot below)
5 You can now add or remove words that you no longer want to be highlighted as misspelled. (see screenshots below)
Only add a single word per line. Words are case sensitive, so you may wish to add the word more than once with uppercase and lowercase letters.
5 When finished, click/tap on File (menu bar) in Notepad, and click/tap on Save (Ctrl+S). (see screenshot below)
1 Open File Explorer (Win+E).
2 Copy and paste the location below into the address bar, and press Enter. (see screenshot below)
%AppData%\Microsoft\Spelling
3 Open the folder (ex: en-US) of the dictionary for a language you want to reset and clear. (see screenshot below)
4 Delete the default.dic file. (see screenshot below)
The default.dic file will automatically be recreated the next time you add a word to the dictionary for this language.
This option is only available in Windows 10.
1 Open Settings, and click/tap on the Privacy icon.
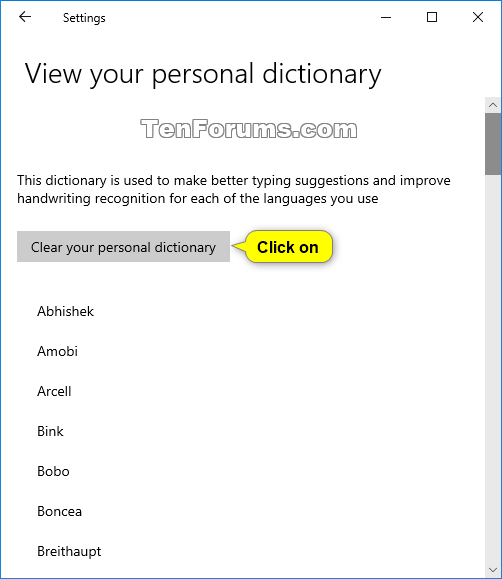
2 Click/tap on Inking & typing personalization on the left side, and click/tap on the View your personal dictionary link under "Getting to know you" on the right side. (see screenshot below)
3 Click/tap on the Clear dictionary button. (see screenshot below)
4 You can now close Settings if you like.
That's it,
Shawn Brink
Related Tutorials
- How to Turn On or Off Spelling Autocorrect and Highlight Misspelled Words in Windows 10
- Turn On or Off Spelling "Autocorrect" and "Highlight" Misspelled Words in Windows 8 and 8.1
- How to Turn On or Off Online Speech Recognition in Windows 10
- How to Turn On or Off Getting to know you for Inking & Typing Personalization in Windows 10
- How to Enable Windows Spellchecker in Microsoft Edge Chromium
- How to Add or Remove Words for Spellcheck Dictionary in Microsoft Edge Chromium
Add or Remove Words in Spell Checking Dictionary in Windows 10
-
New #1
Cant thank you enough for this tutorial! There is one thing that needs to be changed. In Option 2, step 5, this needs to be changed to 'save' instead of 'save as'. Correct?
-
New #2
Thank you Friscogriffin, and welcome to Ten Forums. Option 2 step 5 has now been corrected. :)
-
New #3
Wow, that was quick. Glad to be of service. Windows 10 Forums is awesome!
Add or Remove Words in Spell Checking Dictionary in Windows 10
How to Add or Remove Words in Spell Checking Dictionary in Windows 10Published by Shawn BrinkCategory: General Tips
13 Oct 2022


 Quote
QuoteTutorial Categories

Related Discussions
