

How to Add or Remove "Console lock display off timeout" from Power Options in Windows 10
Console lock display off timeout is the amount of minutes Windows will wait idle with no activity while on the lock screen when a user locks the computer before timing out and automatically turning off the display.
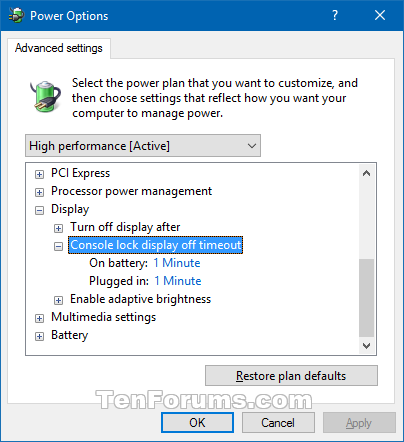
The Console lock display off timeout setting is not shown in Power Options by default.
This will only affect the lock screen that is displayed when a user locks the computer (Win+L).
The Console lock display off timeout setting is set to 1 minute by default for all power plans.
Any changes to the Console lock display off timeout setting will affect all users on the PC that use the same power plan.
This tutorial will show you how to add or remove the Console lock display off timeout setting under Display in Power Options for all users in Windows 10.
You must be signed in as an administrator to be able to add or remove this setting in Power Options.
- Option One: Add or Remove "Console lock display off timeout" in Power Options using Command Prompt
- Option Two: Add or Remove "Console lock display off timeout" in Power Options using REG file
EXAMPLE: "Console lock display off timeout" in Power Options
1. Open an elevated command prompt.
2. Type the command below you want to use into the elevated command prompt, and press Enter.
(Add)
REG ADD HKLM\SYSTEM\CurrentControlSet\Control\Power\PowerSettings\7516b95f-f776-4464-8c53-06167f40cc99\8EC4B3A5-6868-48c2-BE75-4F3044BE88A7 /v Attributes /t REG_DWORD /d 2 /f
OR
(Remove - default)
powercfg -attributes SUB_VIDEO 8EC4B3A5-6868-48c2-BE75-4F3044BE88A7 +ATTRIB_HIDE
3. You can now close the elevated command prompt if you like.
The downloaded .reg files below will modify the DWORD value in the registry key below.
HKEY_LOCAL_MACHINE\SYSTEM\CurrentControlSet\Control\Power\PowerSettings\7516b95f-f776-4464-8c53-06167f40cc99\8EC4B3A5-6868-48c2-BE75-4F3044BE88A7
Attributes DWORD
1 = Remove
2 = Add
1. Do step 2 (add) or step 3 (remove) below for what you would like to do.
A) Click/tap on the Download button below to download the file below, and go to step 4 below.
Add_Console_lock_display_off_timeout.reg
Download
A) Click/tap on the Download button below to download the file below, and go to step 4 below.
Remove_Console_lock_display_off_timeout.reg
Download
4. Save the .reg file to your desktop.
5. Double click/tap on the downloaded .reg file to merge it.
6. When prompted, click/tap on Run, Yes (UAC), Yes, and OK to approve the merge.
7. You can now delete the downloaded .reg file if you like.
That's it,
Shawn Brink
Related Tutorials
- How to Change 'Console lock display off timeout' in Windows 10
- How to Change Power Plan Settings in Windows 10
- How to Lock the Computer in Windows 10
- How to Enable or Disable the Lock Screen in Windows 10
- How to Change Turn Off Display After Time in Windows 10
- How to Add or Remove 'Dim display after' from Power Options in Windows
- How to Add or Remove 'Turn off Display after' from Power Options in Windows
- How to Add or Remove 'Adaptive display' from Power Options in Windows
- How to Add or Remove 'Allow display required policy' from Power Options in Windows
- How to Add or Remove 'Display brightness' from Power Options in Windows
- How to Add or Remove 'Adaptive backlight' from Power Options in Windows 10
- How to Add or Remove 'Dimmed display brightness' from Power Options in Windows
- Add or Remove 'Enable adaptive brightness' from Power Options in Windows
Add Console lock display off timeout to Power Options in Windows 10
Add Console lock display off timeout to Power Options in Windows 10
How to Add or Remove 'Console lock display off timeout' from Power Options in Windows 10Published by Shawn BrinkCategory: Performance & Maintenance
28 Dec 2021
Tutorial Categories

Related Discussions
