

Warning
As Microsoft has changed the upgrade method from ESD based upgrade to a UUP based, the method told in this tutorial does not work anymore with 15xxx and later builds.
Please see UUP to ISO tutorial for a working method: UUP to ISO - Create Bootable ISO from Windows 10 Build Upgrade Files Windows 10 Installation Upgrade Tutorials
Kari
How to Create Bootable ISO from Windows 10 install.esd File
Information
Thanks to our member topgundcp for the idea. This tutorial will use the decrypt script mentioned in his post, according to new information I have found the original authors are users abbodi1406, qad and synchronicityI from the MDL site, complete credits in the Read Me file included in the tool downloadable packet. I have simply edited the script a bit and finally made these step by step instructions.
The command script file tool used to create the ISO from the ESD file is a native Windows tool DISM, no third party tools or programs are involved. If you are concerned you can open the ESDtoISO.cmd file with Notepad and check it, it is totally safe only using native Windows commands.
Note
When Windows 10 is upgraded to a new build using the Windows Update, Microsoft uses the ESD file format to deliver install files needed. ESD stands for Electronic Software Delivery.
The Windows install.esd file contains the usual Windows install.wim file (WIM = Windows Imaging), encrypted and compressed. Install.wim file in its turn contains everything needed for a complete Windows installation.
This tutorial will show you how to create a bootable ISO file from the install.esd file you have downloaded which can then be burned to a DVD disk or USB to be used for clean install instead of upgrade.
If you have upgraded from Windows 8.1 or if you have performed a repair install on your Windows 10 see this post before starting.
EDIT:
Starting from Windows Insider Build 14986 upgrades no longer contain install.esd file, the file which makes process in this tutorial possible. The new differential UUP upgrade method (Universal Upgrade Platform) needs another tool, another method to create the ISO image. See tutorial here: UUP to ISO - Create Bootable ISO from Windows 10 Build Upgrade Files
However, users can still choose which method to use. Please read this post about difference in ESD and UUP methods and how to switch back to ESD upgrade
1.) Check Windows Update for possible new build. Tutorial: Windows Update - Check for and Install in Windows 10 - Windows 10 Forums
2.) When a new build is available, let Windows Update download it. When Windows Update has prepared the upgrade, you will be told a restart has been scheduled. At this point you can find the install.esd file which contains everything needed to make an ISO image in a hidden folder C:\$Windows.~BT\Sources.
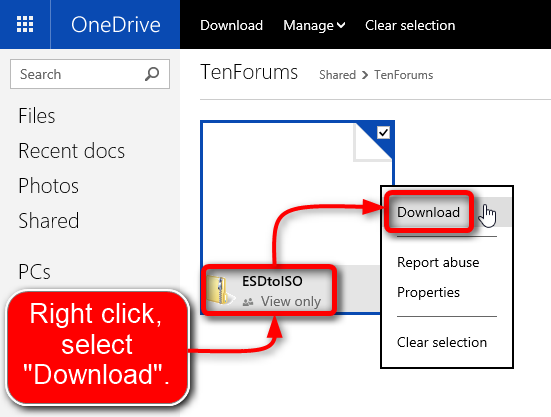
3.) The ESDtoISO tool is based on ESD Decrypter v.6.7, I have edited the original script to remove everything not necessarily needed. Download the tool (ESDtoISO.zip) from OneDrive: bit.ly/TenForums
4.) Open the downloaded ZIP archive with File Explorer, click Extract all, select where you want the files to be extracted, click Extract. Here I selected to extract the files on drive E:, folder ESD:
1.) Copy the ESD file to same folder where you extracted the ESDtoISO tool files. Right click the ESDtoISO.CMD file and select Run as administrator. This runs the tool, automatically finding your ESD file.
2.) Select the ISO you want to create, a traditional ISO which contains the install.wim file to install Windows, or an ESD based ISO which instead of install.wim file contains the compressed install.esd to install Windows. Both types can be used the same way to install Windows, both can be used as such, mounted to a virtual drive or burned to Flash or DVD drive.
Some facts to help you to decide, the numbers about Build 10041 ISO image created with this tool:
- WIM based ISO, Windows 10 Build 10041 32 bit, size 2.45 GB, ISO created from the ESD in 6:57 (Min:Sec)
- ESD based ISO Windows 10 Build 10041 32 bit, size 2.09 GB, ISO created from the ESD in 3:32
- WIM based ISO, Windows 10 Build 10041 64 bit, size 3.30 GB, ISO created from the ESD in 9:40
- ESD based ISO, Windows 10 Build 10041 64 bit, size 2.68 GB, ISO created from the ESD in 4:35
Above times to create the ISO using this tool using an HP ProBook 4530S i5 laptop.
Because the ISO based on ESD intead of WIM is more compressed and encrypted to save space, Windows needs to do more decompressing and decrypting when using it. The difference is not significant but to give you an example, installing Windows 10 to a Hyper-V virtual machine took using the 32 bit Build 10041 ESD based ISO (#2 in above list) 15 minutes (from boot to first Settings dialog after the installation), and using the same Windows version but a WIM based ISO file (#1 in above list) 12:35. Both virtual machines had exactly the same settings, the virtual hard disks were created on the same drive on host, and the host was not used for anything else during the installation.
3.) The tool starts working, showing an error for missing key. This error can be ignored:
4.) The process can take some time, up to half an hour depending on your hardware. When finished you have an ISO image to be used as such in installing the new build on a virtual machine or to be burned to DVD or USB to be used on a clean install on a physical computer.
That's it, now you can perform a clean install with your new Windows build.
Kari
Related Tutorials
- How to Download a Windows 10 ISO File
- How to create a Windows 10 ISO image for clean, in-place upgrade and repair install
- How to Create a Windows 10 ISO Image File from UUP Upgrade Files
ESD to ISO - Create Bootable ISO from Windows 10 ESD File
-
Posts : 1,811 W7 Ultimate SP1 (64 bit), LM 19.2 MATE (64 bit), W10 Home 1703 (64 bit), W10 Pro 1703 (64 bit) VM
-
-
New #3
There is no install.esd file in C:\RecoveryImage. All I see is the following:
C:\Users\rrkurtz\Desktop\ESDtoISO>dir c:\RecoveryImage
Volume in drive C has no label.
Volume Serial Number is 74BE-73AC
Directory of c:\RecoveryImage
10/21/2014 07:40 PM <DIR> .
10/21/2014 07:40 PM <DIR> ..
10/21/2014 07:40 PM 328 DONOTREPLACE.txt
10/04/2014 02:22 AM <DIR> Drivers
10/03/2014 10:08 PM 3,618,526,248 Install.wim
10/03/2014 11:01 PM <DIR> OEMInformation
2 File(s) 3,618,526,576 bytes
4 Dir(s) 188,399,144,960 bytes free
Is Install.wim the same thing? Can I rename it to .esd?
-
New #4
Ran it anyway and it likes install.wim.
Is the tutorial wrong? Should it state install.wim instead of install.esd?
Edit: install.esd was for initial Win 10 TP. install.wim is in the new build 9860.
-
New #5
Ran it anyway and it likes install.wim.
Is the tutorial wrong? Should it state install.wim instead of install.esd?
After I enter I the first message I get is:
Backing up original esd file...
Running Decryption program...
ERROR: The ESD file is not a valid encrypted image.
===============================================================================
Creating ISO Structure Layout...
===============================================================================
Deployment Image Servicing and Management tool
Version: 6.3.9600.17029
-
Posts : 1,811 W7 Ultimate SP1 (64 bit), LM 19.2 MATE (64 bit), W10 Home 1703 (64 bit), W10 Pro 1703 (64 bit) VMNew #6
I had an install.esd file (i.e. C:\RecoveryImage\install.esd).
After I ran the tutorial tool, it had changed to install.esd.bak
-
New #7
Thanx Kari, togundcp... just wanna mention credit also goes to the original scripter abbodi1406 at MDL.
BTW, Has someone tried the install.esd swap with install.wim of the 9841 iso to produce similar results?
-
New #8
Apparently I'm in the process of doing that. See my previous posts.
Currently running ESDtoISO, install.wim is still there but install.wim.bak is also there.
At 4% after 10 minutes. I'm going to have to kill this and try again tomorrow as I need to go to bed.
-
-

ESD to ISO - Create Bootable ISO from Windows 10 ESD File
How to Create Bootable ISO from Windows 10 install.esd FilePublished by Kari "Kalsarikänni" FinnCategory: Installation & Upgrade
11 May 2017


 Quote
QuoteTutorial Categories

Related Discussions
