Enable AHCI in Windows 8 and Windows 10 after Installation  

Page 10 of 22 FirstFirst ... 8910111220 ... LastLast

  1. Posts : 72
    windows 10 Insider Preview 16179
       #90

    Kbird said:
    Nope :)

    as mentioned in my last Post you can not Reinstall windows on the SSD with an IMAGE AND switch to AHCI in one move , you would get a x07 Stop Error most likely as you would not have AHCI setup on the SSD yet ...in Win10.

    you would need to follow this Tutorial to successful completion and then do it your way OR simply ( and best way) install the SSD and Clean install Windows 10 on to the SSD along with any of your Programs you still need/want.

    this way works ( see link below) easily too going from IDE to AHCI if you don't want to do a Clean Install.... and don't want to play in the registry... the values are rewritten by Windows 10 itself while in Safe Mode.

    PS Do a MacriumBackup before attempting this and make sure you have an updated Rescue Disk too...and that it works ie is bootable

    Attn. SSD owners - Enabling AHCI mode AFTER Windows 10 installation.
    Kbird,

    I was not going to update the AHCI and do the image restore in one move if it sounded that way. there would have been some restarts and checking the changes/installs in between but thank you for stressing that point because it keeps me cautious.

    I went from originally cloning my HDD to the SSD then opted for the Image instead after some good advice I received here. I do also see the purity in doing a good Clean Install especially since that is what ultimately got me out of some bad Insider update hell a couple weeks ago! If I do the Clean Install would I do the AHCI settings before the install (not in the same move) or follow the tutorial on doing it after? I am on Insider Preview 15060 as of 5 minutes ago but prior to that I created a bootable image of IP15060 using UUP to ISO so is that what I would use for the Clean Install?

    Finally, if I do a clean install of windows after the SSD is installed I want to make sure I set the SSD up the correct way and have the partitions and alignments right. Is there a tutorial for that as I have only seen them for cloning or imaging to the SSD. Well, that is probably because that is all I was looking for!

    Thanks,

    Danny R
      My Computer


  2. Posts : 18,432
    Windows 11 Pro
       #91

    @djrobison22,

    To do the clean install and set up the SSD, fully shutdown the computer - in your current Windows 10 hold down the shift key when you click shutdown to get a full shutdown. Then change the SATA controller to AHCI mode in BIOS/UEFI. Boot the computer from your bootable Windows 10 USB flash drive or DVD that you made from your Windows 10 ISO file. Select the custom install option. When you get the list of partitions on the SSD, delete every one of them. If you happen to have a separate data partition it is hopefully at the very end of the SSD and you would delete every partition except for it. Pick the unallocated space and click next to let Windows set up the partitions it wants.
      My Computer


  3. Posts : 2,324
    Win10
       #92

    What NAVY LCDR Said :)

    With a Clean Install windows 10 will setup up the Correct 4 partitions and align them as it needs , you don't need to worry about that , it also will setup TRIM etc as it will know it is a SSD not a HDD.

    Are you staying on the Insider Hell Route ? :) if so then yes Mount the ISO and copy it to a FAT32 Formatted USB Key and Clean install with that.

    Once reinstalled Clean then use Macrium to Image the SSD to another Drive frequently so you can reinstall if Insider gets pear shaped on you for any reason...

    KB
      My Computers


  4. Posts : 2
    windows 10
       #93

    for AMD users (old laptops) from 2009 to 2013

    I managed to get my old G6-1d48dx running smoothly on Windows 10 using this method!
    (Please note that not all G6's can use this method and you should proceed at your own discretion!)

    Steps to fix this error:

    1. Download BIOS revision F.46 (You most likely have F.48 or F.49) if it is available for your laptop (Go to the Windows 7 Drivers section>BIOS>Previous Versions).

    2. Install the older BIOS

    3.After installing the older BIOS, your laptop most likely will not boot fully, it should give a BSOD and restart, let it do this twice and the third time it should attempt to perform a startup repair THIS WILL (AND SHOULD) FAIL!

    4. After startup repair fails, click on "Advanced Options"

    5. Click Troubleshoot>Advanced options>Start-up settings

    6. Click restart

    7. When you see the start-up settings screen, press "4" on your keyboard

    8. You will then boot into safe mode, do not log into your computer when presented with the login screen, just press Power>Restart

    9. You should be able to fully boot into Windows now

    10. Put the computer to sleep and wake it, it should now fully work!

    The issue was that the newer BIOS breaks the way Windows 8/10 read the SATA configuration and downgrading the BIOS fixes it.

    Enjoy!

    there's no need to edit registry or going to BIOS because 90% of laptops are set to ACHI SATA as default settings
    i hope this one helps let me know!

    thanks
      My Computer


  5. Posts : 1
    Windows 1
       #94

    Hi, I can't seem to get past step 12. When I attempt to do so (from 3 to 0), I get a message: Error writing value to new content. I am trying to change from IDE to AHCI to install Samsung SSD EVO 250. Magician indicates my current hard drive is not supported.
    Motherboard GA-P35C-DS3R
    HDD WDC WD1600JS-00NCB1
    Windows 10
      My Computer


  6. Posts : 68,935
    64-bit Windows 11 Pro for Workstations
    Thread Starter
       #95

    Hello Perkybunch, and welcome to Ten Forums. :)

    If you are wanting to install Windows 10 to the new SSD, then you could set your BIOS to use AHCI, remove the old HDD, connect the new SSD, and clean install Windows 10 to the SSD.

    If not, then check to make sure that you are the owner of the StartOverride registry key, and have its permissions set to "Allow" you "Full control" of the key. Afterwards, see if you are able to modify the "0" DWORD.

    Change Owner of File, Folder, Drive, or Registry Key in Windows 10 Windows 10 Security System Tutorials
      My Computers


  7. Posts : 1
    Win 10 Pro 1703
       #96

    colsearle said:
    Today I visited a customer on Win 10 x64 who's SSD was in IDE mode which I changed to AHCI by changing the StartOverride keys from 3 to 0 in the registry.

    All good. My question is I also see forums suggesting a safemode then nornal boot will also work after changing to AHCI. Does anyone experience with this ? Does anyone know if and which registry entries the safemode method changes ?

    If the safemode method works then it has to be better than a registry edit ?
    safemode was the only thing that worked for me. My boot disk is a NVMe M2 flash drive. Interestingly after having my system now sucessfully working in AHCI mode, both iaStorAV\StartOverride\0 and storahci\StartOverride\0 still have the value 3. So probably NVMe uses a different set of drivers, but safemode knows about it.
      My Computer


  8. Posts : 68,935
    64-bit Windows 11 Pro for Workstations
    Thread Starter
       #97

    Hello aweiler, and welcome to Ten Forums. :)

    It's normal for the value of StartOverride\0 to automatically get set back to 3 after a restart. Manually setting it's value to 0 just helps allow the change to AHCI to take place.
      My Computers


  9. Posts : 2,450
    Windows 10 Pro x64
       #98

    Hi Shawn

    An observation I just made to my system, after a visit to a friend who wanted help to change from IDE to AHCI mode.

    As I always had an hp laptop, I was never triggered to see if AHCI was enabled, since hp, at least since 2009 (that I remember), have set the default mode to AHCI and locked the BIOS/UEFI not allowing any change.

    Apparently I have AHCI 'Enabled'

    Enable AHCI in Windows 8 and Windows 10 after Installation-ahci.png

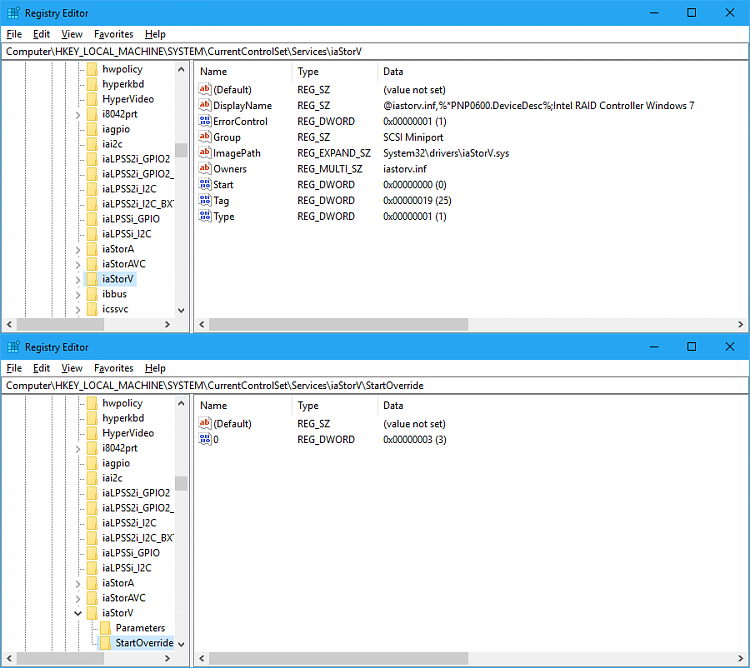
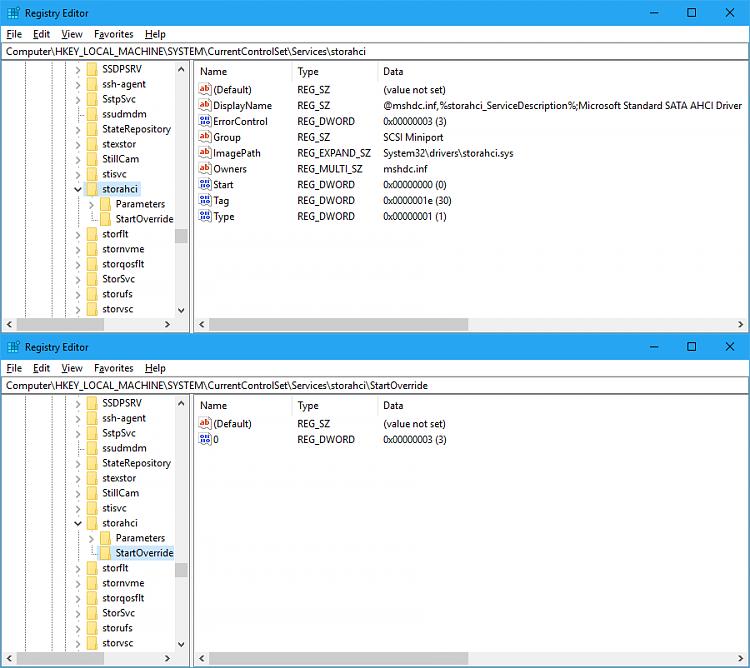
    So, I checked all steps of the tutorial and FYI, I post images of my registry keys.

    Enable AHCI in Windows 8 and Windows 10 after Installation-iastorv.png

    Enable AHCI in Windows 8 and Windows 10 after Installation-storahci.png

    Everything seems OK, except from Step 6.

    According to the tutorial in Step 6, we need to change the StartOverride value to 0, in the HKEY_LOCAL_MACHINE\SYSTEM\CurrentControlSet\Services\iaStorAV key.

    I don’t have this key, but instead I have
    HKEY_LOCAL_MACHINE\SYSTEM\CurrentControlSet\Services\iaStorAVC
    (as seen in the following image).

    Enable AHCI in Windows 8 and Windows 10 after Installation-iastoravc.png

    Forgetting the value of the StartOverride, as it returns to 3 after reboot, I was wondering if this key difference is just in my laptop, or it’s a new thing that changed the 'iaStorAV' to 'iaStorAVC' after a feature update for all systems, in which case you might consider changing Step 6 of the tutorial.

    Take care!
      My Computer


  10. Posts : 18,432
    Windows 11 Pro
       #99

    There is a second method of moving from IDE to AHCI that does not involve modifying the registry. In device manager, delete the IDE controller that is under IDE ATA/ATAPI Controllers. Reboot the computer and enter BIOS/UEFI setup. Change the controller type to AHCI. On the next boot Windows 10 will install the AHCI driver under IDE ATA/ATAPI Controllers.
      My Computer


Tutorial Categories

Enable AHCI in Windows 8 and Windows 10 after Installation Tutorial Index Network & Sharing Instalation and Upgrade Browsers and Email General Tips Gaming Customization Apps and Features Virtualization BSOD System Security User Accounts Hardware and Drivers Updates and Activation Backup and Restore Performance and Maintenance Mixed Reality Phone


  Related Discussions
Our Sites
Site Links
About Us
Windows 10 Forums is an independent web site and has not been authorized, sponsored, or otherwise approved by Microsoft Corporation. "Windows 10" and related materials are trademarks of Microsoft Corp.

© Designer Media Ltd
All times are GMT -5. The time now is 21:14.
Find Us


Windows 10 Forums