

How to Create and Use Hyper-V Checkpoints in Windows 10
Note
Checkpoint is a powerful Hyper-V feature to easily undo all changes on a virtual machine. You can play with virtual machines testing apps, changing settings, editing registry and so on as if "sandboxing" and when needed, discard all changes and restore an earlier Checkpoint in a few clicks and seconds.
A standard checkpoint stores virtual machine state exactly as it is (see Part Three in this tutorial for difference between a production and a standard checkpoint). Whereas a Windows Restore Point only stores and restores the Windows system state but does not store the app state and restore or remove user files, a standard Hyper-V checkpoint stores and restores the complete system including app state and user files. A checkpoint can rather be compared with a system image than a restore point although even that comparison is not accurate.
You can create as many Checkpoints as you want to. Creating a checkpoint only takes a few seconds. Testing for instance sysprepping Windows 10 Technical Preview in Audit Mode you can create a checkpoint before entering the Audit Mode after installation has finished and Windows boots to OOBE / Welcome Mode, second checkpoint when signed in as built-in administrator in Audit Mode and third before sysprepping with your answer file. Now when something does not work as you'd expected, simply return to any of your earlier checkpoints instead of starting from scratch.
In the Windows 10 Creators update you can now take checkpoints and saved states on virtual machines that are acting as nested Hyper-V hosts.
In this tutorial we will create checkpoints and apply (restore) them.
For this tutorial you will need Hyper-V enabled and setup as told in this tutorial, and at least one working virtual machine.
Contents:
Part One: Create a Checkpoint
Part Two: Apply (restore) a checkpoint
Part Three: Checkpoint settings
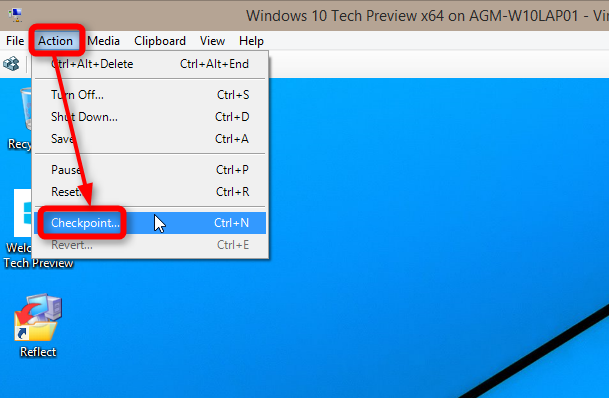
1.1) Checkpoints can be created in Hyper-V Manager from Action menu (#1) or from context (right click) menu (#2). Select a vm first, then create a checkpoint for that vm. The vm don't have to be running, you can create a checkpoint also when the vm is turned off:
A checkpoint can also be created from Action menu in Virtual Machine Connection > Action menu:
1.2) When you select Checkpoint in Action or Context menus as told in 1.1 Hyper-V asks if you want to rename the checkpoint (default name vm_name_date&time). Name the checkpoint as you wish, click Yes (No for default name):
1.3) The progress can be seen in status bar of Virtual Machine Connection:
1.4) When checkpoint is created click OK:
1.5) You can see all your checkpoints in Hyper-V Manager. Select a vm to see its checkpoints, Now is the current state:
2.1) To revert (restore) to last checkpoint created directly from Virtual Machine Connection, select Action > Revert:
2.2) Confirm the operation:
2.3) To apply any existing checkpoint, select your vm in Hyper-V Manager and double click a checkpoint, alternatively right click a checkpoint and select Apply:
2.4) The selected checkpoint will now be applied and vm turned off. Hyper-V notifies you of success (#1), start (boot) the vm to checkpoint you had selected by clicking the Start button (#2):
3.1) In vm settings you can select what type of checkpoints you will use:
- Production checkpoints
- A Production Checkpoint stores the machine state but considers all apps being closed; if you have let's say an Excel workbook open but you have not saved your work, applying this checkpoint will restore the state of the vm as it was when you had saved your work last time. When a production checkpoint is applied Windows boots as in cold boot, to Welcome screen and empty desktop after sign in with no running apps.
- Standard checkpoints
- A Standard Checkpoint stores the machine state with app state; all open apps and unsaved work will be saved in checkpoint, if you have PowerPoint with an unsaved presentation open when checkpoint is created, it will be open and and your unsaved work there when the checkpoint is applied. This causes a minor security risk, though: as a standard checkpoint when applied bypasses Welcome / Sign In and enters directly to desktop as it was when checkpoint was saved, anyone having access to your vm can see your files and use your access rights.
3.2) The location of checkpoints (highlighted in above screenshot) can only be changed when the vm in question has no checkpoints. When the first checkpoint is created and saved, you can no longer change the location of checkpoints of that vm.
That's about it! Do not hesitate to post your questions and concerns in this thread.
Kari
Related Tutorials
- How to Setup and Use Hyper-V in Windows 10 for OS Virtualization
- How to Create VHD of Windows 10 Installation and Use in Hyper-V
- How to Add Hyper-V Manager to Control Panel in Windows 10
Create and Use Hyper-V Checkpoints in Windows 10
-
-
-
New #3
Excellent, thank you.
Check point for M$ and snapshot for VMWARE.
-
-
New #5
Fwiw, Kari, build 14316 is the first build running on my eVGA home built machine that doesn't cause me a boot loop. Now to play
-
-
-
New #8
Really? I have to admit I do not understand what you mean with boot loops? Do you mean that your virtual machines looped, rebooting when no reboot was expected?
-
-
New #9
No, We talked about this back in the TP2 days - Installing Hyper-V on my desktop machine would cause it to lock up and reboot inexplicably, as soon as I installed it.
Bootlooping is a term more often used in the world of Android, whereupon, after making a system change, the device boots, starts to load the OS, and crashes, repeating ad infinitum. My situation was the same - with Hyper-V just enabled on previous builds, my system continually rebooted before I even got to the login screen. Disabling VT-x in BIOS stopped the boot loops - but, without that enabled, I can't use Hyper-V. It was a catch .22 for me. I had no issues with Hyper-V on any other machine but this one.
Now, I have no issues with running it on this one. I clean installed Build 14295 (and then took build 14316) after I noticed that 14295 had a lot of newer (date-wise) drivers as default drivers. I also played around in my BIOS settings, but currently they are exactly the same as I previously used (loaded from my saved profile). But, for whatever reason, Hyper-V actually works and my system is not bootlooping.

Create and Use Hyper-V Checkpoints in Windows 10
How to Create and Use Hyper-V Checkpoints in Windows 10Published by Kari "Kalsarikänni" FinnCategory: Virtualization
19 Apr 2020


 Quote
QuoteTutorial Categories

Related Discussions
