How to Boot from a USB Flash Drive in Windows 10
This tutorial will show you how to boot from a USB drive at boot or from within a Windows 10 PC or Surface.
If you have fast boot or ultra fast boot enabled in your UEFI firmware settings, then you will need to temporarily disable fast boot or ultra fast boot to be able to boot from a USB.
For a Windows 11 version of this tutorial, see:
Boot from USB Drive on Windows 11 PC
Contents
- Option One: To Boot from a USB Drive from within Windows 10
- Option Two: To Boot from a USB Drive at Boot on Windows 10 PC
- Option Three: To Boot from a USB Drive at Boot on Surface
1 Connect a bootable USB drive to a USB port on your PC.
2 Boot to Advanced startup options from within Windows 10.
3 After the computer restarts, click/tap on the Use a device option. (see screenshot below)
4 Click/tap on the USB drive that you want to use to boot from. The computer will now restart and boot from the selected USB drive. (see screenshot below)
1 Connect a bootable USB drive to a USB port on your PC.
2 Turn on or restart your PC.
3 Press the appropriate key (ex: F11) displayed for Boot Menu when you see the option available like below.
The key to press for Boot Menu will vary per motherboard. Usually the boot screen will show you what key to press like below.
Find Boot Menu Option Keys & System BIOS Keys Down | WikiGain.com
Boot Menu Option Keys For All Computers and Laptops | [Updated List 2021] |
You can also read the manual for your motherboard to see what specific key to press for Boot Menu.
4 In the boot menu, click on the USB drive you want to boot from. (see screenshot below)
See also: Boot Surface from a USB device
1 While Surface is turned off, connect a bootable USB drive to the USB port.
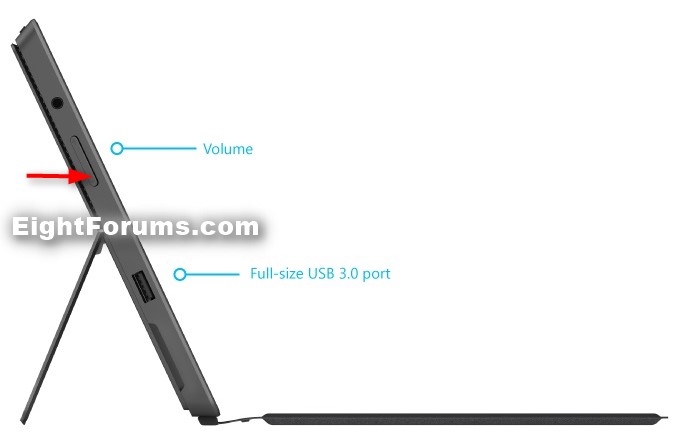
2 Press and hold the volume-up button. (see screenshot below)
3 Press and release the power button. (see screenshot below)
4 Continue holding the volume-up button until the Surface or Windows logo no longer appears on the screen.(see screenshot below)
5 You should now see the Surface UEFI. Do one of the following:
- Surface Pro 4, Surface Pro (5th Gen), Surface Pro (5th Gen) with LTE Advanced, Surface Pro 6, Surface Book, Surface Book 2, Surface Studio (1st Gen), Surface Studio 2, Surface Laptop (1st Gen), Surface Laptop 2, Surface Go or Surface Go with LTE Advanced: Go to step 14 below.
- Surface Pro 3 and Surface 3: Go to step 6 below.
- Surface Pro 1 and Surface Pro 2: Go to step 10 below.
6 Select Configure Alternate System Boot Order.
7 Do one of the following:
- Surface Pro 3: Select USB > SSD.
- Surface 3: Select Network > USB > SSD.
8 Select Exit Setup.
9 Select Yes to save the configuration and restart Surface.
10 Select Secure Boot Control.
11 Select Disable. This will allow Surface to search for an alternate device to boot from instead of from your SSD.
This may affect the look of your Surface splash screen.
12 Select Exit Setup.
13 Select Yes to save the configuration and restart Surface.
14 Select Boot configuration.
15 Select USB Storage and drag it to the top of the list. Alternatively, you can swipe left on USB Storage to boot to the device immediately. This will not affect the boot order.
16 Select Exit and then select Restart Now.
Once youíve followed the steps above, youíre ready to start your Surface from your USB drive.
Before starting your Surface from a USB drive, make sure you donít have any other USB devices connected to your Surface, including USB mouse devices, keyboards, or other storage drives. Surface will try to boot from any other connected USB devices.
If you donít want to start your Surface from your USB drive, make sure the drive is not inserted in the USB port on your Surface when you start it.
If youíre having trouble starting your Surface by using the steps below, you can boot it from the USB drive through Windows. To do this
Insert the USB drive into the USB port, and then go to Start, select Settings > Update & security > Recovery.
Under Advanced startup, select Restart Now.
On the Choose an option screen, select Use a device > USB Storage.
Surface Pro (5th Gen), Surface Pro (5th Gen) with LTE Advanced, Surface Go, Surface Go with LTE Advanced, Surface Laptop (1st Gen), Surface Laptop 2, Surface Book, Surface Book 2, Surface Studio (1st Gen), Surface Studio 2, Surface Pro 4, Surface 3, or Surface Pro 3 with a configured boot order in UEFI
1 Shut down your Surface.
2 Insert the bootable USB drive into the USB port on your Surface.
3 Press the power button to turn it on.
4 Follow the on-screen instructions to boot from your USB drive.
Surface Pro (5th Gen), Surface Pro (5th Gen) with LTE Advanced, Surface Go, Surface Go with LTE Advanced, Surface Laptop (1st Gen), Surface Laptop 2, Surface Book, Surface Book 2, Surface Studio (1st Gen), Surface Studio 2, Surface Pro without a configured boot order in UEFI
1 Shut down your Surface.
2 Insert the bootable USB drive into the USB port on your Surface.
3 Press and hold the volume-down button on the Surface. While you're doing this, press and release the power button.
4 The Microsoft or Surface logo appears on your screen. Continue to hold the volume-down button. Release the button once spinning dots appear beneath the logo.
5 Follow the on-screen instructions to boot from your USB drive.
That's it,
Shawn Brink
Related Tutorials
- How to Create a Bootable USB Flash Drive to Install Windows 10
- How to Create Windows 10 USB Install Media for UEFI / GPT with PowerShell Script
- How to Create a Bootable USB Recovery Drive in Windows 10
- How to Change Windows To Go Startup Options in Windows 10
- How to Download a Recovery Image for a Surface Device
Boot from USB Drive on Windows 10 PC
-
New #1
Due to some tweaking with BIOS while trying for "Clean Install" I've lost the "Use a Device" & "Use another Operating System" options in the "Advanced Start Up". How to restore the same ? I am using UEFI BIOS of American MegaTrends, 217. I've just installed Win 10 Creators Update
-
New #2
Hello layman, :)
Check your UEFI/BIOS settings to make sure that any "Allow USB at boot" type setting is enabled.
-
New #3
Hello Brink,
The BIOS settings -> Advanced shows the default option as Legacy USB Support "Enabled". The other options are "Auto" & "Disabled". The BIOS settings -> Boot shows Boot Option #1 as Windows Boot Manager. More Boot Options may be created by mentioning Path. There is no option "Allow USB at boot" to be "Enabled".
-
New #4
The "Use another Operating System" option would only be there if you dual boot with another Windows OS.
If you have a bootable USB flash drive connected and USB is enabled in UEFI, then you should see the "Use a Device" option. I'm not sure why you wouldn't otherwise. You might try having the USB flash drive connected to a different USB port to see if that may be the issue.
-
New #5
There is no issue with the USB ports. The Bootable USB stick is visible in "Windows explorer" as well as "Device manager", but the "Advanced Start up" still does not show "Use another device". Incidentally, when I upgraded to version 1607, it was showing.
-
New #6
I must admit that I'm not sure why you don't have the option anymore.
Are you able to use the boot menu from your motherboard like in Option 2 for now to boot from the USB?
-
New #7
After adding another boot option (ex. F: ) in the BIOS, the "Use another device" option is back in "Advanced Start Up".
-
-
-

Boot from USB Drive on Windows 10 PC
How to Boot from a USB Flash Drive in Windows 10Published by Shawn BrinkCategory: Installation & Upgrade
29 Jul 2022
Tutorial Categories


Related Discussions


 Quote
Quote
