
New
#90
Move Users Folder Location in Windows 10
-
-
New #91
I mean without going into audit mode and without creating a temporary profile in the partition C: .
In other words, I would like to create a custom installation DVD so that, at the end of the normal installation process, the first account created is saved in another partition.
So, how do I do this?
Thanks
Bye
-
New #92
By following instructions in this tutorial. Simply instead of rebooting after the sysprep, shutdown the PC changing the boot switch in the sysprep command from /reboot to /shutdown:
When PC shuts down create a system image, for instance if using Macrium for imaging you need to boot the PC with Macrium boot disk and then create the image. In the future you can then use the image instead of Windows original install media to install Windows by restoring the image.Code:%windir%\system32\sysprep\sysprep.exe /oobe /shutdown /unattend:d:\relocate.xml
-
-
New #94
Using this method you only need the Windows System Image Manager, part of the Windows 10 ADK. The whole process is explained in this tutorial: Windows 10 Image - Customize in Audit Mode with Sysprep - Windows 10 Forums
-
New #95
Hi All,
Hopefully I'm posting this in the correct thread.
Windows 10, clean install (using the instructions provided in this thread) and validated. Everything went well. I did notice a snafu that some applications are creating the User folder and accompanying folder/file structure under the C drive.
Google Chrome
Mozilla Firefox
IpSwitch WSFTP
All other installs seem to work well using the moved User folder located on the D drive.
Any thoughts?
-
New #96
Some programs will always require the C:\Users\Your_Username\AppData folders for their application data, a working system with relocated Users folder often has a tiny Users folder on C: drive, too. However, the folder C:\Users remains so small it is totally irrelevant, just leave it there.
-
New #97
-
New #98
Hi!
Thanks Kari for your tutorial, I used it for W7 and it worked great!
Now I'm trying to do the same on W10, but running into a hitch.
I've upgraded the machine from 8.1 then done a clean install (clean clean from bootable usb, not 'reset' clean), following the instructions the whole way, yet I can't get it to work. I then tried method two, three times, slightly different workings on line 10, but when I get to the desktop after the OOBE the Users folder is in the same place on the C:\ drive. I don't get any notices that there's something wrong with the code, it just boots as normal.
I'm trying to move it from Disk C:\ to D:\, my install media is in drive E. The one thing that was bugging me was that in the code it says, but an install.wim doesn't exist on the usb stick in the sources folder, but an install.esd does.Code:cpi:source="wim:E:\sources\install.wim#Windows 10 PRO"
Should it instead be?Code:cpi:source="esd:E:\sources\install.esd#Windows 10 PRO"
-
-
New #99
No, it should be the install.wim file and that's the cause for your issue.
If you create the Windows 10 install media as USB Flash drive in Media Creation Tool, the compressed and encrypted ESD file is used instead of the WIM file. You need to have an install media with the WIM file instead; easiest way to get it is to use the Media Creation Tool again, this time selecting the ISO image option. The ISO image created with the tool uses the WIM file. For Media Creation Tool, see tutorial: Windows 10 ISO Download - Windows 10 Forums
Step 1, select Create installation media for another PC:

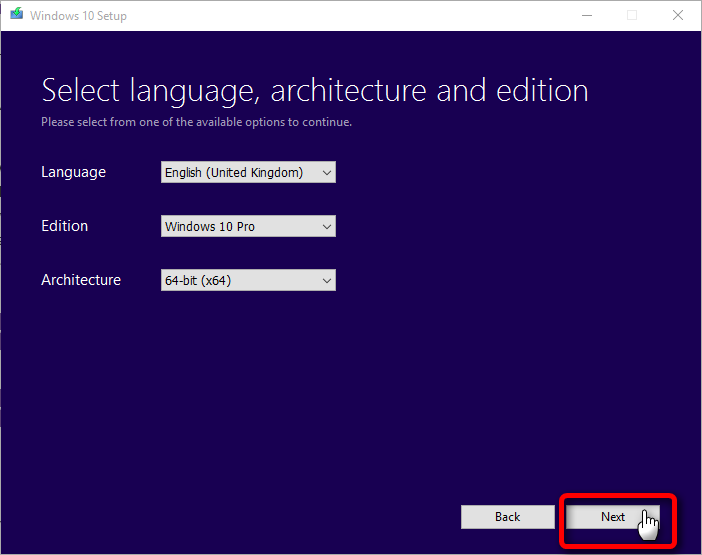
Step 2, select your language, edition and bit version. Be sure to select the same bit version as you are installing; you cannot use a 32 bit install.wim in sysprepping a 64 bit Windows and vice versa:
Step 3, select ISO file and let it be created. There's no need to burn the ISO to disk or flash drive if you already have an install media to use, the ISO will only needed when sysprepping :

When you have the ISO, do like this:
- Install Windows 10 clean, boot to Audit Mode, create the answer file (this tutorial, Method One Steps 1 & 2)
- Before sysprepping (Method One, Step 3), mount the ISO file as virtual DVD drive by double clicking it. Check the drive letter given for it by Windows, let's say the virtual drive gets letter F > use this CPI source in answer file:Code:
cpi:source="wim:F:\sources\install.wim#Windows 10 PRO"
- Sysprep as told in tutorial
Should work now.
Kari
- Install Windows 10 clean, boot to Audit Mode, create the answer file (this tutorial, Method One Steps 1 & 2)

 Quote
QuoteTutorial Categories

Related Discussions
