

How to Turn On or Off AutoSwitch for Wireless Network Connection in Windows 10
When you connect to a new wireless network, Windows will create a profile for the wireless network. A wireless (Wi-Fi) network profile contains the SSID (network name), password key, and security information to be able to connect to a wireless network.
If you turned on to automatically connect to wireless networks, Windows will automatically connect to your wireless network profiles based on a priority order when the wireless network is in range.
The autoSwitch parameter controls the roaming behavior of an auto-connected wireless network when a more preferred wireless network is in range.
If autoSwitch is turned on, it allows Windows to continue looking for other auto-connected wireless networks while connected to the current wireless network. If a higher priority auto-connected wireless network than the currently connected wireless network comes in range, Windows will automatically connect to it instead.
This tutorial will show you how to turn on or off autoSwitch for wireless networks set to connect automatically when in range in Windows 7, Windows 8, and Windows 10.
Contents
- Option One: Turn On or Off AutoSwitch for Wireless Network Connection in Control Panel
- Option Two: Turn On or Off AutoSwitch for Wireless Network Connection in Command Prompt
This option requires you to be connected to the wireless network you want to turn on or off autoSwitch for.
1 Open the Control Panel (icons view), and click/tap on the Network and Sharing Center icon.
2 Click/tap on the Change adapter settings link on the left side of the Network and Sharing Center. (see screenshot below)
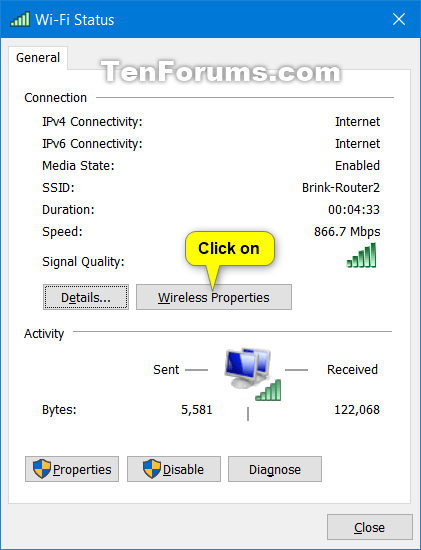
3 Click/tap on the wireless network connection (ex: "Brink-Router2") you want to turn on or off autoSwitch for to open its Status dialog. (see screenshot below)
You can also select the wireless network connection (ex: "Brink-Router2") you want to turn on or off autoSwitch for, and click/tap on View status of this connection on the toolbar.
4 Click/tap on the Wireless Properties button in the Status dialog. (see screenshot below)
5 Check (on) or uncheck (off - default) Look for other wireless networks while connected to this network for what you want, and click/tap on OK. (see screenshot below)
Look for other wireless networks while connected to this network requires Connect automatically when this network is in range to be checked.
6 When finished, you can close Status dialog (step 4), Network Connections (step 3), and Network and Sharing Center (step 2).
This option does not require you to be connected to the wireless network you want to turn on or off autoSwitch for.
1 Open a command prompt.
2 Copy and paste thenetsh wlan show profilescommand into the command prompt, press Enter. (see screenshot below)
The wireless network profiles will be listed in priority order to connect to when in range.
Make note of the wireless network profile name (ex: "Brink-Router2") you want to turn on or off autoSwitch for.
Make note of the interface name (ex: "Wi-Fi") this wireless network profile (ex: "Brink-Router2") is on.
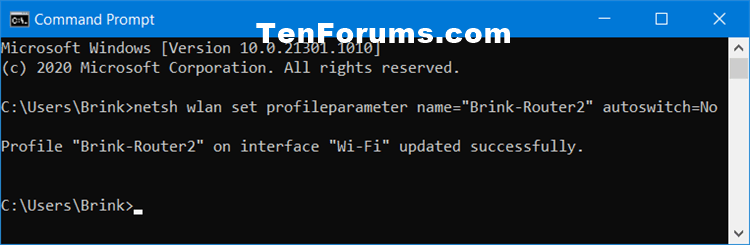
3 Type the command below you want to use into the command prompt, and press Enter. (see screenshots below)
(To turn on autoSwitch for this wireless network)
netsh wlan set profileparameter name="profile name" autoswitch=Yes
OR
(To turn on autoSwitch for this wireless network on specific interface)
netsh wlan set profileparameter name="profile name" interface="InterfaceName" autoswitch=Yes
OR
(Default - To turn off autoSwitch for this wireless network)
netsh wlan set profileparameter name="profile name" autoswitch=No
OR
(Default - To turn off autoSwitch for this wireless network on specific interface)
netsh wlan set profileparameter name="profile name" interface="InterfaceName" autoswitch=No
Substitute profile name in the commands above with the actual name (ex: "Brink-Router2") of the wireless network profile from step 2.
Substitute InterfaceName in the command above with the actual interface name (ex: "Wi-Fi") from step 2. Specifying an interface name (aka: wireless adapter) can be handy when you have more than one wireless adapter, and only want to turn on or off autoSwitch for a wireless network on a specific wireless adapter (aka: interface).
For example:
ON:netsh wlan set profileparameter name="Brink-Router2" autoswitch=Yes
ON (specific interface):netsh wlan set profileparameter name="Brink-Router2" interface="Wi-Fi" autoswitch=Yes
OFF:netsh wlan set profileparameter name="Brink-Router2" autoswitch=No
OFF (specific interface):netsh wlan set profileparameter name="Brink-Router2" interface="Wi-Fi" autoswitch=No
4 You can now close the command prompt if you like.
That's it,
Shawn Brink
Related Tutorials
- *]How to Turn On or Off Wi-Fi Communication in Windows 10
- How to Connect To a Wireless Network in Windows 10
- How to Disconnect from a Wireless Network in Windows 10
- How to Delete a Wireless Network Profile in Windows 10
- How to Turn On or Off Connect Automatically to Wireless Network in Windows 10
- How to Change Wireless Network Connection Priority Order in Windows 10
- How to Change Preferred Band for Wireless Network Adapter in Windows
- How to Automatically Turn Off Wi-Fi Upon Ethernet Connect in Windows
Turn On or Off AutoSwitch for Wireless Network Connection in Windows
-
New #1
Brink,
Option 1 Step 3 has changed, you now get the WiFi Status dialog by clicking on the View status of this connection item in the row above them

All the best,
Denis
-
-
New #3
A user has reported that the autoswitch setting is no longer required for Windows to switch to a higher priority network i.e. it does so even if that setting has not been set.
Windows 10 auto switching to stronger WIFI connection not working
I've re-tested mine, and that user is correct. Switching is much quicker with the setting made.
- auto-switching took 1 minute to switch to a higher priority network in my test if the auto-switch property was set
- auto-switching took 7-9 minutes to switch to a higher priority network in my test if the auto-switch property was not set
Have you experienced this?
Denis
-

Turn On or Off AutoSwitch for Wireless Network Connection in Windows
How to Turn On or Off AutoSwitch for Wireless Network Connection in Windows 10Published by Shawn BrinkCategory: Network & Sharing
12 Apr 2021


 Quote
Quote
Tutorial Categories

Related Discussions
