How to Set Linux Distribution version to WSL 1 or WSL 2 in Windows 10
The Windows Subsystem for Linux (WSL) (aka: "WSL 1") lets developers run a GNU/Linux environment -- including most command-line tools, utilities, and applications -- directly on Windows, unmodified, without the overhead of a traditional virtual machine or dualboot setup.
WSL 2 (Windows Subsystem for Linux 2) is a new version of the architecture in WSL that changes how Linux distributions interact with Windows. WSL 2 has the primary goals of increasing file system performance and adding full system call compatibility. Each Linux distribution can run as WSL 1 or as WSL 2, and can be switched between at any time. WSL 2 is a major overhaul of the underlying architecture and uses virtualization technology and a Linux kernel to enable its new features.
When you have Windows Subsystem for Linux (WSL) enabled, you can install Linux distribution apps from the Microsoft Store.
Users can make WSL 1 or WSL 2 the default architecture to be used as the default Linux distribution version whenever any new Linux distributions are installed.
Users can also set the Linux distribution version to WSL 1 or WSL 2 for existing installed Linux distributions at any time.
See also: Set your distribution version to WSL 1 or WSL 2 | Microsoft Docs
This tutorial will show you how to set the Linux distribution version to WSL 1 or WSL 2 for your account in Windows 10.
Contents
- Option One: Set Default Linux Distribution version to WSL 1 or WSL 2 for New Linux Distributions
- Option Two: Set Linux Distribution version to WSL 1 or WSL 2 for Specific Installed Linux Distributions
1 Open an PowerShell.
2 Copy and paste the command below you want to use into PowerShell, and press Enter. (see screenshot below)
(Set WSL 1 as default version)
wsl --set-default-version 1
OR
(Set WSL 2 as default version)
wsl --set-default-version 2

3 You can now close PowerShell if you like.
1 Open an PowerShell.
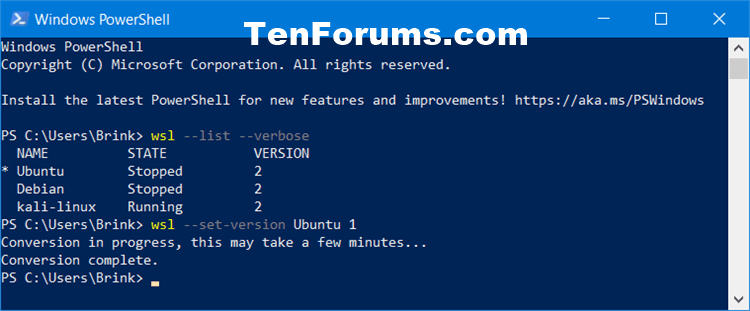
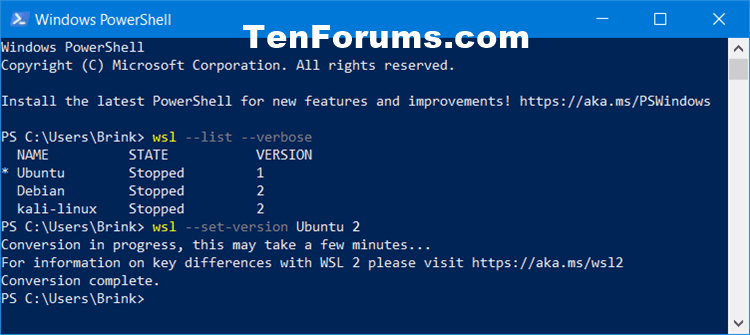
2 Copy and paste the command below into PowerShell, press Enter, and make note of the Linux distribution name (ex: "Ubuntu") you want to change the version (ex: "1" or "2") for. (see screenshot below)
wsl --list --verbose
3 Type the command below into PowerShell, and press Enter. (see screenshots below)
wsl --set-version <distribution name> <versionNumber>
Substitute <distribution name> in the command above with the actual Linux distribution name (ex: "Ubuntu") from step 2.
Substitute <versionNumber> in the command above with the number 1 (WSL 1) or 2 (WSL 2) for the default architecture you want.
For example:wsl --set-version Ubuntu 2

4 You can now close PowerShell if you like.
That's it,
Shawn
Related Tutorials
- How to Enable or Disable Windows Subsystem for Linux WSL in Windows 10
- How to Update from WSL to WSL 2 in Windows 10
- How to Install Windows Subsystem for Linux (WSL) Distros in Windows 10
- How to Export and Import Windows Subsystem for Linux (WSL) Distro in Windows 10
- How to Set Default Windows Subsystem for Linux (WSL) Distro in Windows 10
- How to Run a Windows Subsystem for Linux (WSL) Distro in Windows 10
How to Set Linux Distribution version to WSL 1 or WSL 2 in Windows 10

How to Set Linux Distribution version to WSL 1 or WSL 2 in Windows 10
Published by Shawn BrinkCategory: Apps & Features12 Sep 2020
Tutorial Categories


Related Discussions


