

How to Change or Restore Default Location of Camera Roll Folder in Windows 10
The C:\Users\<user name>\Pictures\Camera Roll (%UserProfile%\Pictures\Camera Roll) folder is created by the Camera app
Photos and videos captured with the built-in camera or webcam are saved by default to the Camera Roll folder.
See also: Fix a missing Camera Roll in Windows 10 | Microsoft Support
If you like, you can change the default location of this Camera Roll folder to where you want to have your photos or videos captured with the Camera app saved to by default instead.
This tutorial will show you how to change or restore the default location of the Camera Roll folder for your account in Windows 10.
Contents
- Option One: To Change Default Location of Camera Roll Folder in Properties
- Option Two: To Restore Default Location of Camera Roll Folder in Properties
- Option Three: To Restore Default Location of Camera Roll Folder using a BAT file
EXAMPLE: Camera Roll folder default location in File Explorer
1 If you haven't already, you will need to create a new folder named Camera Roll at the location (ex: "D:" ) you want to move your Camera Roll folder to.
2 In File Explorer (Win+E), copy and paste shell:Camera Roll into the address bar, and press Enter to open the current location of the Camera Roll folder.
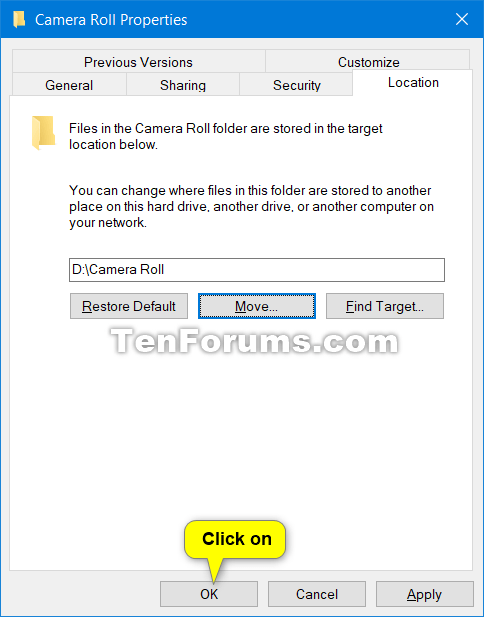
3 Right click or press and hold on an empty area in the Camera Roll folder, and click/tap on Properties. (see screenshot below)
4 Click/tap on the Location tab, and click/tap on the Move button. (see screenshot below)
5 Browse to and select the Camera Roll folder at the location (ex: "D:\Camera Roll" ) from step 1, and click/tap on Select Folder. (see screenshot below)
6 Click/tap on OK to apply. (see screenshot below)
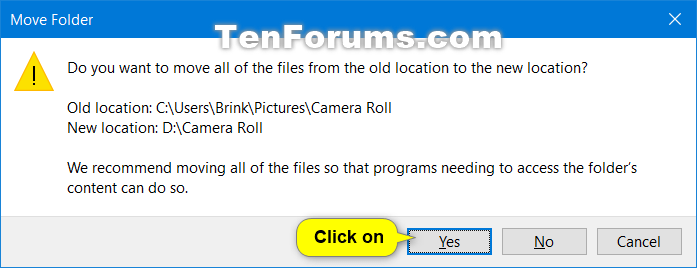
7 Click/tap on Yes to move all the files from the old location to the new location. (see screenshot below)
1 Open File Explorer (Win+E), copy and paste shell:Camera Roll into the address bar, and press Enter to open the current location of the Camera Roll folder.
2 Right click or press and hold on an empty area in the Camera Roll folder, and click/tap on Properties. (see screenshot below)
3 Click/tap on the Location tab, and click/tap on the Restore Default button. (see screenshot below)
4 Click/tap on OK to apply. (see screenshot below)
5 If the Camera Roll folder does not exist at this default location, click/tap on Yes to create it. (see screenshot below)
6 Click/tap on Yes to move all files from the old location to the new location. (see screenshot below)
7 After a brief moment, your Camera Roll folder will be restored to its default location (ex: "C:\Users\Brink\Pictures\Camera Roll").
1 Click/tap on the Download button below to download the BAT file below.
Restore_Camera-Roll_folder_default_location.bat
Download
Contents of .bat file for reference:
Code:taskkill /f /im explorer.exe timeout /t 2 /nobreak >nul if not exist "%UserProfile%\Pictures\Camera Roll" mkdir "%UserProfile%\Pictures\Camera Roll" reg add "HKCU\SOFTWARE\Microsoft\Windows\CurrentVersion\Explorer\User Shell Folders" /v "{AB5FB87B-7CE2-4F83-915D-550846C9537B}" /t REG_EXPAND_SZ /d %%USERPROFILE%%"\Pictures\Camera Roll" /f attrib +r -s -h "%USERPROFILE%\Pictures\Camera Roll" /S /D timeout /t 1 /nobreak >nul start explorer.exe
2 Save the .bat file to your desktop or where you like.
3 Unblock the .bat file, and run the .bat file.
4 You will now notice your screen temporarily go black as a command prompt opens and closes as explorer is restarted to apply the registry changes.
5 Copy any files you wanted from the incorrect Camera Roll folder location into the now restored default C:\Users\<username>\Pictures\Camera Roll folder location.
6 If you like, you can delete the incorrect Camera Roll folder (not restored default folder).
7 When finished, you can delete the downloaded .bat file if you like.
That's it,
Shawn
Related Tutorials
- How to Restore Default Location of Your Personal Folders in Windows 10
- How to Add or Remove Camera Roll Library in Windows 10
- How to Change or Restore Default Location of Saved Pictures Folder in Windows 10
- How to Change or Restore Default Location of Screenshots Folder in Windows 10
Change or Restore Default Location of Camera Roll Folder in Windows 10
-
New #1
I have an unusual problem. The W10 Camera app saves to a "Camera Roll" folder in the account folder of a deleted user. The user is no longer listed in User Accounts, but the folder is still there.
I noticed this when I could not find a video I had made with the Windows Camera app. Trying to open it in the app, I was denied permission. I tried a few different ways and finally got it to open. I was able to manually copy these files to my Camera Roll in the expected location, but they won't save there by default.
Long ago I moved all the default Windows folders such as Documents, Pictures, Videos, etc. from the users folder on the C drive to a new partition on Disk 0 named "K" (thanks to a tutorial here) inside a folder called "Ruekberg" (e.g. pictures are in "K:\Ruekberg\Pictures" etc.). Everything worked fine for the last couple of years.
Earlier this year I had to do an in-place upgrade of Windows 10 to solve some performance issues. I couldn't get access to the Upgrade menus from the Startup menu, until I noticed that I was logging in as a local user "druek" instead of my Microsoft Account username. Both were Administrator accounts. Not sure why I had two accounts. Anyway, once I logged in with my MS Account I was able to do the upgrade. So at some point I had those two user accounts. After the upgrade, I had only the MS Account user account.
All other documents save to the right places, but any pictures or videos I take with Windows Camera go to "K:\druek\Pictures\Camera Roll" instead of "K:\Ruekberg\Pictures\Camera Roll".
Properties in "K:\Ruekberg\Pictures\Camera Roll" show the Location tab, as discussed in the tutorial above. Properties in "K:\druek\Pictures\Camera Roll" do not show the Location tab.
When I go to "Settings-Storage-Change where new content is saved" all the choices point to "RUEKFILES (K:). But since both user account folders for "Ruekberg" and "druek" are on drive K, it doesn't distinguish. (See screenshot.)

In the users folder of the C drive there is a folder called "druek" filled with important looking folders of programs and locations I use, but in fact most of them are empty or have nothing in them of value. Only the OneDrive folder has anything in it; curiously enough, the "Camera Roll" folder has a bunch of pictures in it, but these are duplicates of files already in my actual Pictures folder. Maybe I was experimenting a few years ago with OneDrive. I don't use it any more, and am not signed in.
All of my real documents are in K:\Ruekberg. I would just as soon delete the folder C:\User\druek, but I don't want to screw things up.

I can deal with them being saved to a dumb location (it's really dumb Windows Camera won't let me choose whatever darn location I want to save them in), but I'm denied permission to open them until some magic happens behind the scenes, it's frustrating.
Appreciate any help anyone can offer.Last edited by druekberg; 17 Nov 2020 at 22:46. Reason: Added info
-
New #2
Hello @druekberg,
As a workaround, you could create a hard symbolic link using an option in the tutorial below with "K:\druek\Pictures\Camera Roll" as the source, and "K:\Ruekberg\Pictures\Camera Roll\<new folder>" as the link.
Create Soft and Hard Symbolic Links in Windows
-
New #3
Thanks, Brink, I always appreciate your wisdom. So there's not a safe way to delete the ophaned "druek" account and folder?
-
New #4
It would just keep recreating this "Camera Roll" folder at this incorrect location each time.
The symbolic link is just a workaround to link these two folders for now, but you would need to find and change the source of what is still set to save to this incorrect location by default.
Double check the two registry keys below to make sure the {AB5FB87B-7CE2-4F83-915D-550846C9537B} value in the right pane is showing the correct path.
HKCU\SOFTWARE\Microsoft\Windows\CurrentVersion\Explorer\Shell Folders
HKCU\SOFTWARE\Microsoft\Windows\CurrentVersion\Explorer\User Shell Folders
-
New #5
Hey Brink,
Thanks for the further detail. There's no {AB5FB87B-7CE2-4F83-915D-550846C9537B} listed at either of those locations. However, most of the locations listed are C:\Users\druek. The only ones that point to K:\Ruekberg are default folders such as Documents, Music, Pictures. Since I didn't initially change the Location of some default folders, such as Downloads, Favorites, those are still pointing to C:\Users\druek.
I wonder if it would fix the issue if I move the Location of Pictures back to the default location at C:\Users\druek, and then back to where I prefer it at K:\Ruekberg.
Otherwise I will do the hard symoblic link thing. It's not a huge issue. I was worried that the druek account was an orphan. It must be the original account I used to set up Windows 10 initially, but now it is hiding in the shadow of my Microsoft Account.
I can post screenshots of those two HKCU\SOFTWARE\ folders you mentioned, if it helps, but I don't want to waste your time.
-
New #6
I would try moving the location of any folder showing the incorrect path to the correct one first.
Restore Default Location of Personal Folders in Windows 10
-
New #7
Hi
The 'Location' tab is missing in the Camera Roll properties on Windows 11. Is there another location there?
Thanks
YW71
-
-
-
New #9
Hi,
I've also got a problem with my Camera Roll folder and have been searching to find a solution.
Sometime ago I moved the location of my Pictures folder to a new larger HDD E: , as my SSD C: drive was getting very full via the save where new content is saved option under storage. This worked fine (saving photos from my iPhone in the Camera Roll folder in
Pictures) until somehow the files started saving back to my Pictures folder on the C: drive again but in a folder called Camera Roll - Copy! I also have a folder in there called Camera Roll - Copy(2). I managed to delete them but they keep reappearing and my photos are still being saved there.
When I look at the storage screen and via shell:Camera Roll it still shows the path as on the HDD E: but photos are not saving there.
I looked at process explorer and ApplePhotoStreams.exe and iCloudPhotos.exe are listed along side the Camera Roll - Copy(2) in the C: drive folder, if this is any help!
Please can someone help me to get my phone photos back to saving in the correct folder and get rid of the Camera Roll Copy folders?

Change or Restore Default Location of Camera Roll Folder in Windows 10
Published by Shawn BrinkCategory: Customization08 Sep 2020


 Quote
QuoteTutorial Categories

Related Discussions
