

How to make TeamViewer more secure
TeamViewer is a comprehensive, remote access, remote control and remote support solution that works with almost every desktop and mobile platform, including Windows, macOS, Android, and iOS. TeamViewer lets you remote in to computers or mobile devices located anywhere in the world and use them as though you were there. Plus, you can remotely connect to servers, commercial-grade machines, and IoT devices from anywhere, at any time through our secure global remote access network.
TeamViewer when initially installed is not a very secure application. It's designed for ease-of-use with basic security features that give you minimal protection against hackers. TeamViewer has many security features you can turn on and setup to go from a minimally secure TeamViewer experience to a very secure experience.
Not everyone needs all the security features enabled. You need to decide which ones are applicable to your situation.
For example, you wouldnt want to turn on the feature that requires a user at the target computer to accept the incoming TeamViewer request if youre connecting to an unattended computer.
Contents
- Part One: Start TeamViewer only when you need it
- Part Two: Assign a secure password
- Part Three: Using Black and White lists
- Part Four: Using Two Factor Authentication (2FA
- Part Five: Using Unattended mode
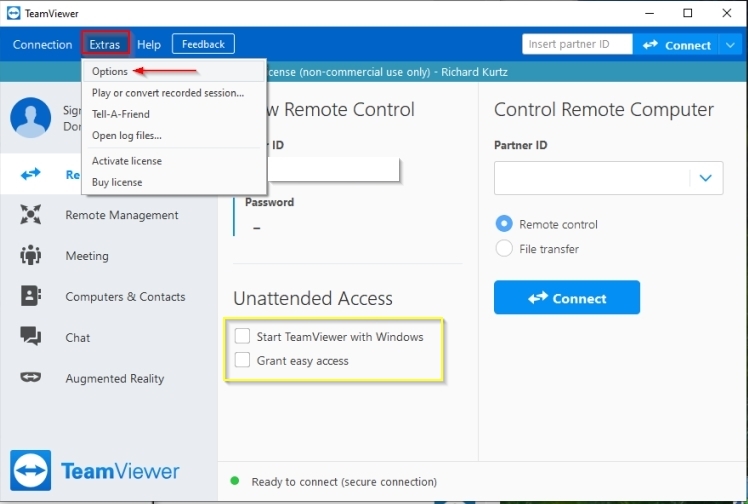
1.1 If TeamViewer is set to always run, exit it. You will start TeamViewer only when you need to use it. There is no reason to leave it running unless you are on a unattended computer that will be remotely controlled by another computer via TeamViewer which in itself is a very secure setup.
1.2 Make sure Start TeamViewer with Windows and Grant easy access are unchecked (yellow rectangle) below.
By default, TeamViewer generates a simplistic number/character password each time it's started, often reusing the same password. The format is nnccnncc where n is a number from 0 to 9 and c is a character from a to z so you end up with passwords like 23ad85ul. This may be hard for a person to guess but very easy for a computer to guess.
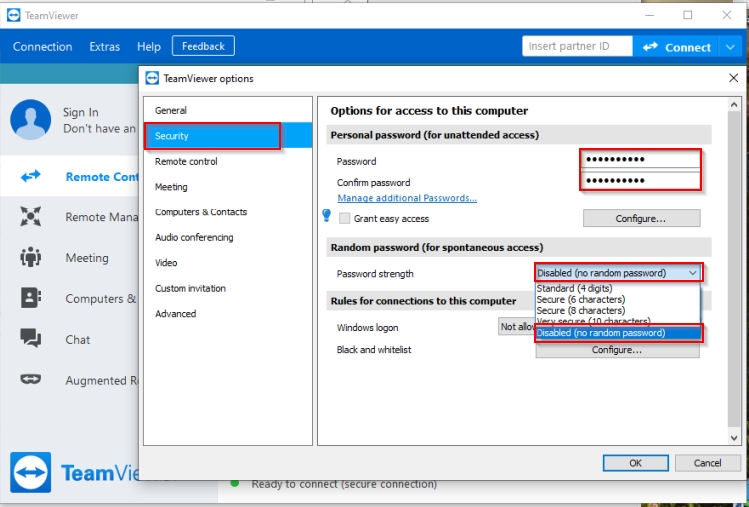
2.1 Click on Extras at the top then Options in the drop down and then Security at left (2nd image).
2.2 Enter a good, strong Password and matching Confirm Password of a minimum 10 to 12 characters with at least one number and special character.
2.3 Disable the random password generation in the Password strength drop-down. Click OK to save your changes.
3.1 What is a Blacklist?
The Blacklist generally lets you prevent certain partners or devices from establishing a connection to your computer. TeamViewer accounts or TeamViewer IDs on the blacklist cannot connect to your computer.
You will still be able to set up outgoing TeamViewer sessions with partners on the blacklist.
3.2What is a Whitelist?
If you add TeamViewer accounts to the Whitelist, only these accounts will be able to connect to your computer. The possibility of a connection to your computer through other TeamViewer accounts or TeamViewer IDs will be denied.
For detailed information, see this article on the TeamViewer site: Blacklists and Whitelists
Information
2FA is an extra layer of security used to make sure that people trying to gain access to an online account are who they say they are. First, a user will enter their username and a password. Then, instead of immediately gaining access, they will be required to provide another piece of information. This second factor could come from one of the following categories:
- Something you know: This could be a personal identification number (PIN), a password, answers to secret questions or a specific keystroke pattern
- Something you have: Typically, a user would have something in their possession, like a credit card, a smartphone, or a small hardware token
- Something you are: This category is a little more advanced, and might include biometric pattern of a fingerprint, an iris scan, or a voice print
With 2FA, a potential compromise of just one of these factors wont unlock the account. So, even if your password is stolen or your phone is lost, the chances of a someone else having your second-factor information is highly unlikely. Looking at it from another angle, if a consumer uses 2FA correctly, websites and apps can be more confident of the users identity, and unlock the account.
Taken from: What Is Two-Factor Authentication (2FA)? - Authy
Here is an excellent tutorial on Two-factor authentication on the TeamViewer web site:
What is two-factor authentication for your TeamViewer account?
It covers the following topics.
2FA requires you to have a TeamViewer account which I also highly recommend. It only takes a few minutes to setup (I use my Gmail account).This article applies to all TeamViewer free users and customers with a Business, Premium, Corporate or Tensor plan.
General
Activate two-factor authentication
Video tutorial to activate two-factor authentication
How to get the security code?
Further reading
The Advantages of Creating a TeamViewer Account
- Saving, management and easy access of Computers & Contacts, as well as the possibility to initiate connections for remote control, file sharing, chat, video calls or presentations without the need to type in their IDs.
- Chat functionalities.
- Access to the Management Console and all associated functionalities, e.g. customized TeamViewer modules, Service Queue or TeamViewer Policies.
- The ability to take your account and license with you wherever you go and whatever computer you use
- Usage of TeamViewer integrations, such as Salesforce, Jira, Outlook, and many more.
- The ability to assign devices to your account for remote monitoring and management without the necessity of a password
That's it. Now when you connect to this computer using TeamViewer, assuming it's running, you should get right in and assume control. No
Note
Much of the information for this tutorial section on unattended use was garnered from this article on the TeamViewer web site. It was not plagiarized, I took a lot of time to read and understand it then wrote this tutorial as I understood how it worked. All errors are mine, unless of course the original material was in error.
The following is done on the partner computer that you intend to help. It can be done on multiple partner computers if you are helping different people at different times. It's fairly easy to setup, is the most secure method of accessing a remote partner computer and if it's setup right, that computer is accessible 24/7.
5.1 Make sure you have disabled random passwords as described in step 2.3 above.
5.2 Remove personal passwords you have set.
This is optional and suggested if this computer is assigned to (or will be assigned to) a TeamViewer account (see step x.x) which is the most secure method I can recommend.
You remove the password by removing the dots in Password and Confirm Password fields (shown in step 2.2).
You can choose to leave the passwords and not include the device in a TeamViewer account, then you would have to supply that password each time you connected to this computer. It would still run unattended, it would just require a password at each connection. This is less secure.
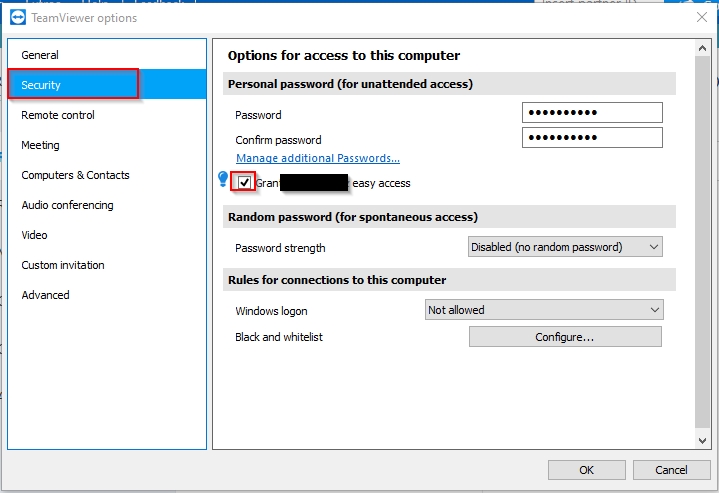
5.3 Grant Easy Access for your account (optional)
You can assign the computer to your TeamViewer account under Options, General, Account assignment. Enter the TeamViewer account credentials you want this computer assigned to in the window that opens:
This is what the Account Assignment area looks like once this is completed. It will tell you what TeamViewer account this computer is assigned to.
Check the checkbox Grant accountname easy access as shown:
action is required by your partner on that computer.
How to make TeamViewer more secure

How to make TeamViewer more secure
What you can do to make using TeamViewer more securePublished by Rich KurtzCategory: Apps & Features
11 Jun 2020


 Quote
QuoteTutorial Categories

Related Discussions
