

How to Delete Recovery Partition in Windows 10
In Windows 10, there can be a Windows recovery partition or computer manufacturer OEM factory recovery partition available on the Windows disk.
- The Windows recovery partition allows you to boot into Windows recovery environment (WinRE) to restore your computer when problems happen.
- The OEM recovery partition allows you to press a specific key (usually F9 for HP and F12 for Dell) to recover your computer to the factory default settings. This partition is usually around 12-18 GB, and much larger than the Windows recovery partition.
Windows Recovery Environment (WinRE) is a recovery environment that can repair common causes of unbootable operating systems. By default, WinRE is preloaded into the Windows 10 for desktop editions (Home, Pro, Enterprise, and Education).
WinRE includes these tools:
- Automatic repair and other troubleshooting tools. For more info, see Windows RE Troubleshooting Features.
- System Restore
- Startup Repair
- Uninstall Updates
- Command Prompt at boot
- System Image Recovery
- UEFI Firmware Settings
- Go back to the previous build of Windows
- Push-button reset. This tool enables your users to repair their own PCs quickly while preserving their data and important customizations, without having to back up data in advance. For more info, see Push-Button Reset Overview.
The default partition layout for UEFI-based PCs is: a system partition, an MSR, a Windows partition, and a recovery tools partition.
If you have more than one recovery partition (ex: Windows created a second one) or have an obsolete or no longer needed factory recovery partition, then you can delete the recovery partition to reclaim disk space.
This tutorial will show you how to safely delete the Recovery Partition in Windows 10.
You must be signed in as an administrator to delete a recovery partition.
The Recovery Partition will automatically be restored by any of the following:
1) Feature Update via Windows Update
2) Repair Install
3) Refresh Windows 10
4) Reset Windows 10
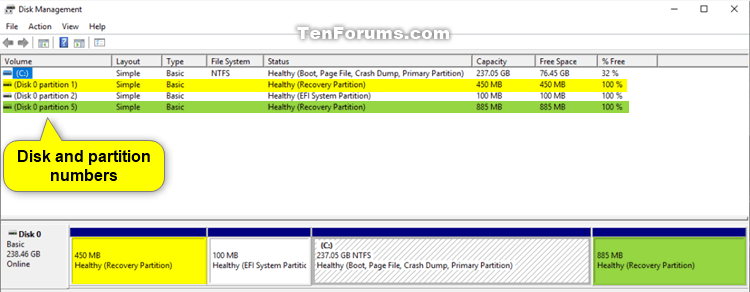
EXAMPLE: Recovery Partition in Windows 10

EXAMPLE: Advanced Start Options at boot from recovery partition

Here's How:
1 Open an elevated command prompt.
2 Copy and paste thereagentc /infocommand into the elevated command prompt, and press Enter. (see screenshot below step 3)
The
reagentc /infocommand will only show you the disk number (ex: "Disk 0") and partition number (ex: "Partition 4") of the recovery partition currently being used by Windows.
If you have multiple recovery partitions and want to delete a recovery partition other than the currently used one, use the method in the note box under step 3 instead.
3 Make note of the disk number (ex: "Disk 0") and partition number (ex: "Partition 4") for the Windows RE location. (see screenshot below)
You can also open Disk Management (diskmgmt.msc), and look under the Volume column at the top to ID the disk number (ex: 0) and partition number (ex: 1 or 5) of the recovery partition you want to delete.
4 Copy and paste thereagentc /disablecommand into the elevated command prompt, and press Enter to disable WinRE.
5 Copy and paste thediskpartcommand into the elevated command prompt, and press Enter. (see screenshot below step 10)
6 Copy and paste thelist diskcommand into the elevated command prompt, and press Enter. (see screenshot below step 10)
7 Type the command below into the elevated command prompt, and press Enter. (see screenshot below step 10)
select disk <number>
Substitute <number> in the command above with the actual disk number (ex: "0") from step 3.
For example:select disk 0
8 Copy and paste thelist partitioncommand into the elevated command prompt, and press Enter. (see screenshot below step 10)
This command will also allow you to see the partition number of any Recovery partition(s) on the disk.
9 Type the command below into the elevated command prompt, and press Enter. (see screenshot below step 10)
select partition <number>
Substitute <number> in the command above with the actual partition number (ex: "4") from step 3.
For example:select partition 4
10 Copy and paste thedelete partition overridecommand into the elevated command prompt, and press Enter. (see screenshot below)
11 You can now close the elevated command prompt if you like.
12 The deleted Recovery Partition will now show as Unallocated space on the disk that you can extend another partition into, or what you like. (see screenshot below)
That's it,
Shawn Brink
Related Tutorials
- How to Enable or Disable Windows Recovery Environment (WinRE) in Windows 10
- How to Delete Volume or Partition in Windows 10
- How to Boot to Advanced Startup Options in Windows 10
- How to Create a Bootable USB Recovery Drive in Windows 10
- How to Create Bootable USB Flash Drive to Install Windows 10 from
- How to Create a Recovery Image used to Reset Windows 10
- How to create a custom bootable recovery partition to restore Windows
How to Delete Recovery Partition in Windows 10
-
New #1
Hi Brink, I have a recovery partition at the beginning of the disk which if cleaned/deleted I cannot extend or move any other partition back into in. Is this possible?
I’d like to just move the unallocated partition to after the C partition so that I can extend it into this unallocated space. I’ve tried EaseUS but that won’t allow me to do this either, I suspect it’s not possible.
Thanks.
-
New #2
Hello Virginia,
Some 3rd party disk management programs may allow you to extend the C partition into the unallocated space, but not all.
Usually when the unallocated space is on the far left, it's better to clean install Windows to get the partitions aligned correctly again. Starting with Windows 10 2004, the Recovery Partition gets created on the far right end now to make it easier to extend into the unallocated space.
Personally, I would just leave the recovery partition for now since it's on the far left until you are able to clean install next.
-
-
New #4
The problem is due to the MSR partition which cannot be moved even by tools like Minitool Partition Wizard.
The only way I know of sorting this is to image backup the drive with good old Macrium Reflect (to rescue as always), then restore partitions in following order using drag and drop i.e.
EFI, MSR, Recovery Drive, C Drive. This way Cdrive can then be expanded to fill unallocated space to its right from disk management (option in Macrium Reflect iirc as well).
You can put partitions in 2004 order i.e. C drive, Recovery drive, but then you need to use something like Minitool Partition Wizard to move Recovery to right so C drive should be expanded.
The new 2004 order is easier to manage now as the EFI and MSR partions are fixed.
-
-
-

How to Delete Recovery Partition in Windows 10
Published by Shawn BrinkCategory: Hardware & Drivers22 Mar 2022


 Quote
QuoteTutorial Categories

Related Discussions
