

How to Change Compatibility Mode Settings for Apps in Windows 10
Most apps created for earlier versions of Windows will work in this version of Windows, but some older apps might run poorly or not at all. You can try using compatibility mode or run the Program Compatibility Troubleshooter on most programs to detect and fix common compatibility problems.
Starting with Windows 10 build 15002, Microsoft enabled high-DPI support improvements by default for some Windows desktop apps, you can now enable them yourself for other GDI-based applications, too! To do this, youll need to find the applications .exe file, right-click on it, and select Properties. Go to the Compatibility tab, and turn on System (Enhanced) DPI scaling, and click OK. This setting overrides the way that applications handle DPI scaling (which sometimes uses bitmap stretching and can result in applications rendering blurry) and forces them to be scaled by Windows. The setting that was previously labeled "Disable display scaling on high DPI settings" is now referred to as Application scaling. This works only for apps that use GDI.
Starting with Windows 10 build 21354, you can now toggle compatibility settings for x64 applications on ARM64 devices.
Starting with Windows 10 build 21382, Microsoft has added a new Use legacy display ICC color management compatibility feature that lets these apps get accurate color and access the full gamut of your HDR display. This flag only has an effect in HDR mode. HDR mode changes the behavior of some creative and artistic apps that use International Color Consortium (ICC) display color profiles, such as Adobe Photoshop, Adobe Lightroom Classic, and CorelDraw (amongst others). In the past, these apps were limited to targeting the sRGB color gamut.
See also:
- Make older apps or programs compatible with Windows 10 | Windows Support
- High-DPI Scaling Improvements for Desktop Applications in the Windows 10 Creators Update - Building Apps for Windows
- High DPI Desktop Application Development on Windows | Microsoft Docs
If changing compatibility settings doesn't fix the problem, try the following.
- Go to the support website for the app developer, and check if a new or updated version of this app is available for Windows 10.
- Windows 10 application compatibility - downloads, tips, support | Windows 10
This tutorial will show you how to change compatibility mode settings on older desktop apps for your account or all users in Windows 10.
Dont use compatibility mode on antivirus programs, firewall software, backup software, disk utilities, or on system programs that came with Windows. This might cause data loss or create a security risk.
For a Windows 11 version of this tutorial, see:
Enable or Disable Run App in Compatibility Mode in Windows 11
Contents
- Option One: To Manually Change Compatibility Mode Settings for an App in Properties
- Option Two: Automatically Change Compatibility Mode Settings for App in Program Compatibility Troubleshooter
- Option Three: To Manually Change Compatibility Mode Settings for an App in Registry Editor
1 Right click or press and hold on the .exe file or shortcut of a classic app (desktop) that you want to change compatibility mode settings for, and click/tap on Properties.
2 Do step 3 (current account) or step 4 (all users) below for how you want to apply the compatibility settings.
A) Click/tap on the Compatibility tab, and go to step 5 below. (see screenshot above)
You must be signed in as an administrator to be able to do this step.
A) Click/tap on the Compatibility tab, click/tap on the Change settings for all users button, and go to step 5 below. (see screenshot below)
5 Do step 6 (on) or step 7 (off) below for what compatibility mode you would like to use.
Runs the app using settings from a previous version of Windows. Try this setting if you know the app is designed for (or worked in) a specific version of Windows.
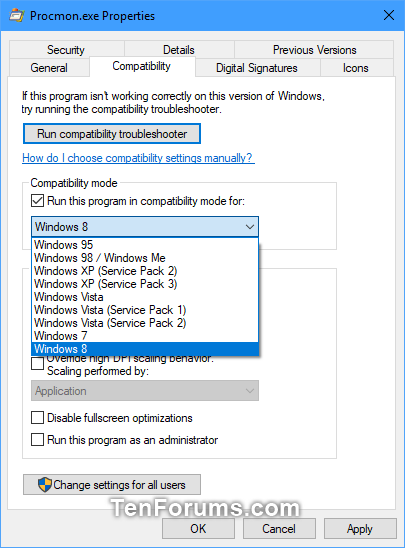
A) Check the Run this program in compatibility mode for box, select the latest version of Windows that you know the app is designed for or worked in, and go to step 8 below. (see screenshot below)
This is the default setting.
A Uncheck the Run this program in compatibility mode for box, and go to step 8 below. (see screenshots below step 6)
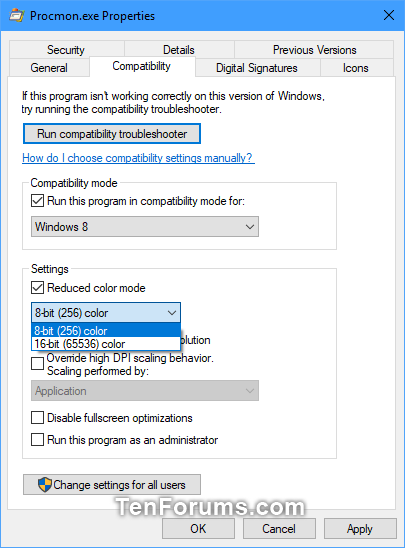
8 Under Settings, check or uncheck the ones you want, and click/tap on OK when finished. (see screenshots and table below)
Settings Description Reduced color mode Uses a limited set of colors in the program. Some older programs are designed to use fewer colors. Run in 640 × 480 screen resolution Try this setting if the graphics for the program appear jagged or are rendered improperly. Override high DPI scaling behavior (build 15002) You can select to override high DPI scaling behavior if scaling to have scaling performed by either Application, System, or System (Enhanced). Override system DPI (build 17063) This override setting will allow Windows to instead report the current DPI of the main monitor when the "application starts" or at "Windows logon" Disable fullscreen optimizations Improves compatibility of the full screen apps. Run this program as an administrator To always run the program elevated as administrator. If you aren't signed in to your PC as an administrator, this option is unavailable. Use legacy display ICC color management Lets these apps get accurate color and access the full gamut of your HDR display. This flag only has an effect in HDR mode. HDR mode changes the behavior of some creative and artistic apps that use International Color Consortium (ICC) display color profiles, such as Adobe Photoshop, Adobe Lightroom Classic, and CorelDraw (amongst others). In the past, these apps were limited to targeting the sRGB color gamut. 


1 Do step 2 (context menu), step 3 (properties), or step 4 (Control Panel) below for how you would like to open the Program Compatibility Troubleshooter.
2 Right click or press and hold on a desktop app or it's shortcut that you want to change compatibility mode settings for, click/tap on Troubleshoot compatibility, and go to step 5 below. (see screenshot below)
3 Right click or press and hold on a desktop app or it's shortcut that you want to change compatibility mode settings for, and click/tap on Properties.
A) Click/tap on the Compatibility tab, click/tap on the Run compatibility troubleshooter button, and go to step 5 below. (see screenshot below)
4 Open the Control Panel (icons view), and click/tap on the Troubleshooting icon.
A) Click/tap on the Run programs made for previous versions of Windows link. (see screenshot below)
B) Click/tap on Advanced, and click/tap on Next. (see screenshot below)
C) Uncheck Apply repairs automatically, and click/tap on Next. You will need to be signed in as an administrator to be able to use the Run as administrator option if you like. (see screenshot below)
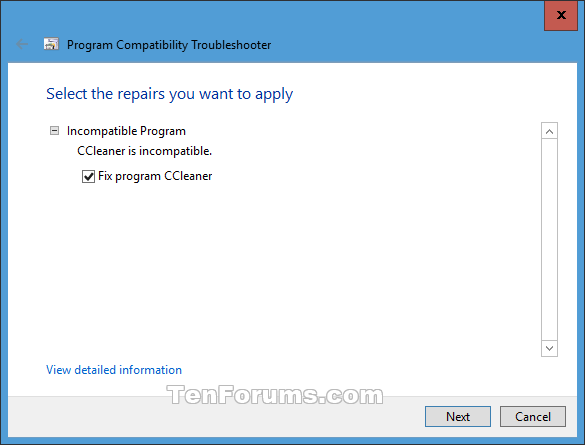
D) Select the app (ex: CCleaner) you are having compatibility issues with, and click/tap on Next. (see screenshot below)
E) Check Fix program box, click/tap on Next, go to step 5 below. (see screenshot below)
5 Click/tap on the troubleshooting option you want to use. (see screenshot below)
6 Follow the rest of the onscreen instructions in the troubleshooter until you are finished troubleshooting the compatibility issue with the selected app.. (see screenshots below)
1 Press the Win + R keys to open Run, type regedit into Run, and click/tap on OK to open Registry Editor.
2 If prompted by UAC, click/tap on Yes.
3 In regedit, navigate the location below that you want to use. (see screenshot below)
If the Layers key is not there, then right click or press and hold on the AppCompatFlags key, click/tap on New, click/tap on Key, type Layers, and press Enter.
(for current user only)
HKEY_CURRENT_USER\Software\Microsoft\Windows NT\CurrentVersion\AppCompatFlags\Layers
OR
(for all users)
HKEY_LOCAL_MACHINE\SOFTWARE\Microsoft\Windows NT\CurrentVersion\AppCompatFlags\Layers
4 Do step 5 (set) or step 6 (remove) below for what you would like to do.
A) In the right pane of Layers, right click or press and hold on an empty area, then click/tap on New, and click/tap on String Value. (see screenshot above)
B) Type in the full path of the app's exe file (ex: "C:\Program Files\CCleaner\CCleaner.exe") you want to change compatibility settings for, press Enter, then double click/tap on the full path in the right pane to modify it. (see screenshot below step 3)
C) Type in a one or more combinations of data values from the table below for how you want to run the program as, click/tap on OK, and go to step 7 below. (see screenshot below)
If you use more than one compatibility setting, then you must enter them like below in the order they are listed in the table below.
~ [Privilege Level] + [Settings (value(s) with space between)] + [Compatibility Mode (only one)]
EXAMPLE ONE:
To run a program as if it was in Windows Vista SP2 (Compatibility mode), and Reduced color mode 16-bit (Settings), and to run as administrator (Privelege level) you would type this exactly:
~ RUNASADMIN 16BITCOLOR VISTASP2
EXAMPLE TWO:
If say you also wanted to add Run in 640 x 480 screen resolution (Settings) with the above example, you would type this exactly:
~ RUNASADMIN 640x480 16BITCOLOR VISTASP2
Settings Data value Disable fullscreen optimizations DISABLEDXMAXIMIZEDWINDOWEDMODE Run this program as an administrator RUNASADMIN Run in 640 x 480 screen resolution 640X480 Override system DPI (build 17063)
Windows logon
Application start-
PERPROCESSSYSTEMDPIFORCEOFF
PERPROCESSSYSTEMDPIFORCEONOverride high DPI scaling behavior. (build 15002)
Scaling performed by: Application
Scaling performed by: System
Scaling performed by: System (Enhanced)-
HIGHDPIAWARE
DPIUNAWARE
GDIDPISCALING DPIUNAWAREReduce color mode (8-bit 256) 256COLOR Reduce color mode (16-bit 65536) 16BITCOLOR Use legacy display ICC color management TRANSFORMLEGACYCOLORMANAGED
Compatibiliy mode Data value Windows 95 WIN95 Windows 98 / Windows ME WIN98 Windows XP (Service Pack 2) WINXPSP2 Windows XP (Service Pack 3) WINXPSP3 Windows Vista VISTARTM Windows Vista (Service Pack 1) VISTASP1 Windows Vista (Service Pack 2) VISTASP2 Windows 7 WIN7RTM Windows 8 WIN8RTM
A) In the right pane of Layers, right click or press and hold on the full path of the app (ex: "C:\Program Files\CCleaner\CCleaner.exe") you want to remove compatibility settings for, and click/tap on Delete. (see screenshot below step 3)
B) Click/tap on Yes to confirm, and go to step 7 below. (see screenshot below)
7 When finished, you can close Registry Editor.
That's it,
Shawn Brink
Related Tutorials
- How to Add or Remove Compatibility Tab on Properties Page in Windows
- How to Add or Remove Troubleshoot Compatibility Context Menu in Windows 10
- How to Run an App as Administrator in Windows 10
- How to Turn On or Off Fix Scaling for Apps that are Blurry in Windows 10
- How to Enable or Disable Fullscreen Optimizations for Apps and Games in Windows 10
- How to See DPI Awareness of Running Apps in Task Manager in Windows 10
Change Compatibility Mode Settings for Apps in Windows 10

Change Compatibility Mode Settings for Apps in Windows 10
How to Change Compatibility Mode Settings for Apps in Windows 10Published by Shawn Brink
21 Sep 2022


Tutorial Categories

Related Discussions
