

How to Remove Display from Desktop in Windows 10
If you are running the Windows 10 Enterprise or the Windows 10 Pro for Workstations editions, a new Remove display from desktop feature allows you to use your monitor as a Specialized Display. A monitor is categorized as specialized if it is neither intended to be used as a desktop monitor nor as a head-mounted display.
The Specialized Display feature enables a display to be dedicated to a specific purpose, such as:
- Fixed-function arcade/gaming rigs like cockpit/driving/flight/military simulators
- Medical imaging devices that have custom panels (e.g. grayscale X-ray displays)
- Dedicated video monitoring scenarios (e.g. Avid Pro)
- Monitor panel testing and validation (e.g. in the factory)
- Video walls
See also:
- Specialized Displays in Windows 10 Enterprise and Windows 10 Pro for Workstations | Microsoft Docs
- Set up dual monitors on Windows 10 | Microsoft Support
- How to use multiple monitors in Windows 10 | Microsoft Support
You can also use this to prevent Windows 10 from using a connected display without having to disconnect the display, and then easily allowing Windows 10 to use the display again when wanted.
This essentially allows you to remove and restore a connected external display on demand without having to physically disconnect and reconnect the display OR turn on or off the display power.
This tutorial will show you how to remove a display from desktop to prevent Windows 10 from using the display, and restore when wanted.
Contents
- Option One: Remove Display from Desktop in Settings
- Option Two: Remove Display from Desktop in NVIDIA Control Panel
You must be signed in as an administrator to use this option.
This options is only available in the Windows 10 Enterprise or Windows 10 Pro for Workstations editions.
Otherwise you will need to use Option Two instead.
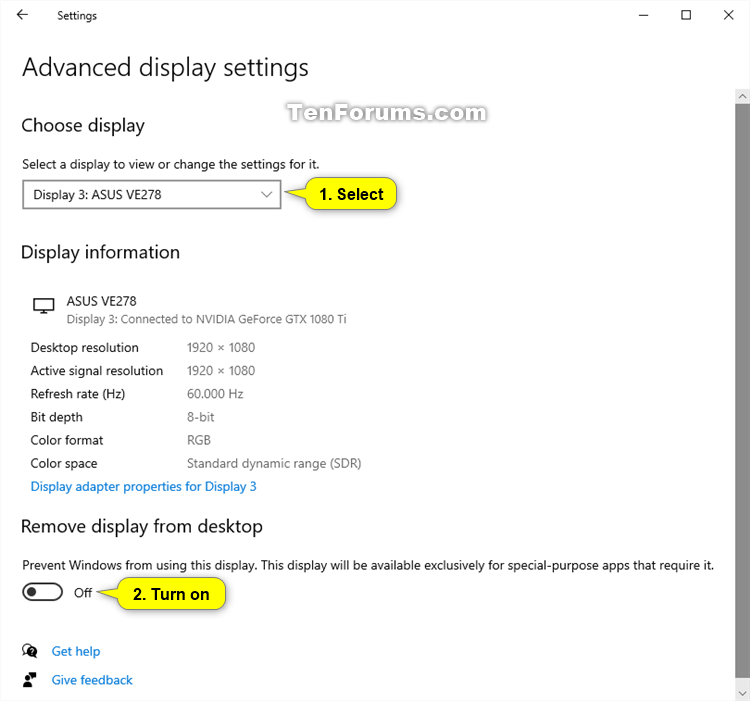
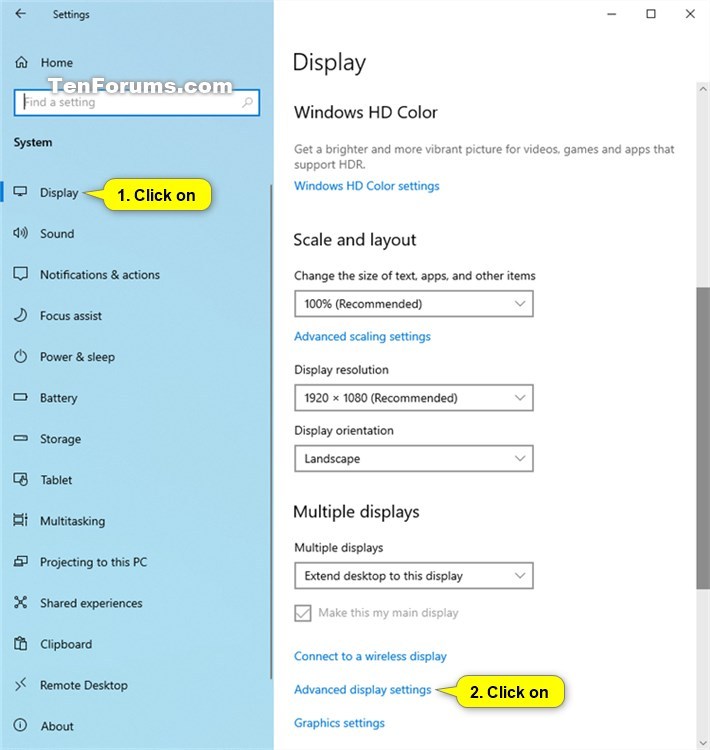
1 Open Settings, and click/tap on the System icon.
2 Click/tap on Display on the left side, and click/tap on the Advanced display settings link on the right side towards the bottom. (see screenshot below)
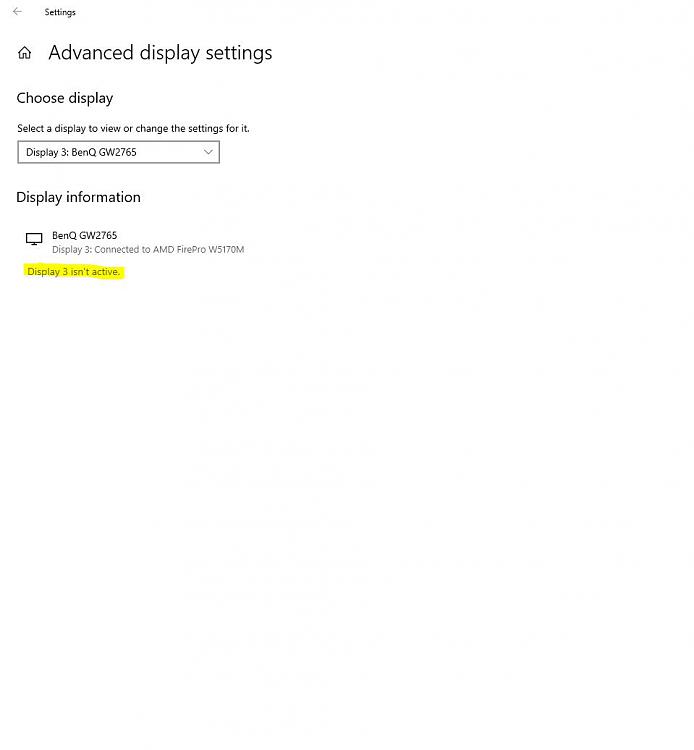
3 Select a display you want to remove or restore in the Choose display drop menu. (see screenshots below)
4 Turn on (remove) or off (restore) Remove display from desktop for what you want depending on the current state of the display. (see screenshots below)
5 You can now close Settings if you like.
This option is only available if you have NVIDIA graphics and drivers installed.
This option is independent from Option One, and will not allow you to use the monitor as a Specialized Display.
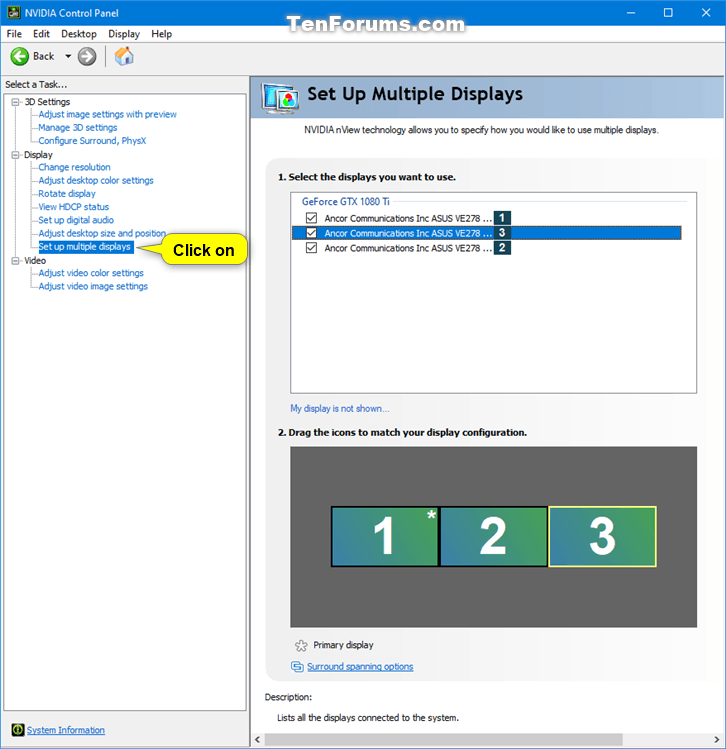
1 Open the NVIDIA Control Panel (ex: from desktop context menu or notification icon).
2 Click/tap on the Set up multiple displays link under Display in the left pane. (see screenshot below)
3 Under Select the displays you want to use on the right side, check (restore) or uncheck (remove) the displays for what you want, and click/tap on Apply. (see screenshot below)
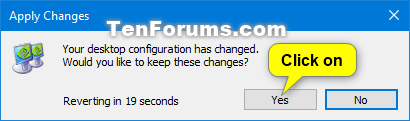
4 Click/tap on Yes in the Apply Changes dialog when prompt to confirm. (see screenshot below)
If needed, your changes will automatically revert in 20 seconds if you wait and do not click/tap on Yes before this time is up.
5 You can now close the NVIDIA Control Panel if you like.
That's it,
Shawn Brink
Related Tutorials
- How to View Detailed Display Information in Windows 10
- How to Clear and Reset External Display Cache in Windows 10
- How to Restart Video Graphics Driver of Display Adapter in Windows 8 and Windows 10
- How to Change Presentation Mode to Project Display in Windows 10
- How to Change Turn Off Display After Time in Windows 10
- How to Set a Display as Main Display in Windows 10
- How to Change Display Orientation in Windows 10
- How to Change Brightness of Built-in Display in Windows 10
- How to Change Screen Resolution of a Display in Windows 10
- How to Change DPI Scaling Level for Displays in Windows 10
- How to Change Screen Refresh Rate of a Display in Windows 10
- How to Calibrate Display Color in Windows 10
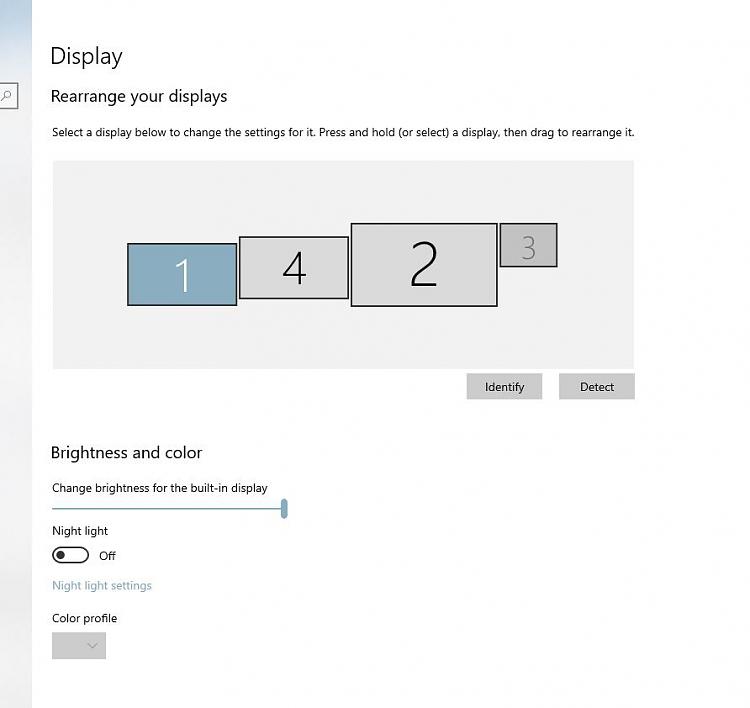
- How to Rearrange Multiple Displays in Windows 10
How to Remove Display from Desktop in Windows 10
-
New #1
thanks for the tuto
Personnally I use https://www.nirsoft.net/utils/multi_monitor_tool.html in a batch file
-
-
New #3
Hello. I tried following your directions above for Option 1 (I don't have NVIDIA for Option 2) and when I get to step 3, I don't have an option for step 4 to complete this task to remove my inactive monitor. See attached image for what I do have.
This happened the other day when Microsoft remoted into my computer to try and fix an issue and after the session ended, this is the result.
Let me describe my working environment. I'm in office and my laptop is on a docking station and I keep it closed and work with the two large monitors in my office. After my session with Microsoft, only one of the monitors was showing anything on the screen. When I opened my laptop, now all screens were working, but I don't want to keep my laptop open, since I don't use it's monitor/keyboard, when docked in office. I'm trying to get my monitors to turn on how they were when my laptop is closed, both my monitors are on (showing a display). Any way to fix this issue? Thanks in advance. I also include two images showing how the displays are listed when the laptop is opened and closed. Monitor 4 is the one I want to stay on when the laptop is closed.

-
New #4
The NVCP steps in this guide do not in any way correlate to the "Remove Display from Desktop" feature, it is instead the equivalent of disabling display extension or duplication.
How to Remove Display from Desktop in Windows 10
Published by Shawn BrinkCategory: Hardware & Drivers10 Jul 2022


 Quote
Quote


Tutorial Categories

Related Discussions
