

How to Enable or Disable Cellular Data Roaming in Windows 10
Some Windows 10 devices have a SIM card and/or eSIM in them that lets you connect to a cellular data network (aka: LTE or Broadband), so you can get online in more places by using a cellular signal.
If your Windows 10 device doesnt have a SIM card or eSIM, you can still connect to a cellular network by plugging in an external cellular device (also called a cellular modem or mobile broadband device). However, these external cellular devices will often have their own settings instead of being able to use the built-in Settings > Network & Internet > Cellular settings in Windows 10.
Users can choose if your cellular data connection stays on when your Windows 10 device is outside your mobile operator's network. Selecting Don't roam will prevent data roaming charges by automatically turning off your cellular data connection when entering a roaming area. If you do allow roaming, you can use cellular data when your Windows 10 device is in a roaming area. Depending on your data plan, you might pay more for data you use when roaming.
See also:
- Add your Windows 10 PC to your mobile account to get online | Windows Support
- Cellular settings in Windows 10 | Windows Support
- Use an eSIM to get a cellular data connection on your Windows 10 PC | Windows Support
- Set up the LTE connection on your Surface | Surface Support
This tutorial will show you how to enable or disable cellular data roaming in Windows 10.
If you turn off cellular, you will be disconnected from all cellular data networks.
If you turn on airplane mode, it will automatically turn off all cellular, Wi-Fi, and Bluetooth wireless communication. However, you will still be able to turn on or off your individual Wi-Fi and Bluetooth communications.
You must have a data plan from a mobile operator to connect to a cellular data network.
Contents
- Option One: Enable or Disable Cellular Data Roaming in Settings
- Option Two: Enable or Disable Cellular Data Roaming in Local Group Policy Editor
- Option Three: Enable or Disable Cellular Data Roaming using a REG file
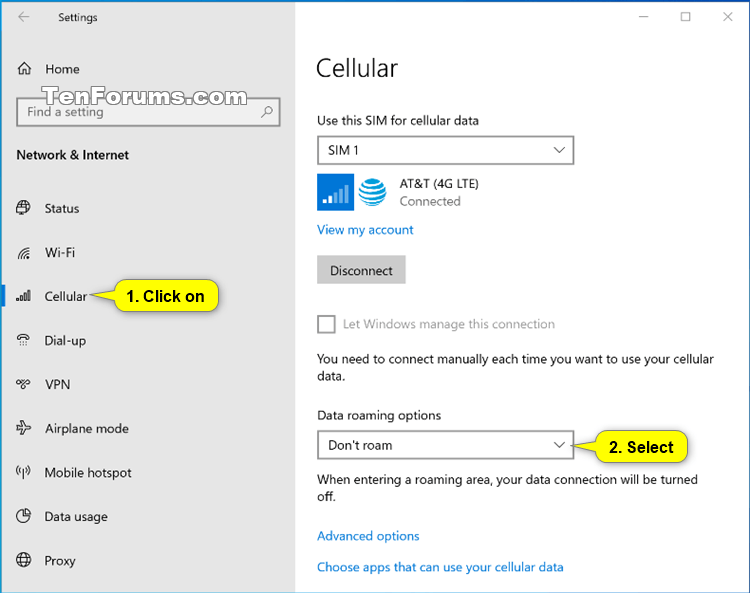
1 Open Settings, and click/tap on the Network & Internet icon.
2 Click/tap on Cellular on the left side, select Don't roam (default) or Roam for what you want in the Data roaming options drop menu on the right side. (see screenshots below)
This setting will modify the DWORD value in the registry key below.
HKEY_LOCAL_MACHINE\SOFTWARE\Microsoft\WwanSvc\RoamingPolicyForPhone\{GUID}
NOTE: The {GUID} key will be unique per system and per cellular data connection.
InternetAlwaysOn DWORD
18000 (hex) = Don't roam
18002 (hex) = Roam
3 You can now close Settings if you like.
You must be signed in as an administrator to do this option.
The Local Group Policy Editor is only available in the Windows 10 Pro, Enterprise, and Education editions.
All editions can use Option Three for this same policy.
1 Open the Local Group Policy Editor.
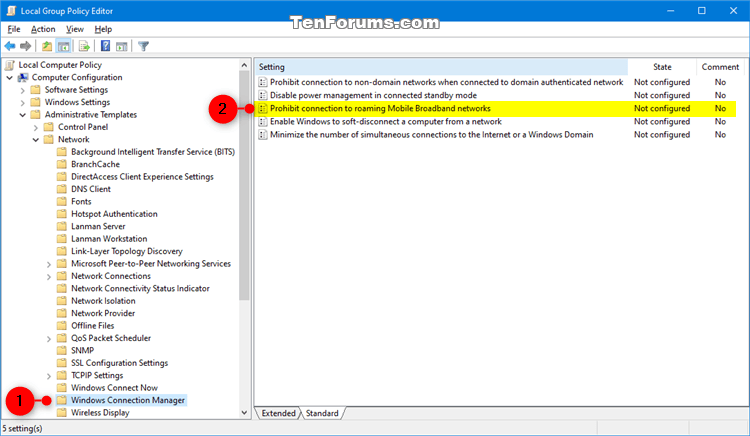
2 In the left pane of Local Group Policy Editor, navigate to the location below. (see screenshot below)
Computer Configuration > Administrative Templates > Network > Windows Connection Manager
3 In the right pane of Windows Connection Manager in Local Group Policy Editor, double click/tap on the Prohibit connection to roaming Mobile Broadband networks policy to edit it. (see screenshot above)
4 Do step 5 (enable) or step 6 (disable) below for what you would like to do.
This setting will allow users to be able to select Don't roam or Roam in Option One.
A) Select (dot) Not Configured or Disabled, click/tap on OK, and go to step 7 below. (see screenshot below)
Not Configured is the default setting.
This setting will disable cellular data roaming and gray out the Data roaming options setting in Option One.
7 When finished, you can close the Local Group Policy Editor if you like.
You must be signed in as an administrator to do this option.
This option is for the same policy in Option Two.
The downloadable .reg files below will modify the DWORD values in the registry keys below.
HKEY_LOCAL_MACHINE\SOFTWARE\Policies\Microsoft\Windows\WcmSvc\GroupPolicy
fBlockRoaming DWORD
<delete> = Enable
1 = Disable
1 Do step 2 (enable) or step 3 (disable) below for what you would like to do.
This is the default setting. This setting will allow users to be able to select Don't roam or Roam in Option One.
A) Click/tap on the Download button below to download the file below, and go to step 4 below.
Enable_user_choice_for_cellular_data_roaming.reg
Download
This setting will disable cellular data roaming and gray out the Data roaming options setting in Option One.
A) Click/tap on the Download button below to download the file below, and go to step 4 below.
Disable_cellular_data_roaming.reg
Download
4 Save the .reg file to your desktop.
5 Double click/tap on the downloaded .reg file to merge it.
6 When prompted, click/tap on Run, Yes (UAC), Yes, and OK to approve the merge.
7 If you like, you can now delete the downloaded .reg file.
That's it,
Shawn
Related Tutorials
- How to Connect to and Disconnect from a Cellular Data Network in Windows 10
- How to Turn On or Off Cellular Communication in Windows 10
- How to Change When to Use Cellular Instead of Wi-Fi Network in Windows 10
- How to Allow or Deny Let Apps Use Cellular Data in Windows 10
- How to Hide or Show 'Choose apps that can use your cellular data' link in Windows 10
- How to Set Data Limit for Cellular, Wi-Fi, and Ethernet Networks in Windows 10
- How to Set Wi-Fi and Cellular Wireless Network as Metered or Non-Metered Connection in Windows 10
- How to Set Up and Use SIM PIN for Cellular Data Network Connection in Windows 10
- How to Change SIM PIN for Cellular Data Network Connection in Windows 10
- How to Remove SIM PIN for Cellular Data Network Connection in Windows 10
- How to Unblock SIM PIN for Cellular Data Network Connection in Windows 10
How to Enable or Disable Cellular Data Roaming in Windows 10

How to Enable or Disable Cellular Data Roaming in Windows 10
Published by Shawn BrinkCategory: Network & Sharing31 Jan 2020


Tutorial Categories

Related Discussions
