

How to Change Windows Defender Antivirus Maximum CPU Usage for a Scan in Windows 10
Windows Security is built-in to Windows 10 and includes an antirvirus program called Windows Defender Antivirus.
Windows Defender Antivirus helps protect your PC against malware (malicious software) like viruses, spyware, and other potentially unwanted software. Malware can infect your PC without your knowledge: it might install itself from an email message, when you connect to the Internet, or when you install certain apps using a USB flash drive, CD, DVD, or other removable media. Some malware can also be programmed to run at unexpected times, not only when it's installed.
Windows Defender Antivirus has a maximum 50 percentage CPU usage for a scan by default in Windows 10. If you like, you can specify a percentage of CPU usage you want Windows Defender Antivirus to not exceed.
See also: Configure Windows Defender Antivirus scanning options | Microsoft Docs
This tutorial will show you how to specify the maximum percentage CPU usage allowed for a scan by Windows Defender Antivirus in Windows 10.
You must be signed in as an administrator to specify maximum percentage CPU usage for a scan by Windows Defender Antivirus.
Contents
- Option One: To See Current Maximum CPU Usage for Scan by Microsoft Defender Antivirus
- Option Two: To Specify Maximum CPU Usage for Scan by Microsoft Defender Antivirus in PowerShell
- Option Three: To Specify Maximum CPU Usage for Scan by Microsoft Defender Antivirus in Local Group Policy Editor
- Option Four: To Specify Maximum CPU Usage for Scan by Microsoft Defender Antivirus using Registry Editor
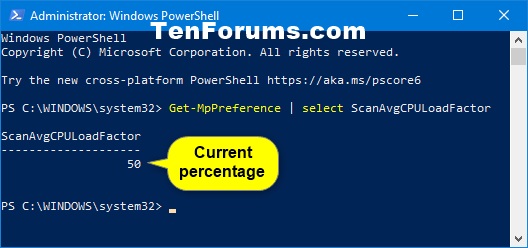
1 Open an elevated PowerShell.
2 Copy and paste the command below into the elevated PowerShell, and press Enter. (see screenshot below)
Get-MpPreference | select ScanAvgCPULoadFactor
3 You will now see the ScanAvgCPULoadFactor value (ex: "50") for the current maximum percentage CPU usage for a scan.
4 You can now close the elevated PowerShell window if you like.
This option will set the AvgCPULoadFactor DWORD value in the HKEY_LOCAL_MACHINE\SOFTWARE\Microsoft\Windows Defender\Scan key in Registry Editor.
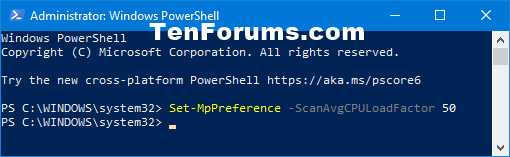
1 Open an elevated PowerShell.
2 Type the command below into the elevated PowerShell, and press Enter. (see screenshot below)3 You can now close the elevated PowerShell window if you like.
Set-MpPreference -ScanAvgCPULoadFactor <percentage>
Substitute <percentage> in the command above with a value of 5 to 100 for the maximum CPU usage you want to specify.
Setting a value of 0 will disable CPU throttling for Windows Defender Antivirus allowing Microsoft Defender Antivirus to use as much CPU as it wants.
50 is the default value.
For example:Set-MpPreference -ScanAvgCPULoadFactor 50
The Local Group Policy Editor is only available in the Windows 10 Pro, Enterprise, and Education editions.
If the policy in this option is enabled to specify, it will override Option Two.
All editions can use Option Two or Option Four.
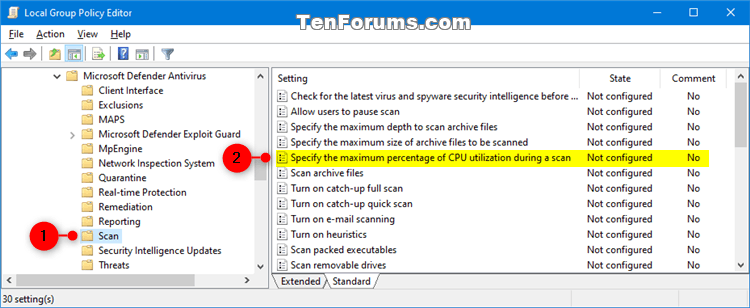
1 Open the Local Group Policy Editor.
2 In the left pane of Local Group Policy Editor, navigate to the location below. (see screenshot below)
Computer Configuration/Administrative Templates/Windows Components/Microsoft Defender Antivirus/Scan
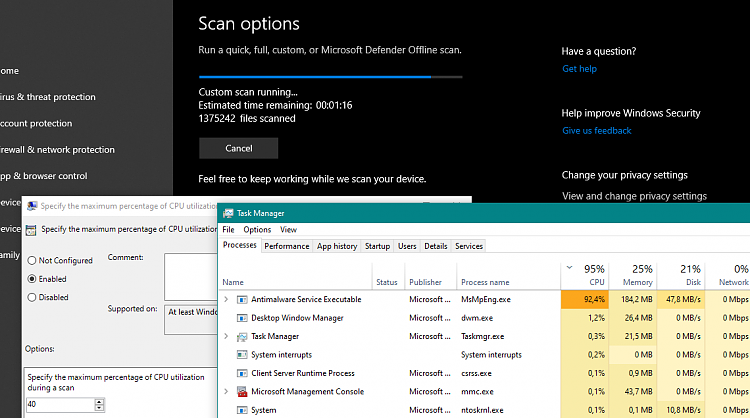
3 In the right pane of Scan in Local Group Policy Editor, double click/tap on the Specify the maximum percentage of CPU utilization during a scan policy to edit it. (see screenshot above)
4 Do step 5 (specify) or step 6 (undo) below for what you would like to do.
A) Select (dot) Enabled. (see screenshot below)
B) Under Options, type a value of 5 to 100 for the maximum CPU usage you want to specify, click/tap on OK, and go to step 7 below.
Setting a value of 0 will disable CPU throttling for Windows Defender Antivirus allowing Windows Defender Antivirus to use as much CPU as it wants.
50 is the default value.
A) Select (dot) Not Configured or Disabled, click/tap on OK, and go to step 7 below. (see screenshot below)
Not Configured is the default setting.
7 When finished, you can close the Local Group Policy Editor if you like.
The option is for the same policy as Option Three.
If the policy in this option is enabled to specify, it will override Option Two.
1 Press the Win + R keys to open the Run dialog, type regedit into Run, and click/tap on OK to open Registry Editor.
2 Navigate to the key below in the left pane of Registry Editor. (see screenshot below)
HKEY_LOCAL_MACHINE\SOFTWARE\Policies\Microsoft\Windows Defender\Scan
If you do not have a Scan key, then right click on the Windows Defender key, click/tap on New, click/tap on Key, type Scan for the name, and press Enter.
3 Do step 4 (specify) or step 5 (undo) below for what you would like to do.
A) In the right pane of the Scan key, double click/tap on the AvgCPULoadFactor DWORD value to modify it. (see screenshot below step 2)
If you do not have a AvgCPULoadFactor DWORD, then right click on an empty area in the right pane of the Scan key, click/tap on New, click/tap on DWORD (32-bit) Value, type AvgCPULoadFactor for the name, and press Enter.
B) Select (dot) Decimal, type a value of 5 to 100 for the maximum CPU usage you want to specify, click/tap on OK, and go to step 6. (see screenshot below)
Setting a value of 0 will disable CPU throttling for Windows Defender Antivirus allowing Windows Defender Antivirus to use as much CPU as it wants.
50 is the default value.
A) In the right pane of the Scan key, right click on the AvgCPULoadFactor DWORD value, and click/tap on Delete. (see screenshot below step 2)
B) Click/tap on Yes to confirm, and go to step 6. (see screenshot below)
6 You can now close Registry Editor if you like.
That's it,
Shawn Brink
Related Tutorials
- How to Set CPU Process Priority for Applications in Windows 10
- How to Turn On or Off Microsoft Defender Antivirus in Windows 10
- How to Turn On or Off Periodic Scanning with Windows Defender Antivirus in Windows 10
- How to Manually Scan Files, Folders, and Drives with Windows Defender Antivirus in Windows 10
- How to Schedule a Scan in Microsoft Defender Antivirus in Windows 10
- How to Add or Remove 'Scan with Microsoft Defender' Context Menu in Windows 10
- How to Add or Remove Microsoft Defender context menu in Windows 10
- How to Enable or Disable Scan Archive Files by Windows Defender in Windows 10
- Enable or Disable Scan Mapped Network Drives with Windows Defender in Windows 10
- Enable or Disable Scan Removable Drives during Windows Defender Full Scan in Windows 10
- How to Specify Scheduled Scan Type for Microsoft Defender Antivirus in Windows 10
- How to Enable or Disable Scan Network Files with Windows Defender Antivirus in Windows 10
Set Windows Defender Antivirus Max CPU Usage for a Scan in Windows 10
-
New #1
Hello Brink, it looks like this setting has no effect on mpengine.
I've tried all of the options you described and even after system reboot my scan consumes 100% of CPU.
There is one thing I noticed though:
In "Option 2" you say: HKEY_LOCAL_MACHINE\SOFTWARE\Microsoft\Windows Defender\Scan
But GPO sets: HKEY_LOCAL_MACHINE\SOFTWARE\Policies\Microsoft\Windows Defender\Scan
However none of these 2 keys work so I guess you made a typo here.
Anyway is there any workaround for this?
- - - Updated - - -
Here is screenshot to confirm:
EDIT:
Removed wrong registry entry screenshot.
-
-
New #3
-
-
New #5
Ah you got it!
It works well for quick scans but not for custom scan.
Same problem with insider build, so I think I'll just go ahead and report this problem.
But if you're aware of a workaround let me know, because right now my scans are more like CPU stress tests rather than virus scans
- - - Updated - - -
Full scan also does not respect setting.
-
-
New #7
The policy setting says:
"This policy setting allows you to configure the maximum percentage CPU utilization permitted during a scan"
It says nothing about scan type.
What am I missing?
-
-
-
New #9
Well I guess you're right, it's a bug with policy description and not with anti virus
So you think this works as it should?

Set Windows Defender Antivirus Max CPU Usage for a Scan in Windows 10
How to Change Windows Defender Antivirus Maximum CPU Usage for a Scan in Windows 10Published by Shawn BrinkCategory: Security System
10 Jul 2023


 Quote
Quote

Tutorial Categories

Related Discussions
