

How to Enable or Disable Touchpad in Windows 10
If your Windows 10 PC (ex: laptop) has a built-in touchpad, you may want to enable or disable on demand.
This tutorial will show you how to enable or disable the touchpad in Windows 10.
The TouchPad settings will vary from one device and driver to another, so you may not have some settings or your settings may be different than in this tutorial.
If you have something different, then please post screenshots. I'll be happy to include it in the tutorial for others.
Contents
- Option One: Double Tap to Enable or Disable Touchpad
- Option Two: Disable Touchpad when Mouse is Connected
- Option Three: Enable or Disable Touchpad using Keyboard Shortcut
- Option Four: Enable or Disable Touchpad in Touchpad Settings
- Option Five: Enable or Disable Touchpad for some ThinkPad, IdeaPad, Lenovo Laptops
- Option Six: Enable or Disable Precision Touchpad in Settings
- Option Seven: Enable or Disable Precision Touchpad using a REG file
1 If the Double Tap To Enable or Disable TouchPad setting is enabled, you can double tap on the corner zone (top left) of the touchpad to enable or disable the touchpad as wanted.
1 If the Leave touchpad on when a mouse is connected setting is enabled, the touchpad will automatically be disabled when a mouse is connected and automatically enable the touchpad when the mouse is disconnected.
1 Some devices may have a F5 or F6 function key available allowing you to press Fn plus the function key to enable or disable the touchpad as wanted.
The exact function key will vary per device if even available. Some devices may have a switch to toggle instead.
1 Open Settings, and click/tap on the Devices icon.
2 Click/tap on Touchpad on the left side, and click/tap on the Additional settings link under Related settings on the right side. (see screenshot below)
3 Do step 4 (disable) or step 5 (enable) below for what you want to do.
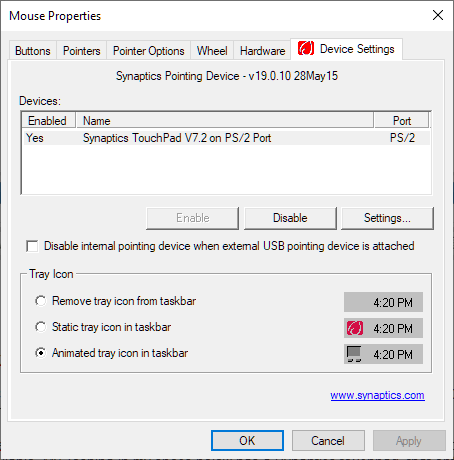
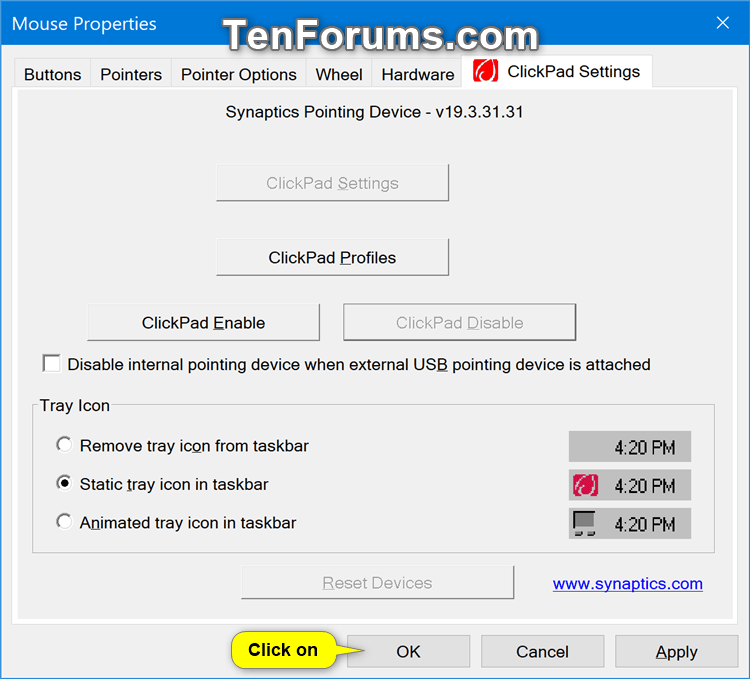
A) In the ClickPad Settings tab (name may vary), click/tap on the ClickPad Disable button (name may vary). (see screenshots below)

B) Click/tap on OK to confirm. (see screenshot below)
C) Click/tap on OK. (see screenshot below)
A) In the ClickPad Settings tab (name may vary), click/tap on the ClickPad Enable button (name may vary), and click/tap on OK. (see screenshot below)
1 Open Settings, and click/tap on the Devices icon.
2 Click/tap on Touchpad on the left side, and turn on (default) or off Touchpad on the right side for what you want. (see screenshots below)

The downloadable .reg files below will modify the DWORD value in the registry key below.
HKEY_CURRENT_USER\SOFTWARE\Microsoft\Windows\CurrentVersion\PrecisionTouchPad\Status
Enabled DWORD
0 = Disable (off)
1 = Enable (on)
1 Do step 2 (enable) or step 3 (disable) below for what you would like to do.
This is the default setting.
A) Click/tap on the Download button below to download the file below, and go to step 4 below.
Enable_Precision_touchpad.reg
Download
A) Click/tap on the Download button below to download the file below, and go to step 4 below.
Disable_Precision_touchpad.reg
Download
4 Save the .reg file to your desktop.
5 Double click/tap on the downloaded .reg file to merge it.
6 When prompted, click/tap on Run, Yes (UAC), Yes, and OK to approve the merge.
7 Restart the computer to apply.
8 You can now delete the downloaded .reg file if you like.
That's it,
Shawn Brink
Related Tutorials
- How to Hide or Show Touchpad Button on Taskbar in Windows 10
- How to Enable or Disable Double Tap to Enable or Disable Touchpad in Windows 10
- How to Disable Touchpad when Mouse is Connected in Windows 10
- How to Adjust Touchpad Sensitivity in Windows 10
- How to Enable or Disable Touchpad Tapping and Tap to Click in Windows 10
- How to Enable or Disable Touchpad MultiFinger Gestures in Windows 10
Enable or Disable Touchpad in Windows 10
-
New #1
Tutorial updated to add options 6 and 7 to enable or disable a Precision touchpad in Windows 10.
-
New #2
Hi, if you have a laptop which has no way to disable the touchpad - e.g.
- does not have an option in Settings to disable the touchpad
- whose touchpad driver cannot be updated to be seen as 'precision' (older fixes didn't work on mine, neither installing an Ultranav Synaptics driver nor a registry fix
- does not have a dedicated function key
this may work (it worked on my Lenovo Thinkpad):
Download and install Touchpad Blocker (free)
Touchpad Blocker - free software to disable touch-pad while typing
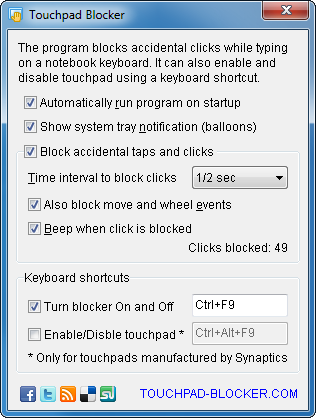
Enable the bottom option. By default Ctrl Alt F9 will enable/disable the touchpad.
The hot key is configurable.
Note: there seems no simple command option to do this.
-
New #3
Hello, I have a Precision touchpad from microsoft with double tap feature to disable/enable touchpad. Is there any way to remove this feature? I've tried disabling touchpad drivers but the feature is still there.
-
New #4
Probably depends what options there are in your driver's GUI. Have you looked there? E.g. via Control Panel, Mouse, and appropriate tab.
See also under Touchpad in Settings.
Older example of some settings you might find (different option addressed)
Precision Touchpad Double-tap and Drag - Turn On or Off | Windows 8 Help Forums
-
New #5
Hey thanks for the quick reply. Yes, i have tried all those options from this forum. I have a all the gesture options in my control panel but do not have an option to turn off the disable zone. Clicking additional properties also does not have clickpad tab.
-
New #6
This shows precision touchpad settings in Settings. You might explore Additional Options e.g.
How to customize 'Precision Touchpad' settings on Windows 10 | Windows Central
You could try looking for a sensitivity setting by way of mitigation.
If you were to start your own thread including say
MS precision touchpad ......
in the title
you would have a better chance of having someone familiar with one respond.
-
New #7
For Lenovo users with Alps touchpad:
I don't know if someone is still interested, my Yoga 500 has Alps touchpad (driver 8.201.1611.252) and has no option to disable. Also in device manager the 'Disable Device' button is inactive. I had to disable the touchpad manually by Fn+F6 each time on startup.
Finally I found the solution in the registry:
Computer\HKEY_CURRENT_USER\SOFTWARE\Alps\Apoint\USBMouse "USBMouse"=dword:00000001
Set to 1 - touchpad is disabled when mouse is connected
(default was 0)

Enable or Disable Touchpad in Windows 10
How to Enable or Disable Touchpad in Windows 10Published by Shawn BrinkCategory: Hardware & Drivers
08 Jun 2023


 Quote
QuoteTutorial Categories

Related Discussions
