This tutorial will show how to create a small Macrium Reflect Recovery Partition and add it to Windows 10 Boot Menu. In case of emergency, user can boot to Macrium Rescue environment and fix Windows boot issues, or restore a Reflect backup image.
Tutorial requires Macrium Reflect (any edition) being installed. Macrium Reflect Free download:
Download
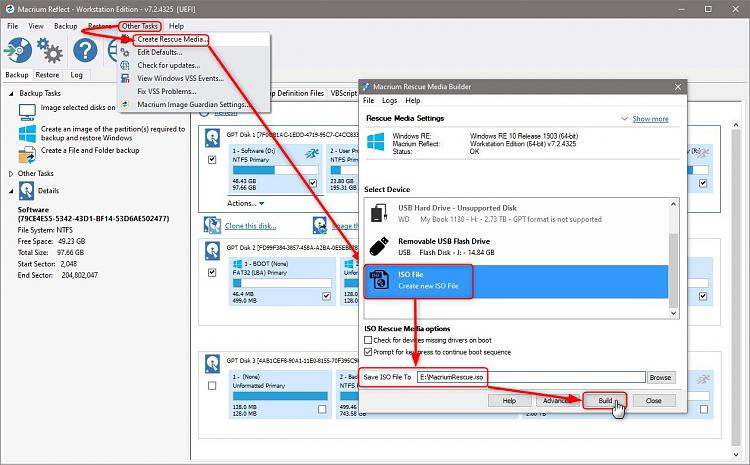
1.1 Open Macrium Reflect. Select Create Rescue Media in Other Tasks menu, select ISO File, select location to save ISO file, click Build:
(Click screenshots to enlarge.)
1.2 Create a small partition (at least 1 GB, recommended 2 GB) on any internal HDD or SSD. If you do not have available space on any disk, you can shrink an existing partition and use the freed space (tutorial).
If you have more than one internal disks, it is recommended that you create the Rescue partition on a secondary disk, not the same disk where Windows is installed. Format the partition as NTFS.
Partition name and letter can be whatever you'd prefer.
1.3 Mount the Macrium Rescue ISO (right click ISO file, select Mount). In File Explorer, copy all content of mounted ISO to the new Macrium Rescue partition you created. In my case now, the mounted ISO got drive letter J: and small partition I created is drive R:
2.1 Copy the following batch code, paste it in Notepad or any other text or code editor:
@ECHO OFF

TITLE Add Macrium Rescue to Windows boot menu

:SETLETTER

CLS

ECHO.

ECHO ###################################################

ECHO #

ECHO # This batch file creates Macrium Rescue

ECHO # environment adding it to Windows boot menu.

ECHO #

ECHO ###################################################

ECHO.

bcdedit /create {ramdiskoptions} /d "Ramdisk"

bcdedit /set {ramdiskoptions} ramdisksdidevice partition=R:

bcdedit /set {ramdiskoptions} ramdisksdipath \boot\boot.sdi

for /f "tokens=2 delims={}" %%i in ('bcdedit.exe /create /d "Macrium Rescue" /application OSLOADER') do (set guid={%%i})

bcdedit /set %guid% device ramdisk=[R:]\sources\boot.wim,{ramdiskoptions}

bcdedit /set %guid% path \windows\system32\winload.efi

bcdedit /set %guid% osdevice ramdisk=[R:]\sources\boot.wim,{ramdiskoptions}

bcdedit /set %guid% systemroot \windows

bcdedit /set %guid% winpe yes

bcdedit /set %guid% detecthal yes

bcdedit /displayorder %guid% /addlast

ECHO.

ECHO Macrium Rescue added to Windows boot menu.

ECHO.

pause
2.2 Edit the batch file according to your needs:
- Three lines in blue font contain the drive letter for new Rescue partition, in my case R:
- Line in red font contains the label for boot menu entry, in my case Macrium Rescue
- Line in green font, winload.efi is for UEFI systems with GPT disks. Change it to winload.exe if your PC is a BIOS system with MBR disks
2.3 Save the batch file as Rescue.bat. Alternatively, you can download the batch file from my OneDrive. If downloading, remember to unblock the file before using it (tutorial):
Download
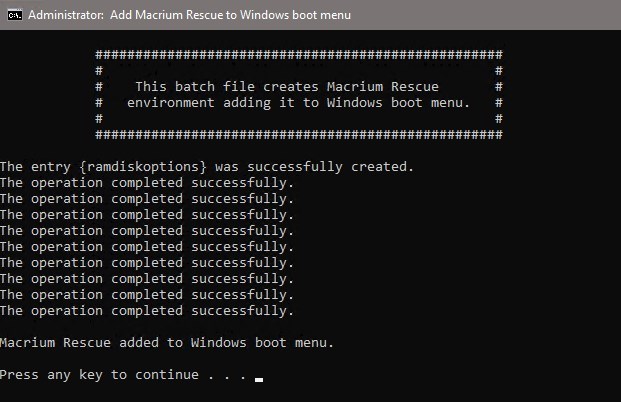
2.4 Open an elevated Command Prompt (tutorial), run the batch file. Alternatively, right click it and select Run as administrator. Macrium Rescue environment will be added to Windows Boot Menu:
2.5 You can now remove the drive letter from the recue partition to hide it.
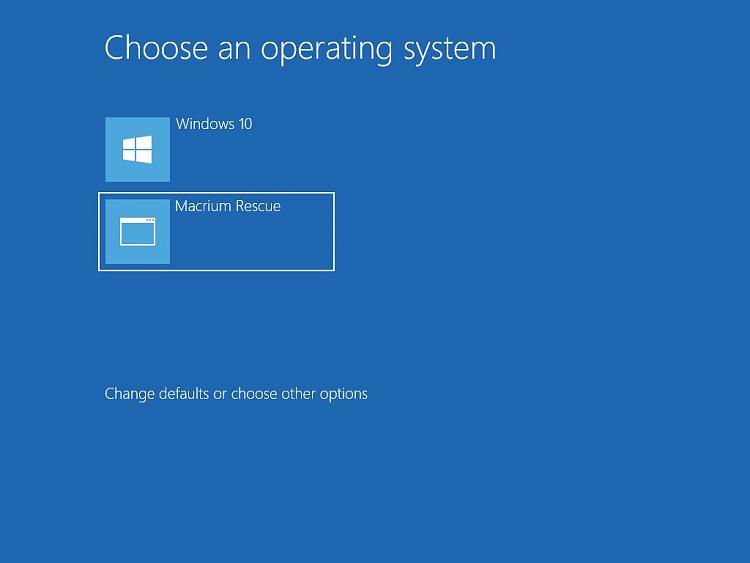
2.6 You can now select to boot to Macrium Rescue from Windows Boot Menu:
That's it!
Kari
Related Tutorials
- How to Create and Restore a System Image Backup with Macrium Reflect
- How to Use Macrium Reflect Rescue Media to Fix Windows Boot Issues
Macrium Reflect - Create a Rescue Partition
-
New #1
Great tutorial.
I have been doing this for several years using the batch file created by @Kyhi in his tutorials which is basically similar to yours.
Another way of creating the boot entry is to use easybcd for those who might be daunted by using a batch command file.
It might be worth adding that as another option (I know you prefer not to use 3rd party tools but some like graphical methods). I am happy to create a supplementary tutorial if you wish - let me know (I am quite busy though at the moment tbh).
-
-
-
New #4
Hi,
First of all, thanks for writing up the tutorial.
I just wonder, why the need to add MR to W10's bootmenu when you can call it from bios' bootmenu ?
Provided it supports EFI that is.
Also, why not let MR create the Rescue disk on the primary disk ? The system disk ?
When booting to that environment you can then steer MR to wherever your backup images reside.
Further, and I might be mistaken here, I had the idea the MR Rescue disk partition had to be formatted using the FAT32 file system. Maybe not but I do so out of habit and it works fine.
Just my 2 cents,
Cheers to all the good work.
-
New #5
I just made this specifically for Macrium Rescue - using the same method Kyhi's PE usesYes, Kyhi's PE uses the same method. I just made this specifically for Macrium Rescue.

-
-
New #7
Hi @Kari,
I suggest you add an optional final step to remove the drive letter (R in your case) so Macrium Partition is hidden from File Explorer, minimising risk of accidental overwriting or file deletion.
As a second observation, the tutorial you have created works for Windows 10 installers as well - maybe you would like to add a comment on that as well, or copy and make a second tutorial?
Cheers
M.
-
New #8
Macrium already has that feature bulit in to it. Any reason to go thru the other steps? Or am I missing something?

-
-

Macrium Reflect - Create a Rescue Partition
How to Create a Macrium Reflect Rescue PartitionPublished by Kari "Kalsarikänni" FinnCategory: Backup & Restore
22 Sep 2019
Tutorial Categories


Related Discussions


 Quote
Quote
