Information
A virtual machine using Differencing Disks is stored on two separate virtual hard disks. The Parent Disk contains the basic Windows installation, and the Child Disk all user settings, data, customizations and so on. Parent Disk can be write protected, and used as parent for multiple child disks.
Quoting Microsoft Docs:
A differencing disk is associated with another virtual hard disk that you select when you create the differencing disk. This means that the disk to which you want to associate the differencing disk must exist first. This virtual hard disk is called the “parent” disk and the differencing disk is the “child” disk.
The parent disk can be any type of virtual hard disk. The differencing disk stores all changes that would otherwise be made to the parent disk if the differencing disk was not being used. The differencing disk provides an ongoing way to save changes without altering the parent disk. You can use the differencing disk to store changes indefinitely, as long as there is enough space on the physical disk where the differencing disk is stored. The differencing disk expands dynamically as data is written to it and can grow as large as the maximum size allocated for the parent disk when the parent disk was created.
Especially when testing Windows Insider Preview builds in various editions and languages, I use differencing disks on Hyper-V virtual machines. This not only allows me to save storage space on my dedicated Hyper-V drive, but it also makes creating new virtual machines really fast, taking just seconds to boot to the desktop when a VM is run for the first time. No repeated clean installs are required.
An added benefit is that when parent disk is stored on SSD, the child disks can be on HDD, yet being faster than if Windows was installed on a single VHD on HDD. This is especially convenient if your SSD is small. My SSD on this laptop is only 128 GB, I could not possibly store all virtual hard disks on it. Using parent disk on SSD and child disks on HDD, I get close to SSD speeds on my virtual machines. Notice that Hyper-V has no issues in using VHD files stored on an external hard disk; if you have a fast external USB3 HDD, that's a good place to store your child disks.
In this tutorial you will learn how easy and convenient it is to use Differencing Disks in Hyper-V.
Part One: Create Parent Disk Part Two: Create Child Disk Part Three: Create VM using Differensing Disks
1.1) Create a new virtual machine in Hyper-V (tutorial). Name it as you like. To fully benefit from using differencing disks, I want to create this VM on my C: drive (an SSD), instead of my dedicated Hyper-V drive on HDD.
To select other than default location, select Store the virtual machine in a different location, and as location, enter the drive where you want it to be created:
Hyper-V now creates a folder on the drive you selected. Folder name will be the name you gave to VM.
1.2) Only use Generation 2 virtual machines (UEFI with GPT partitioning), both when creating VM to prepare parent disk, and virtual machines to utilize child disks as we will do in Part Two.
1.3) As always when creating a new VM, allocate it enough RAM, and disable dynamic memory. The VHD can be quite small, even 20 GB would be enough.
However, virtual machines we will create later using child disk based on this parent disk will see the child VHD size as the same as parent VHD. If you now create a 20 GB dynamically expanding parent VHD, later child disks will also be 20 GB which leaves not much space to install software.
My recommendation is to use Hyper-V default VHD size 127 GB when creating the parent VM and VHD.
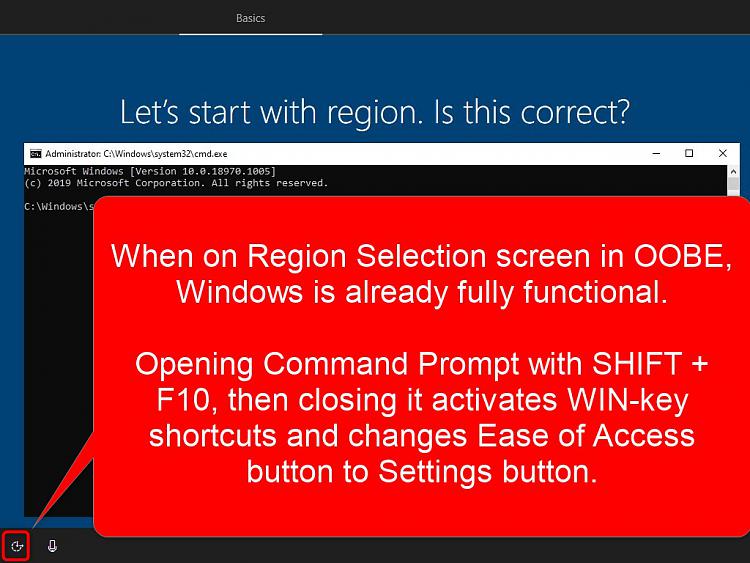
1.4) Start the VM, install Windows normally. After the first restart, OOBE starts and region selection screen is shown. Do not select any region, instead press SHIFT + F10 to open Command Prompt. Close Command Prompt immediately, we only needed to open it to activate WIN-key shortcuts and Windows Settings in OOBE.
1.5) When Command Prompt was opened and closed, it changed the function of Ease of Access button bottom left. The button will now open Windows Settings app:
1.6) Click the button bottom left to open Settings. Run Windows Update, fully updating Windows:
Tip
If the button for any reason does not open Settings, press WIN + R to open Run dialog, type following command and press Enter to open Settings:
ms-settings:
1.7) OPTIONAL If you intend to use same parent disk on virtual machines in different languages, install language packs for each language you might need in the future. In my example case now, I installed Finnish (Suomi), Swedish (Svenska) and German (Deutsch) languages. Wait until all language packs have been installed:
1.8) When Windows has been updated, and optional languages installed, close Settings. Press WIN + R to open Run dialog, type following command and press Enter to open Windows System Preparation Tool (Sysprep):
%windir%\System32\Sysprep\Sysprep.exe
1.9) Sysprep dialog opens. Accept defaults, click OK to run Sysprep:
1.10) Windows will restart. Shut down VM when it returns to OOBE:
Shut down if you installed additional languages
If you installed additional languages (step 1.7), OOBE starts letting you to select in which language Windows should be setup. Click the VM Connection's Shut Ddown button:
Shut down when no additional languages:
If you installed without adding additional languages, OOBE starts with Region Selection screen. Click the VM Connection's Shut Down button:
1.11) You can now delete the VM used to create this parent disk in Hyper-V Manager, it will not be needed anymore.
1.12) In File Explorer, browse to your Parent VHD folder. Delete both Snapshots and Virtual Machine folders, only leaving folder Virtual Hard Disks:
1.13) Open Virtual Hard Disks folder, set the parent disk Read Only to protect it:
Warning
There's a simple reason we write protected the parent VHD and deleted the VM used in creating it. IF the parent VHD is changed in any way, even if the VM used to create it is used, booted once and immediately turned off, it can no longer be used as parent disk, and all child disks stop working, virtual machines showing an error message:
To avoid this, it is extremely important that the VHD will never again be changed or used on a VM.
Parent Disk is now ready to be used on future virtual machines with their respective child disks.
2.1) In Hyper.V Manager > Action pane, select New > Hard Disk:
2.2) Select Differencing as disk type:
2.3) I name the new child disk as Empty Child Disk, and store it to my default VHD folder:
2.4) New Hard Disk Wizard is asking which parent disk I want to use. I browse to and select the parent disk I prepared in Part One:
Done. Keep the empty child disk on safe place.
Time to create first VM using differencing disks!
3.1) Create a new Generation 2 VM. Name it as you wish, I prefer descriptive names. Select Store the virtual machine in a different location, and select a drive. Virtual machine folder will be created on root of that drive:
3.2) On Connect Virtual Hard Disk page, select Attach a virtual hard disk later:
3.3) When VM has been created, open File Explorer and copy the empty child disk you created in Part Two. Browse to folder in which you saved the new VM, and paste the VHD file. Rename it with a descriptive name:'
I always use the exact name of the VM, in this example case now I renamed the child disk as W10 PRO Insider x64 EN-GB.vhdx
3.4) Before starting the VM first time, edit its Settings. Set RAM, processor count, Secure Boot and checkpoints as you'd prefer. Select SCSI Controller on left pane, select Hard Drive, click Add:
3.5) Browse to your VM's folder, select the empty child disk you copied there and renamed in step 3.3:
3.6) Last, the most important setting. You must change the boot order, making new VM boot from still empty child disk:
3.7) That was it. You can now run the VM, in less than a minute you'll land on OOBE Region Selection screen. Setup Windows as usual.
3.8) When on desktop of the new VM, if you inspect the VHD in VM settings, you'll notice that the actual VHD file size, the space it occupies on your hard disk, is about 10 GB less than a normal Windows installation requires:
This is because the Windows itself is installed on the parent disk, each subsequent VM only creates VHD files to store user profiles, settings and data, but there's no need to install Windows. Each virtual machine you create using a child disk of same parent disk saves you this 10 GB; using the same parent on five virtual machines, you've save about 40 GB storage space (10 GB * 5 - 10 GB on parent VHD).
3.9) For a multilingual user, the beauty of differencing disks is in this: If you installed additional languages in step 1.7 on your parent disk, booting the new VM you can select the language before OOBE starts:
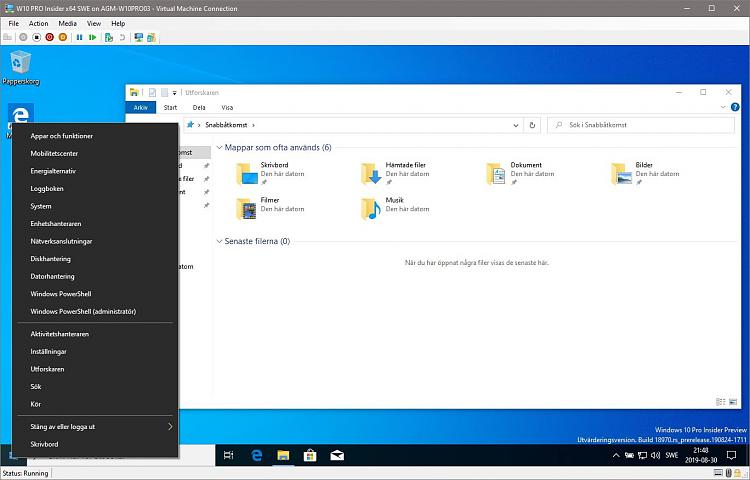
Selecting Swedish (Svenska) as in this example case, the Windows on my new VM, on its child disk, will be completely in Swedish:
This although Windows installed on parent disk is British English.
You are ready to go!
I did a Differencing Disks presentation over a year ago, this image is from that presentation so pointers to version 1803 are already outdated. However, it is still a valid description about what Differencing Disks in Hyper-V means:
Let's keep virtualizing geeks!
Kari
Hyper-V - Use Differencing Disks
-
New #1
i have discovered differential disk with this tuto, thanks kari
-
New #2
I studied how Viboot works, and it creates differencing disks from the Reflect image in a new VM.
One minor problem is the VM is unactivated and you cannot do any new personalisation.
However, you can temporarily attach the differencing disk to an activated VM (I am referring to Hyper-V) and make any new personalisation changes.
Another minor issue with parent/child differencing disks is you cannot directly move them to another directory if you wanted to copy them.
However, you can merge the parent and child vhds, copying the resultant vhd elsewhere. This is easy using the "edit disk - merge" function in Hyper-V.
-
-
New #4
Something is wrong if you had to do this - the parent disk should always be read only. If you make even one minor change to the parent disk, the differencing system disk will fallover. Rather than exporting the VM, create a consolidated vhd of the parent/child vhds, and attach that to a new or other vm, then export that vm.
-
New #5
My view on all these is simply to use macrium to image whatever W11 you want to "Clone" or modify and then restore to new target disk or machine.
So long as you copy the GUUID into the new VM's config activation shouldn't change as most VM systems are "OS" agnostic and use their own "paravirtualised" Bios and hardware. Ms activation uses the GUUID to identify the machine / device for digital activation and as the Virtual hardware should be reasonably identical on whatever machine its used on activation shouldn't be a problem. This also means that in the VM config set the hardware up to use as much "paravirtualised" hardware as possible -- especially for GPU and CPU.
With VMWare workstation it's even easier as on ist power on of a new VM copied to a new HDD or machine you get a popup requesting "Moved or Copied" -- use the "I moved it" option which will maintain the same GUUID, otherwise do it in the VM's config file before powering on.
E.G for a KVM/QEMU VM : (The GUUID will depend on the partition GUUID of your virtual disk(s) so check those before you alter for your system).
<domain type="kvm">
<name>win10</name>
<uuid>9f3e665c-c1f8-xxxxxxxxxxx etc </uuid> ====== Modify this line before ist boot
<metadata>
<libosinfo:libosinfo xmlns:libosinfo="http://libosinfo.org/xmlns/libvirt/domain/1.0">
<libosinfo s id="http://microsoft.com/win/10"/>
</libosinfo:libosinfo>
</metadata>
<memory unit="KiB">4194304</memory>
<currentMemory unit="KiB">4194304</currentMemory>
<vcpu placement="static">2</vcpu>
<os firmware="efi">
<type arch="x86_64" machine="pc-q35-6.2">hvm</type>
<bootmenu enable="yes"/>
...............................
Cheers
jimboLast edited by jimbo45; 24 Aug 2022 at 16:53.
-
New #6
I dont know what was wrong... The export would start fine... and then around 29% it would get the Access Denied error. I tried multiple things, and it always failed at the same spot. Then I removed read-only and it succeeded.
Of course I immediately put read-only back. And the VM starts successfully, so I guess no modifications to the parent disk were made. Maybe the read-only flag prevented Windows from copying during the export? I have no idea
-
-
New #8
Install Windows on the parent disk in the compact state and you save even more space on the parent disk.
-
-
New #9

Hyper-V - Use Differencing Disks
How to Use Differencing Disks in Hyper-VPublished by Kari "Kalsarikänni" FinnCategory: Virtualization
02 Sep 2019
Tutorial Categories


Related Discussions


 Quote
Quote