

How to Auto-Mount VHD or VHDX File at Startup in Windows 10
VHD (Virtual Hard Disk) is a file format which represents a virtual hard disk drive (HDD). It may contain what is found on a physical HDD, such as disk partitions and a file system, which in turn can contain files and folders. It is typically used as the hard disk of a virtual machine.
VHDX is a Hyper-V virtual hard disk file format. VHDX has a much larger 64 TB storage capacity than the older VHD format 2TB limit. It also provides data corruption protection during power failures and optimizes structural alignments of dynamic and differencing disks to prevent performance degradation on new, large-sector physical disks.
When you mount a .vhd or .vhdx file, it will be added as a drive in File Explorer > This PC to open it from.
This tutorial will show you how to create an elevated task to automatically mount a VHD or VHDX file at startup for all users in Windows 8.1 and Windows 10.
You must be signed in as an administrator to create an elevated task to auto-mount a VHD or VHDX file at startup.
Contents
- Option One: Create Elevated Task to Auto-Mount VHD or VHDX File at Startup
- Option Two: Delete Elevated Task to Undo Auto-Mount VHD or VHDX File at Startup
EXAMPLE: VHD or VHDX file mounted as drive in File Explorer > This PC
1 Press the Win + R keys to open the Run dialog, type taskschd.msc into Run, and click/tap on OK to open Task Scheduler.
2 Click/tap on Task Scheduler Library in the left pane of Task Scheduler, and click/tap on Create Task in the right Actions pane. (see screenshot below)
3 In the General tab, type a name (ex: "Auto-Mount VHD at Startup") you want for this task. (see screenshot below)
4 In the General tab, type a description (ex: "D:\VHD\Example.vhd") you want for this task. (see screenshot below)
I like to use the full path of the VHD or VDHX file as a quick reference of which file the task is mounting.
5 In the General tab, select (dot) the Run whether user is logged on or not box. (see screenshot below)
6 In the General tab, check the Run with highest privileges box. (see screenshot below)
7 In the General tab, select Windows 10 in the Configure for drop down menu. (see screenshot below)
8 Click/tap on the Triggers tab, and click/tap on the New button. (see screenshot below)
9 Select At startup in the Begin the task drop down menu, and click/tap on OK. (see screenshot below)
If you would like to delay this task from running at startup for a bit before prompting for the BitLocker password to unlock the drive, you can check the Delay task for box, and select how long of a delay you want after startup before this task automatically runs.
10 Click/tap on the Actions tab, and click/tap on the New button. (see screenshot below)
11 Type PowerShell in the Program/script field. (see screenshot below)
12 Type the command below into the Add arguments field, and click/tap on OK. (see screenshot below)
"Mount-DiskImage -ImagePath 'Full path of VHD or VHDX file'"
Substitute Full path of VHD or VHDX file in the command above with the actual full path of the VHD or VHDX file you want automatically mounted at startup.
For example:"Mount-DiskImage -ImagePath 'D:\VHD\Example.vhd'"
For more Mount-DiskImage command usage details, see: Mount-DiskImage | Microsoft Docs
13 Verify the details are correct for the command and full path of the VHD or VHDX file. (see screenshot below)
If it is not correct, click/tap on Edit, go back to step 12, and correct it.
14 Click/tap on the Conditions tab, uncheck the Start the task only if the computer is on AC power box, and click/tap on OK. (see screenshot below)
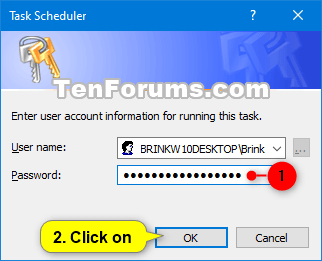
15 When prompted, enter the password of your Windows 10 account, and click/tap on OK. (see screenshot below)
16 You will now see this new task (ex: "Auto-Mount VHD at Startup") listed in the Task Scheduler Library. You can now close Task Scheduler if you like. (see screenshots below)
You can disable and enable this task as needed if you ever wanted to temporarily stop mounting this VHD or VHDX file at startup.

1 Press the Win + R keys to open the Run dialog, type taskschd.msc into Run, and click/tap on OK to open Task Scheduler.
3 Click/tap on Task Scheduler Library in the left pane of Task Scheduler. (see screenshot below step 3)
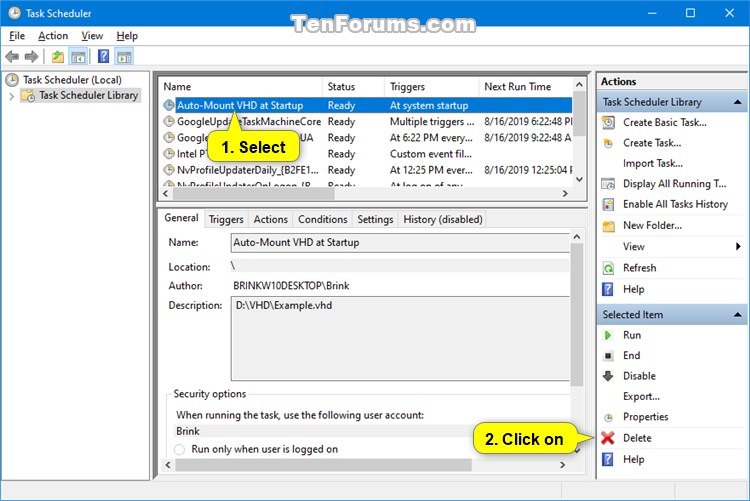
3 Select the task (ex: "Auto-Mount VHD at Startup") you created using Option One in the middle pane, and click/tap on Delete in the right Actions pane.
4 Click/tap Yes to confirm. (see screenshot below)
5 You can now close Task Scheduler if you like.
Related Tutorials
- How to Create and Set Up New VHD or VHDX File in Windows 10
- How to Mount or Unmount VHD and VHDX File in Windows 10
- How to Add or Remove Mount Context Menu in Windows 10
- How to Create BitLocker Encrypted Container File with a VHD or VHDX File in Windows
Auto-Mount VHD or VHDX File at Startup in Windows 10
-
-
New #2
I guess this supersedes the more primitive way I did it?
VHD - Auto-mount at Startup in Windows 8 | Windows 8 Help Forums
(Which still works - it's still running that way on one of my W10 laptops.)
-
-
-
New #5
Thanks a lot for this splendid manual.
Wonder what will happen when the VHD is Bitlocker encrypted.
See tutorial: "How to Create BitLocker Encrypted Container File with a VHD or VHDX File in Windows"
Will it start and but prompt user for the credentials?
Thanks.
-
New #6
Correct. It will prompt for the BitLocker password to unlock it once you are signed in and on your desktop.
Create BitLocker Encrypted Container File with VHD or VHDX in Windows
-
-
-
-
New #9
I've been doing a slightly older version of this for years with Bitlocker-encrypted VHDs.
As mentioned, it does prompt for a Bitlocker password on startup, but it is possible to miss the prompt.
If that happens, I right-click the drive in File Explorer and select the option to Unlock Drive.
I've also found that adding a slight delay to the auto-mount task (one of the options on the screenshot at step 9 above) means that I'm more likely to see the password prompt on my very old laptop.
Auto-Mount VHD or VHDX File at Startup in Windows 10
How to Auto-Mount VHD or VHDX File at Startup in Windows 10Published by Shawn BrinkCategory: Virtualization
19 Jul 2021


 Quote
Quote

Tutorial Categories

Related Discussions
