

How to Add or Remove NVIDIA Control Panel Desktop Context Menu in Windows
If your Windows device has NIVIDIA graphics and NVIDIA display drivers installed, you will have the NVIDIA Control Panel available.
By default, the NVIDIA Control Panel item will show in the desktop context menu.
The NVIDIA Control Panel is NVIDIA's hardware control application that unlocks the features of NVIDIA drivers. The NVIDIA Control Panel was designed by NVIDIA's dedicated user interface team to revolutionize software ease-of-use and ensure that set-up and configuration of your NVIDIA hardware has never been easier.
The NVIDIA Control Panel contains settings and adjustments for NVIDIA GPUs and MCPs. In similar fashion, the NVIDIA Control Panel now applies the same depth of control to the rest of the core components within the system. Without ever leaving Windows or entering the BIOS users can optimize and adjust nearly every system component to minimize noise, increase stability, and maximize performance.
This tutorial will show you how to add or remove the NVIDIA Control Panel desktop context menu for your account in Windows 7, Windows 8, and Windows 10.
- Option One: Add or Remove NVIDIA Control Panel Desktop Context Menu in NVIDIA Control Panel
- Option Two: Add or Remove NVIDIA Control Panel Desktop Context Menu using a REG file
EXAMPLE: NVIDIA Control Panel desktop context menu
1. Perform one of the following actions below to open the NVIDIA Control Panel: (see screenshots below)
A) Run (Win+R) the C:\Program Files\NVIDIA Corporation\Control Panel Client\nvcplui.exe file.
OR
B) Right click or press and hold on the Desktop, and click/tap on NVIDIA Control Panel.
OR
C) Click/tap on the NVIDIA Control Panel notification icon on the taskbar.

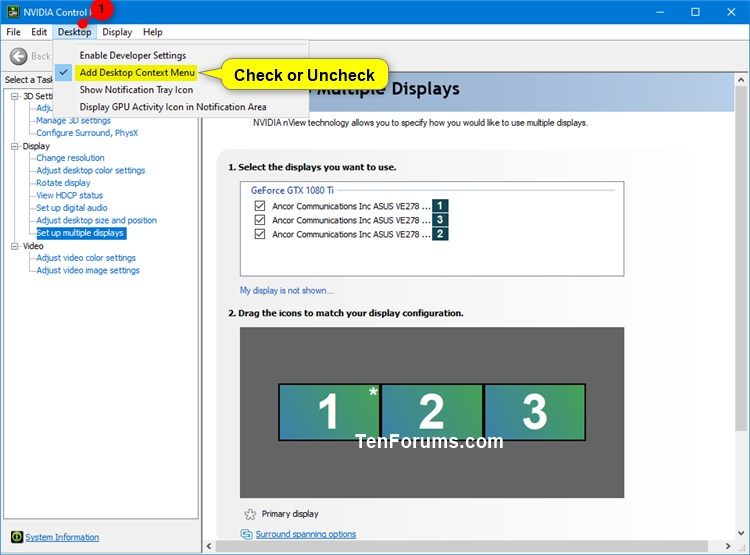
2. In the NVIDIA Control Panel, click/tap on Desktop on the menu bar, and click/tap on Add Desktop Context Menu to check (add - default) or uncheck (remove) it. (see screenshot below)
You can also press the Alt+K keys and press the M key to toggle Add Desktop Context Menu as checked (add - default) or unchecked (remove).
3. You can now close the NVIDIA Control Panel if you like.
The downloadable .reg files below will modify the DWORD value in the registry key below.
HKEY_CURRENT_USER\Software\NVIDIA Corporation\Global\NvCplApi\Policies
ContextUIPolicy DWORD
0 = Remove
2 = Add
1. Do step 2 (add) or step 3 (remove) below for what you would like to do.
A) Click/tap on the Download button below to download the file below, and go to step 4 below.
Add_NVIDIA_Control_Panel_to_desktop_context_menu_for_current_user.reg
Download
A) Click/tap on the Download button below to download the file below, and go to step 4 below.
Remove_NVIDIA_Control_Panel_from_desktop_context_menu_for_current_user.reg
Download
4. Save the .reg file to your desktop.
5. Double click/tap on the downloaded .reg file to merge it.
6. When prompted, click/tap on Run, Yes (UAC), Yes, and OK to approve the merge.
7. You could now delete the downloaded .reg file if you like.
That's it,
Shawn
Related Tutorials
- How to Determine Currently Installed NVIDIA Graphics Display Driver Version in Windows
- How to Add or Remove NVIDIA GPU Activity Notification Area Icon on Taskbar in Windows
- How to Add or Remove NVIDIA Control Panel Notification Tray Icon on Taskbar in Windows
Add or Remove NVIDIA Control Panel Desktop Context Menu in Windows
-
New #1
A while back I used Autoruns64 to fix a problem I had with the context menu, only it removed all the items I deselected, instead of just disabling them. I managed to get back the items that interested me the most, except for Nvidia.
Simply disabling and re-enabling the "Add Desktop Context Menu" item from the NVidia panel didn't work, and I also verified that I have the ContextUIPolicy key set to 2, however the item does not appear in the context menu.
Is there another way to recreate it without having to reinstall the drives?
-
-
Posts : 5,048 Windows 10/11 Pro x64, Various Linux Builds, Networking, Storage, Cybersecurity Specialty.
-
New #4
So it doesn't matter, it was more of a whim, I still have the icon accessible from the system tray.
Thanks anyway
-
New #5
Some time later I found the command to run in CMD as admin, to make the deleted Nvidia item reappear:
regsvr32 "C:\WINDOWS\system32\nvshext.dll"


Add or Remove NVIDIA Control Panel Desktop Context Menu in Windows
How to Add or Remove NVIDIA Control Panel Desktop Context Menu in WindowsPublished by Shawn BrinkCategory: Hardware & Drivers
15 Jul 2019


 Quote
Quote
Tutorial Categories

Related Discussions
