

How to Add or Remove NVIDIA GPU Activity Notification Area Icon on Taskbar in Windows
If your Windows device has NIVIDIA graphics and NVIDIA display drivers installed, you can display the NVIDIA GPU Activity icon in the taskbar notification area to better monitor the GPU activity.
This tutorial will show you how to add or remove the NVIDIA GPU Activity notification area icon on the taskbar for your account in Windows 7, Windows 8, and Windows 10.
Contents
- Option One: Add or Remove GPU Activity Notification Area Icon in NVIDIA Control Panel
- Option Two: Remove NVIDIA GPU Activity Notification Area Icon from Notification Icon
- Option Three: Add or Remove NVIDIA GPU Activity Notification Area Icon using a REG file
EXAMPLE: NVIDIA GPU Activity notification area icon on taskbar
1 Perform one of the following actions below to open the NVIDIA Control Panel: (see screenshots below)
A) Run (Win+R) the C:\Program Files\NVIDIA Corporation\Control Panel Client\nvcplui.exe file.
OR
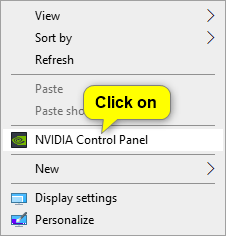
B) Right click or press and hold on the Desktop, and click/tap on NVIDIA Control Panel.
OR
C) Click/tap on the NVIDIA Control Panel notification icon on the taskbar.
2 In the NVIDIA Control Panel, click/tap on Desktop on the menu bar, and click/tap on Display GPU Activity Icon in Notification Area to check (add) or uncheck (remove - default) it. (see screenshot below)
You can also press the Alt + K keys and press the D key to toggle Display GPU Activity Icon in Notification Area as checked (add) or unchecked (remove - default).
3 You can now close the NVIDIA Control Panel if you like.
1 Right click or press and hold on the NVIDIA GPU Activity notification area icon on the taskbar to uncheck and remove it. (see screenshot below)
The downloadable .reg files below will modify the DWORD value in the registry key below.
HKEY_CURRENT_USER\SOFTWARE\NVIDIA Corporation\Global\CoProcManager
ShowTrayIcon DWORD
0 = Remove
1 = Add
1 Do step 2 (add) or step 3 (remove) below for what you would like to do.
A) Click/tap on the Download button below to download the file below, and go to step 4 below.
Add_NVIDIA_GPU_Activity_notification_icon_for_current_user.reg
Download
This is the default setting.
A) Click/tap on the Download button below to download the file below, and go to step 4 below.
Remove_NVIDIA_GPU_Activity_notification_icon_for_current_user.reg
Download
4 Save the .reg file to your desktop.
5 Double click/tap on the downloaded .reg file to merge it.
6 When prompted, click/tap on Run, Yes (UAC), Yes, and OK to approve the merge.
7 Sign out and sign in, or restart the PC to apply.
8 You could now delete the downloaded .reg file if you like.
That's it,
Shawn
Related Tutorials
- How to Set Preferred GPU for Apps in Windows 10
- How to Hide or Show Notification Area Icons on Taskbar in Windows 10
- How to Add or Remove Notification Area on Taskbar in Windows 10
- How to Determine Currently Installed NVIDIA Graphics Display Driver Version in Windows
- How to Add or Remove NVIDIA Control Panel Notification Tray Icon on Taskbar in Windows
- How to Add or Remove NVIDIA Control Panel Desktop Context Menu in Windows
Add or Remove NVIDIA GPU Activity Notification Area Icon in Windows
Add or Remove NVIDIA GPU Activity Notification Area Icon in Windows
How to Add or Remove NVIDIA GPU Activity Notification Area Icon on Taskbar in WindowsPublished by Shawn BrinkCategory: Hardware & Drivers
15 Mar 2020
Tutorial Categories

Related Discussions
