

Information
Quite a many of us Windows geeks are in to customizing Windows install images. For instance, I like to do three different deployment / install images of the same Windows version and edition. One is "plain vanilla", default original Windows install media for a specific version and edition, another the same but containing all my preferred software pre-installed, and one more, multilingual Windows image with software pre-installed, allowing to select Windows language to be installed. I would then like these different Windows images and install options to be available in a single ISO file or bootable USB flash drive.
A post by a fellow member I saw today made me decide to write this tutorial:
No third party tools are required. Windows native DISM (Deployment Image Service and Management Tool) can do it. In fact, using DISM for this is quite fast and easy.
This tutorial will show how to put multiple Windows images to a single WIM file containing all your preferred Windows install images, and how to create an install media (ISO / USB) which, when booted from it, allows you to choose which of the Windows images will be installed.
Part One: Create Base WIM Image Part Two: Add other images to base WIM Part Three: Create ISO or USB Flash Drive
1.1) Create a folder on your PC, and copy contents of Windows 10 install media, either mounted ISO file or USB flash drive to it.
Name the folder as you want to. In this tutorial I use folder D:\ISO_Files, and copy contents of mounted ISO of Windows 10 x64 version 1903 / 19H1 to it.
Note
If your goal is to create a multi-image WIM containing both 32-bit and 64-bit Windows images, the base image must be 32-bit. In this case, be sure to copy contents of 32-bit mounted ISO or USB media to ISO_Files folder.
1.2) Create another folder to save the multi-image WIM. In this tutorial, I will use folder D:\WIM for that.
1.3) Open an elevated Command Prompt, enter following command and check index value for your preferred edition, the edition you want to use a base in multi-image WIM:
dism /Get-WimInfo /WimFile:D:\ISO_Files\Sources\install.wim
Replace D:\ISO_Files with path to folder you created in Step 1.1. If your ISO_Files folder content was copied from media created with Windows Media Creation Tool, replace install.wim with install.esd.
In my case, I want to use PRO edition, noting its index value 6:
1.4) Enter following command to create base WIM:
Dism /Export-Image /SourceImageFile:D:\ISO_Files\Sources\install.wim /SourceIndex:6 /DestinationImageFile:D:\WIM\install.wim /DestinationName:"W10 PRO version 1903 x64 (original)"
Replace D:\ISO_Files with path to folder you created in Step 1.1, D:\WIM with path to folder you created in Step 1.2, and SourceIndex:6 value with actual index value to your base WIM edition. If your ISO_Files folder content was copied from media created with Windows Media Creation Tool, replace install.wim with install.esd in SourceImageFile.
I suggest using clear, descriptive name for both this base WIM, and additional WIM files added to this base. In multi-architecture WIM, it is also important to include bit version to name. In this example, I named my base WIM as W10 PRO version 1903 x64 (original)".
In this example I will add two W10 PRO x64 Insider Build 18898 images to base. First one is heavily customized one but without any pre-installed software, and the second one also customized and with all my preferred pre-installed software.
How to create and capture custom Windows images, see this tutorial: Create Windows 10 ISO image from Existing Installation2.1) I have saved my captured 18898 W10 x64 PRO EN-GB WIM files in folders G:\Captures\EN-GB\18898CustomNoSoftware and G:\Captures\EN-GB\18898CustomWithSoftware.
I will add the first one to base with same command than in Step 1.4, again using a descriptive name. Command to add the 18898 image with no software:
Dism /Export-Image /SourceImageFile:G:\Captures\EN-GB\18898CustomNoSoftware\install.wim /SourceIndex:1 /DestinationImageFile:D:\WIM\install.wim /DestinationName:"Build 18898 x64 PRO (no software)"
Notice that as the image is self made, it only contains one edition (PRO) with index value 1. Therefore, I did not have to check index values.
And then the one with pre-installed software:
Dism /Export-Image /SourceImageFile:G:\Captures\EN-GB\18898CustomWithSoftware\install.wim /SourceIndex:1 /DestinationImageFile:D:\WIM\install.wim /DestinationName:"Build 18898 x64 PRO (with software)"
2.2) In screenshot the command to create base WIM in Step 1.4 (#1), and commands to add two additional images to base in Step 2.1 (#2 & #3):
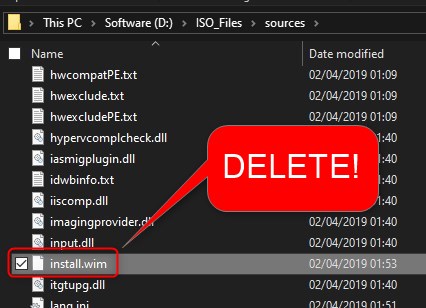
3.1) In your ISO_Files\Sources folder (see step 1.1), delete original install.wim or install.esd file:
3.2) Copy the modified install.wim file from WIM folder (see step 1.2) to ISO_Files\Sources folder
3.3) To create an ISO file from contents in ISO_Files folder, see Part Five in this tutorial: Create Windows 10 ISO image from Existing Installation
3.4) The multi-image WIM file you created is usually bigger than 4 GB. Because of that, normal methods to create USB install media do not work, due FAT32 file size limit. In that case, see this tutorial for how to create a USB install media from your ISO_Files folder: Create bootable USB installer if install.wim is greater than 4GB
That's it! When you install Windows using install media you just created, you can choose what version and edition to install:
Kari
DISM - Create Bootable ISO with Multiple Windows 10 Images
-
New #1
I'm so close to having this all working. I have one little glitch: If I place both x86 and x64 editions of Windows in my image, then the ISO image will not work with a UEFI based VM, and a thumb drive created from the image will not work on a UEFI based physical machine. BIOS based VM / machine is fine.
If I place only x64 editions of Windows 10 in my image, then all is well.
First, here is the scenario:
I thought that I would start fairly simple. I'm creating an ISO image with 2 editions of Windows in the install.wim. There is Windows 10 Pro x86 and Windows 10 Pro x64. Both come from original MSDN ISO images not modified in any way.
I create my base image with the x86 edition as directed, then add the x64 edition.
When done, I verify the WIM and find that it now holds the following 2 editions:
If I try to create a VM in VMware Workstation and boot it from this ISO image I find that I can only boot from the ISO image if I am using a BIOS based VM. A UEFI based VM will not boot from the ISO image. It doesn't seem to see a bootable image at all.Code:C:\Windows\system32>dism /Get-WimInfo /WimFile:D:\ISO_Files\Sources\install.wim Deployment Image Servicing and Management tool Version: 10.0.18362.1 Details for image : D:\ISO_Files\Sources\install.wim Index : 1 Name : W10 PRO version 1903 x86 (original) Description : Windows 10 Pro Size : 9,417,333,203 bytes Index : 2 Name : W10 PRO version 1903 x64 (original) Description : Windows 10 Pro Size : 14,275,465,030 bytes The operation completed successfully.
NOTE: BIOS-based is equivalent to a Gen 1 Hyper-V VM, while a UEFI-based VM is equivalent to a Gen 2 Hyper-V VM.
In addition, if I create a thumb drive using the method in the article linked to in the tutorial, I likewise can boot the thumb drive on a BIOS based computer, but not on a UEFI based computer.
However, if I place multiple x64 editions on my ISO image or thumb drive, then both BIOS and UEFI VMs and physical machines boot up fine from the image or thumb drive.
Ultimately, I would like to see if a way to make this work is possible without having to use a single FAT32 partition and splitting the WIM file, but it that's what it takes, so be it. I'm considering using the EFI folder from RUFUS, but again, I'd love to make this work without 3rd party utilities.
-
New #2
Some new information:
If I make the base image x64 rather than x86, then I can successfully boot on both UEFI and BIOS based systems and VMs.
My suspicion is that a true x86 system might not work but I don't have a 32-bit machine to test that on.
EDIT: Scratch the idea of making x64 the base image. During the installation it fails complaining of a corrupt file.
-
-
New #4
I think I have a solution. I performed one test with a single x86 edition and a single x64 edition and that worked. Now I just need to update it to add a second edition of each and verify that it presents to me the option to install any of the 4 editions.
I'll post back shortly .
.
-
New #5
Solution confirmed, with a couple of things to still work out.
It works in VMware but I have to massage the procedure for creating a thumb drive since there is now a separate x86 and x64 folder. I'll report back as soon as I have that worked out.
Here is what I did:
Using the Windows Media Creation tool, I downloaded the ISO image that contains BOTH x86 and x64 installations. I use that as the base image. Note that this ISO image contains both x86 and an x64 folder. In those folders are install.esd files. Delete the install.esd in both folders.
Now, rather than creating one folder called WIM as in the tutorial, I create a WIM_x86 folder and a WIM_x64 folder.
I use the DISM commands to add all my x64 editions to the WIM_x64 folder and all my x86 editions to the WIM_x86 folder.
Copy the install.wim in the WIM_x64 folder to the ISO_Files\x64\sources folder.
Copy the install.wim in the WIM_x86 folder to the ISO_Files\x86\sources folder.
From there, the rest of the procedure remains the same.
Result:
When you boot from the ISO (physical media still to be confirmed as noted above), the big difference is that you are first asked to choose either 32 bit of 64 bit setup. You then get a menu displaying all the editions appropriate for either x86 or x64. From there, installation proceeds in the same manner.
I'll report back once I have it working on a thumb drive as well.Last edited by hsehestedt; 23 May 2019 at 10:29.
-
New #6
Progress Update:
Works fine on a thumb drive. You simply need to be aware that there are 2 sources folders (one in the x64 folder and another in the x86 folder). Files such as the ei.cfg will need to be copied to both locations. On the FAT32 partition, some files need to be put in folders as well. Eventually, I'll write up a full summary once I have all the remaining questions that I have worked out.
Remaining Issues
Okay, so this whole procedure seems to work wonderfully for standard installations of Windows, both x86 and x64. However, I have not figured out a way to handle unattended installations.
For example, I currently have a thumb drive created with a 3rd party utility that has all the following Windows installs on it:
1) Standard Win 10 Pro x86
2) Standard Win 10 Pro x64
3) Win 10 Pro x86 with Latest Windows Updates
4) Win 10 Pro x64 with Latest Windows Updates
5) Win 10 Pro x86 Unattended Install for BIOS Based Systems
6) Win 10 Pro x64 Unattended Install for BIOS Based Systems
7) Win 10 Pro x64 Unattended Install for UEFI Based Systems
8) Win 10 Pro x86 Sysprep Install for BIOS Based Systems
9) Win 10 Pro x64 Sysprep Install for BIOS Based Systems
10) Win 10 Pro x64 Sysprep Install for UEFI Based Systems
So here is the problem - how can I separate all the answer files? I'm starting to think that this may not be possible with native Windows tools. When I look at the 3rd party tool I was using, it looks like it basically packages each installation in a separate ISO image, each of which can have its own answer file. With this procedure I see no way to separate the answer files for multiple Windows installations.
-
New #7
Kari,
I have a couple of questions.
I wanted to see if I could be clever and get unattended installations of Windows added to the list of available installs. So I had what I thought was a bright idea:
I would follow all the steps in the tutorial, but I would add an answer file to the image and just call it something like standby_autounattend.xml. If I'm booting from a thumb drive and I want to select a normal install, I simply proceed by selecting the edition of Windows I want to install from the menu and install as usual. If I want to perform an unattended install, then at the first static Window, I press SHIFT-F10 to open a command prompt, rename the file to autounattend.xml, select the edition of Windows I want and the installation then proceeds unattended. This works perfectly. NOTE: This obviously won't work for an ISO image because you can't rename the file. But it's fantastic on a thumb drive.
The one item that I am having problems with is the addition of sysprep images. When I add a WIM that has been syspreped, then when I boot I get I get a blank line where the menu selection item for that image should be like this:

If I attempt to select that image I get this:

I should note also that the sysprep image is definitely good. If I boot from the original image that I retrieved it from, it will install Windows 100% successfully.
I notice in the tutorial that you are adding a customized image. Is that a syspreped image or was it customized in a different manner?
Final question: Any thought as to why this may be happening or is what I'm attempting to do simply not possible?
I'm just so close - I have a solution that works for 32-bit and 64-bit editions of Windows, even a workable solution for unattended installs (at least on rewritable media), just no luck with sysprep images.
-
New #8
I've been playing with this ever since Kari posted this tutorial and I have a couple of questions that I'll just condense down here:
1) Let's keep it simple and say I'm only working with x64 images and no mix of x86 and x64. I can export multiple images such as Win 10 Pro, and Home, and even add images where I have injected updates, all without difficulty. However, I cannot seem to get any of my sysprep WIM images to work. The DISM command acts like it is exporting the image and there are no errors to be found. The resulting image is even bootable, but the sysprep installation is not available as noted in my previous post just above.
Is there something special I need to do with sysprep images?
2) What is the difference between doing a DISM /Export-Image and a DISM /Append? Procedurally, it's very different. With the append you have have to mount the WIM first, then append it, then unmount the image. It also takes a very long time compared to an export, but from what I've seen it looks like the end result is the same. Just have not found anything to indicate whether one has advantages over the other.
Any help with this would be apprecaited. As noted, I've been at this for days. I even wrote a program that automatically generates a batch file for me so that I can ensure that I am using the same exact syntax and commands everytime for consistency in testing. Below is a sample of the output generated by the program. Note this may be neededlessly complex. This was while I was experimenting with DISM /Append which involes the extra steps I noted above.
Code:@echo off REM ******************************************** REM * Windows Multi-edition Boot Image Creator * REM * (c) 2019 by Hannes Sehestedt * REM ******************************************** REM This batch file was automatically generated by Windows Multi-edition Boot Image Creator REM on 06-09-2019 at 06:24:37 REM Since this batch file references drive letters, folders, and files that are not likely to be in the same REM place on a different system, this batch file should be run only on the system on which it was generated. REM You should create a new batch file with the program if any of these details change. If you prefer, you can REM carefully modify this batch file manually. setlocal enabledelayedexpansion setlocal enableextensions cd /d %~dp0 REM The following lines will check to make sure that the batch file is run as administrator. If not, the program REM will terminate. REM ***************************************************************** REM * Check to see if this batch file is being run as Administrator * REM ***************************************************************** openfiles > NUL 2>&1 if NOT %ERRORLEVEL% EQU 0 goto NotAdmin goto IsAdmin :NotAdmin cls echo You have not run this file as Administrator. Please echo re-run it as an Administrator. echo. pause goto END :IsAdmin REM ********************************************** REM * End Routine to check if being run as Admin * REM ********************************************** REM *********************************************** REM * Perform a cleanup of the destination folder * REM *********************************************** attrib -h -s -r "D:\MultiBoot_Project\ISO_Files" rmdir /s /q "D:\MultiBoot_Project\ISO_Files" rmdir /s /q "D:\MultiBoot_Project\WIM_x86" rmdir /s /q "D:\MultiBoot_Project\WIM_x64" rmdir /s /q "D:\MultiBoot_Project\Mount" rmdir /s /q "D:\MultiBoot_Project\Temp" REM **************************** REM * Creating project folders * REM **************************** md "D:\MultiBoot_Project\ISO_Files" md "D:\MultiBoot_Project\WIM_x86" md "D:\MultiBoot_Project\WIM_x64" md "D:\MultiBoot_Project\Mount" md "D:\MultiBoot_Project\Temp" REM ***************************************************** REM * This project is an x64 only architecture project. * REM ***************************************************** REM ****************************************************************************** REM * Mounting an x64 Windows image and copying all files EXCEPT the install.wim * REM * files to the project folder \ISO_Files to be used as a base image. * REM ****************************************************************************** call :MountAnISOImage "Z:\Data\Windows\Windows 10 Version 1903 ISO Images\x64\Win 10 1903 x64 Consumer Editions with May 2019 Updates.ISO" robocopy %MountedImageDriveLetter%\ "D:\MultiBoot_Project\ISO_Files" /mir /njh /njs /a-:r /xf install.wim REM ***************************** REM * Now dismounting the image * REM ***************************** powershell.exe -command "Dismount-DiskImage "'Z:\Data\Windows\Windows 10 Version 1903 ISO Images\x64\Win 10 1903 x64 Consumer Editions with May 2019 Updates.ISO'"" REM ******************************************** REM * Cleaning up the \Mount and \Temp folders * REM ******************************************** rmdir /s /q "D:\MultiBoot_Project\Mount\" md "D:\MultiBoot_Project\Mount\" rmdir /s /q "D:\MultiBoot_Project\Temp\" md "D:\MultiBoot_Project\Temp\" REM *************************** REM * Processing image 1 of 3 * REM *************************** REM ****************** REM * Mounting Image * REM ****************** call :MountAnISOImage "Z:\Data\Windows\Windows 10 Version 1903 ISO Images\x64\Win 10 1903 x64 Consumer Editions with May 2019 Updates.ISO" REM ***************************************************** REM * For image number 1 we are using the EXPORT method * REM ***************************************************** "C:\Program Files (x86)\Windows Kits\10\Assessment and Deployment Kit\Deployment Tools\amd64\DISM\dism.exe" /export-image /sourceimagefile:"%MountedImageDriveLetter%\sources\install.wim" /sourceindex:6 /destinationimagefile:"D:\MultiBoot_Project\WIM_x64\install.wim" /destinationname:"W10 Pro 1903 x64 with May 2019 Updates" REM ********************* REM * Dismounting image * REM ********************* powershell.exe -command "Dismount-DiskImage "'Z:\Data\Windows\Windows 10 Version 1903 ISO Images\x64\Win 10 1903 x64 Consumer Editions with May 2019 Updates.ISO'"" REM ******************************************** REM * Cleaning up the \Mount and \Temp folders * REM ******************************************** rmdir /s /q "D:\MultiBoot_Project\Mount\" md "D:\MultiBoot_Project\Mount\" rmdir /s /q "D:\MultiBoot_Project\Temp\" md "D:\MultiBoot_Project\Temp\" REM *************************** REM * Processing image 2 of 3 * REM *************************** REM ****************** REM * Mounting Image * REM ****************** call :MountAnISOImage "Z:\Data\Windows\Windows 10 Version 1903 ISO Images\x64\Win 10 1903 x64 Consumer Editions with May 2019 Updates.ISO" REM ***************************************************** REM * For image number 2 we are using the EXPORT method * REM ***************************************************** "C:\Program Files (x86)\Windows Kits\10\Assessment and Deployment Kit\Deployment Tools\amd64\DISM\dism.exe" /export-image /sourceimagefile:"%MountedImageDriveLetter%\sources\install.wim" /sourceindex:1 /destinationimagefile:"D:\MultiBoot_Project\WIM_x64\install.wim" /destinationname:"W10 Home 1903 x64 with May 2019 Updates" REM ********************* REM * Dismounting image * REM ********************* powershell.exe -command "Dismount-DiskImage "'Z:\Data\Windows\Windows 10 Version 1903 ISO Images\x64\Win 10 1903 x64 Consumer Editions with May 2019 Updates.ISO'"" REM ******************************************** REM * Cleaning up the \Mount and \Temp folders * REM ******************************************** rmdir /s /q "D:\MultiBoot_Project\Mount\" md "D:\MultiBoot_Project\Mount\" rmdir /s /q "D:\MultiBoot_Project\Temp\" md "D:\MultiBoot_Project\Temp\" REM *************************** REM * Processing image 3 of 3 * REM *************************** REM ****************** REM * Mounting Image * REM ****************** call :MountAnISOImage "Z:\Data\Windows\Windows 10 Version 1903 ISO Images\x64\Win 10 1903 x64 UEFI Sysprep with May 2019 Updates.ISO" REM For image number 3 we are using the APPEND method. REM *********************************************** REM * Copying install.wim to project folder \Temp * REM *********************************************** robocopy "%MountedImageDriveLetter%\sources" "D:\MultiBoot_Project\Temp" install.wim /A-:R /njh /njs REM ****************** REM * Mounting image * REM ****************** "C:\Program Files (x86)\Windows Kits\10\Assessment and Deployment Kit\Deployment Tools\amd64\DISM\dism.exe" /Mount-Wim /WimFile:"D:\MultiBoot_Project\Temp\install.wim" /index:1 /MountDir:"D:\MultiBoot_Project\Mount" REM ***************************************************** REM * For image number 3 we are using the APPEND method * REM ***************************************************** "C:\Program Files (x86)\Windows Kits\10\Assessment and Deployment Kit\Deployment Tools\amd64\DISM\DISM.exe" /Append-Image /ImageFile:"D:\MultiBoot_Project\WIM_x64\install.wim" /CaptureDir:"D:\MultiBoot_Project\Mount" /Name:"W10 Pro 1903 x64 UEFI Sysprep with May 2019 Updates" REM ************************ REM * Unmounting the image * REM ************************ "C:\Program Files (x86)\Windows Kits\10\Assessment and Deployment Kit\Deployment Tools\amd64\DISM\dism.exe" /Unmount-Wim /MountDir:"D:\MultiBoot_Project\Mount" /Discard REM ************************************************************* REM * Performing Cleanup-Mountpoints and Cleanup-Wim operations * REM ************************************************************* "C:\Program Files (x86)\Windows Kits\10\Assessment and Deployment Kit\Deployment Tools\amd64\DISM\dism.exe" /Cleanup-Mountpoints "C:\Program Files (x86)\Windows Kits\10\Assessment and Deployment Kit\Deployment Tools\amd64\DISM\dism.exe" /Cleanup-Wim REM ************************* REM * Dismounting the image * REM ************************* powershell.exe -command "Dismount-DiskImage "'Z:\Data\Windows\Windows 10 Version 1903 ISO Images\x64\Win 10 1903 x64 UEFI Sysprep with May 2019 Updates.ISO'"" REM ********************************************************************* REM * Copying the updated install.wim image file(s) to the base project * REM ********************************************************************* robocopy "D:\MultiBoot_Project\WIM_x64" "D:\MultiBoot_Project\ISO_Files\sources" install.wim /a-:r /njh /njs REM ******************************** REM * Creating the final ISO image * REM ******************************** "C:\Program Files (x86)\Windows Kits\10\Assessment and Deployment Kit\Deployment Tools\amd64\Oscdimg\oscdimg.exe" -m -o -u2 -udfver102 -bootdata:2#p0,e,b"D:\MultiBoot_Project\ISO_Files\boot\etfsboot.com"#pEF,e,b"D:\MultiBoot_Project\ISO_Files\efi\microsoft\boot\efisys.bin" "D:\MultiBoot_Project\ISO_Files" "D:\MultiBoot_Project\Win10MultiBoot.ISO" GOTO :END REM *************************************************************************************************************** REM * Below is the subroutine for mounting an ISO image. Call it, passing the path to the ISO image with the call * REM * and it will mount the image and pass the drive letter (with colon), in MountedImageDriveLetter * REM *************************************************************************************************************** :MountAnISOImage REM Grab the path to the image to be mounted, assign it to SubImagePath, and strip quotes from the path. set SubImagePath=%1 set SubImagePath=%SubImagePath:"=% REM Mount the image. powershell.exe -command "Mount-DiskImage "'%SubImagePath%'"" powershell.exe -command "Get-DiskImage -ImagePath '%SubImagePath%' | Get-Volume" > MountInfo.txt REM Get drive letter (includes the colon). REM We need to skip 3 lines in order to read the 4th line of text in the MountInfo.txt file. for /F "skip=3 delims=" %%a in (MountInfo.txt) do ( set LineContents=%%a goto EvaluateForDriveLetter ) :EvaluateForDriveLetter REM We are done with MountInfo.txt. Delete it. del MountInfo.txt set LineContents=%LineContents:~0,1% set MountedImageDriveLetter=%LineContents%: goto :eof :END
-
-
New #9
First, I am sorry for a delayed reply. I saw your post the day it was posted, was a bit busy and thought I'd reply later. Of course I forgot it, remembering it again today when I posted about image description and when it's required, when not in another thread.
My apologies.
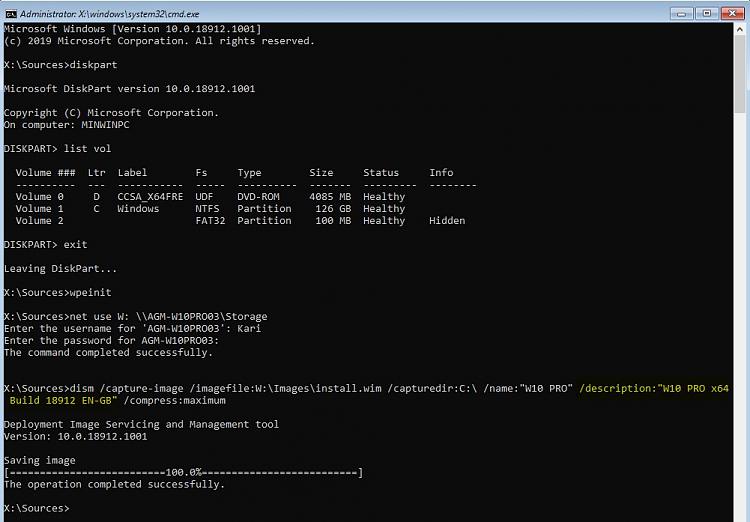
OK, the issue is a missing description for the image. There are several ways to add or edit description to a Windows image, easiest being to add it already when capturing the image by adding a description (see highlighted part):
dism /capture-image /imagefile:W:\Images\install.wim /capturedir:C:\ /name:"W10 PRO" /description:"W10 PRO x64 Build 18912 EN-GB" /compress:maximum
(Click to enlarge.)
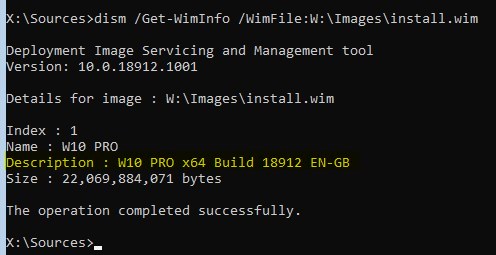
Checking the image, you will see that the name and description are as you set them:
OK, what if the image has no description?
If you have installed Windows 10 ADK and its Deployment Tools, you can open an elevated Deployment and Imaging Tools Environment (DISM in steroids!) and use ImageX to rename / set name and / or description to your custom images. Notice that ImageX is no longer available in Windows 10, you'll need ADK.
Use the following command:
imagex /info I:\Images\install.wim 1 "W10PRO" "Any name" /CHECK
- 1 = Image index, always 1 in captured custom WIM files
- "W10PRO" = Name
- "Any name" = Description
This sets the name and description to what you'd prefer:

What makes all this somewhat confusing is that it's the name that is shown for user in edition selection, not the description. But: without a description, even when name is set, edition name is shown as blank and install fails, showing the error message you got.
KariLast edited by Kari; 09 Jun 2019 at 20:42. Reason: Typos fixed, at least some of them

DISM - Create Bootable ISO with Multiple Windows 10 Images
How to Create a Bootable ISO file Containing Multiple Windows 10 ImagesPublished by Kari "Kalsarikänni" FinnCategory: Installation & Upgrade
28 Oct 2019


 Quote
Quote

Tutorial Categories

Related Discussions
