DISM - Create Bootable ISO with Multiple Windows 10 Images  

Page 2 of 4 FirstFirst 1234 LastLast

  1. Posts : 17,661
    Windows 10 Pro
    Thread Starter
       #10

    hsehestedt said:
    1) Is there something special I need to do with sysprep images?
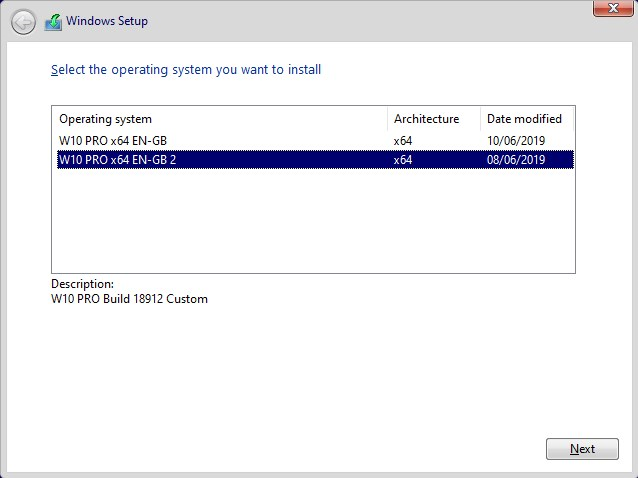
    Add description to your images, as told in my previous post.


    hsehestedt said:
    2) What is the difference between doing a DISM /Export-Image and a DISM /Append?
    Append-Image is mostly used to add data volumes to a Windows image. For instance, if you will use the same custom installer on various hardware, you could create a partition on your technician machine and store drivers to each hardware setup on it in hardware specific folders. Using Append-Image you can then add this partition (volume) to your USB installer, to make it available regardless on which hardware you perform the install.

    Following command would add partition W: on technician machine to USB flash drive installer (drive X:)

    dism /Append-Image /ImageFile:X:\Sources\install.wim /CaptureDir:W:\ /Name:"Hardware Drivers"

    Append-Image can be used to add any type of data volumes to a Windows image. I often use it to add software installers to image.

    Kari
      My Computer


  2. Posts : 4,187
    Windows 11 Pro, 22H2
       #11

    Kari,

    Your level of knowledge astounds me! Naturally, you were 100% correct. I had assumed that only the name was critical. Oddly enough, I saw multiple times when I ran a DISM /Get-WimInfo that the description was undefined but I kept dismissing this.

    Also, there were a few times where it worked but I never made the correlation in all the steps that I performed that those were the few times I was specifying a description. I did the whole process literally 100+ times and along the way stopped using description altogether to make things "easier" and "faster".

    I also want to thank you for the thoroughness of your response. The illustrations, highlights, and complete explanation is simply amazing. I know that it takes you time to formulate such a well documented response, but please know just how much this is really appreciated!

    BTW, never feel like you have to apologize for taking a little time to respond! I can't tell you how thankful I am to get any response at all.

    Finally, on a personal note, I just need to express once more my gratitude for all the exceptional help received. On an issue like this, there just simply is no place else to get answers to weird issues like this. I have literally spent hours scouring the Internet for some answers. I've also been at this for days now, getting about 2 hours of sleep per night (yes, it became an obsession!). To list how many different things I have tried would make your head explode. The fact that I overlooked such a simple solution makes me a bit angry with myself, but very happy in the end.

    It's really great to be able to connect with fellow geeks like this.

    There are a lot of third party utilities out there for making multiboot disks, but for months I have been wanting a solution using nothing but native Microsoft tools and I now have it! As an added bonus, now that I know all the steps, this is insanely easy to automate.
      My Computers


  3. Posts : 17,661
    Windows 10 Pro
    Thread Starter
       #12

    hsehestedt said:
    There are a lot of third party utilities out there for making multiboot disks, but for months I have been wanting a solution using nothing but native Microsoft tools and I now have it! As an added bonus, now that I know all the steps, this is insanely easy to automate.
    First, thanks! You made a grown up man blush…

    I share your goal, to do this without obscure third party tools. I am a Windows purist in the sense that I do not use any third party tools for anything that I am able to do either with Windows native tools, or free Microsoft tools not natively available in Windows. Of course there are exceptions, I use for instance Macrium Reflect for backups although native backup still exists, simply because Microsoft itself recommends using third party backup solutions, Windows Backup being deprecated in near future.

    This also means that I simply refuse to use any snake-oil cleaners, tweakers, optimizers and such, and try to do everything image customization, capture and deployment related stuff with native Windows and Microsoft tools.

    Kari
      My Computer


  4. Posts : 4,187
    Windows 11 Pro, 22H2
       #13

    Kari,

    I just wanted to let you know what my next goal is and see if you had any thought on this...

    If I want to include a couple of different unattended setups. I know that I could simply do something like store them as autounattend1.xml, autounattend2.xml, etc. Then, when I boot from that disk, at the first static screen I could open a command prompt, and rename one of them to autounattend.xml and reboot.

    Are you aware of any better way to handle that?

    Second, since combining a number of different images onto one disk like this will change around the index numbers for my images, should I run Win SIM, generate a new catalog, and update my autounattend.xml files to work on this multiboot disk?

    It seems to me like that might be the logical thing to do, but I'm just guessing here.

    In Microsoft documentation I could the following:

    During attended installations, users will be prompted to select which architecture-specific Windows image to install (x86 or x64 images).

    In unattended installations, if you store multiple Windows editions for multiple architecture types in a single .wim file, you must explicitly specify which image to install during Windows Setup with the MetaData setting.
    But what if all my images are of a single architecture, such as x64? Surely I have to tell the answer file which image it is associated with. Or, is it possible that you choose the image from the menu first, and only then does it kick off the unattended install?

    I'm going to try this all out soon, but thought I would see if you had any insight into this already.
      My Computers


  5. Posts : 17,661
    Windows 10 Pro
    Thread Starter
       #14

    hsehestedt said:
    If I want to include a couple of different unattended setups. I know that I could simply do something like store them as autounattend1.xml, autounattend2.xml, etc. Then, when I boot from that disk, at the first static screen I could open a command prompt, and rename one of them to autounattend.xml and reboot.
    In an unattended install, it is important to understand the difference between answer files autounattend.xml and unattend.xml.

    The unattend.xml is applied when you sysprep Windows in Audit Mode, It contains all customizations for OOBE, and will be included in your custom WIM image after the capture.

    If no specific partitioning is required, you boot target device from your multi-WIM USB, select which custom WIM will be installed, use Windows Setup to partition disk or simply select unallocated space to install Windows.

    This could be called "semi-unattended" install; Windows Setup requires you to manually run the installation, but after disk or partition to install Windows has been selected, rest is done automatically without user interaction.

    The purpose of autounattend.xml in this scenario is different; it takes care of the partitioning, tells Windows Setup to which partition Windows will be installed, and tells Setup which edition to install.

    The edition selection is done by generic edition specific product keys in autounattend.xml. But, as Windows Setup finds multiple custom versions of the same edition, one mouse click is required from the user, to select which custom image to install:
    DISM - Create Bootable ISO with Multiple Windows 10 Images-image.png

    Saving the following answer file as autounattend.xml on root of your multi-WIM install media, the DISK 0 would be wiped clean, EFI system partitions and a 250 GB Windows partition C: would be created, and remaining free space of the disk would be used for a Data partition D:, and only then you would be asked which of the custom WIM images you would like to install:

    Code:
    <?xml version="1.0" encoding="utf-8"?>
    <unattend xmlns="urn:schemas-microsoft-com:unattend">
        <settings pass="windowsPE">
            <component name="Microsoft-Windows-International-Core-WinPE" processorArchitecture="amd64" publicKeyToken="31bf3856ad364e35" language="neutral" versionScope="nonSxS" xmlns:wcm="http://schemas.microsoft.com/WMIConfig/2002/State" xmlns:xsi="http://www.w3.org/2001/XMLSchema-instance">
                <SetupUILanguage>
                    <UILanguage>en-GB</UILanguage>
                </SetupUILanguage>
                <InputLocale>040b:0000040b</InputLocale>
                <UILanguage>en-GB</UILanguage>
                <UILanguageFallback>en-GB</UILanguageFallback>
                <UserLocale>en-GB</UserLocale>
                <SystemLocale>en-GB</SystemLocale>
            </component>
            <component name="Microsoft-Windows-Setup" processorArchitecture="amd64" publicKeyToken="31bf3856ad364e35" language="neutral" versionScope="nonSxS" xmlns:wcm="http://schemas.microsoft.com/WMIConfig/2002/State" xmlns:xsi="http://www.w3.org/2001/XMLSchema-instance">
                <DiskConfiguration>
                    <Disk wcm:action="add">
                        <CreatePartitions>
                            <CreatePartition wcm:action="add">
                                <Order>1</Order>
                                <Size>100</Size>
                                <Type>EFI</Type>
                            </CreatePartition>
                            <CreatePartition wcm:action="add">
                                <Order>2</Order>
                                <Size>16</Size>
                                <Type>MSR</Type>
                            </CreatePartition>
                            <CreatePartition wcm:action="add">
                                <Extend>false</Extend>
                                <Order>3</Order>
                                <Type>Primary</Type>
                                <Size>256000</Size>
                            </CreatePartition>
                            <CreatePartition wcm:action="add">
                                <Order>4</Order>
                                <Size>450</Size>
                                <Type>Primary</Type>
                            </CreatePartition>
                            <CreatePartition wcm:action="add">
                                <Extend>true</Extend>
                                <Order>5</Order>
                                <Type>Primary</Type>
                            </CreatePartition>
                        </CreatePartitions>
                        <ModifyPartitions>
                            <ModifyPartition wcm:action="add">
                                <Order>1</Order>
                                <PartitionID>1</PartitionID>
                                <Label>System</Label>
                                <Format>FAT32</Format>
                            </ModifyPartition>
                            <ModifyPartition wcm:action="add">
                                <Order>2</Order>
                                <PartitionID>2</PartitionID>
                            </ModifyPartition>
                            <ModifyPartition wcm:action="add">
                                <Order>3</Order>
                                <PartitionID>3</PartitionID>
                                <Letter>C</Letter>
                                <Label>Windows</Label>
                                <Format>NTFS</Format>
                            </ModifyPartition>
                            <ModifyPartition wcm:action="add">
                                <TypeID>DE94BBA4-06D1-4D40-A16A-BFD50179D6AC</TypeID>
                                <Order>4</Order>
                                <PartitionID>4</PartitionID>
                                <Format>NTFS</Format>
                                <Label>WinRE</Label>
                            </ModifyPartition>
                            <ModifyPartition wcm:action="add">
                                <Order>5</Order>
                                <PartitionID>5</PartitionID>
                                <Letter>D</Letter>
                                <Label>Data</Label>
                                <Format>NTFS</Format>
                            </ModifyPartition>
                         </ModifyPartitions>
                        <WillWipeDisk>true</WillWipeDisk>
                        <DiskID>0</DiskID>
                    </Disk>
                </DiskConfiguration>
                <UserData>
                    <AcceptEula>true</AcceptEula>
                    <Organization>Ten Forums</Organization>
                    <ProductKey>
                        <Key>VK7JG-NPHTM-C97JM-9MPGT-3V66T</Key>
                    </ProductKey>
                </UserData>
                <ImageInstall>
                    <OSImage>
                        <InstallTo>
                            <DiskID>0</DiskID>
                            <PartitionID>3</PartitionID>
                        </InstallTo>
                    </OSImage>
                </ImageInstall>
            </component>
        </settings>
    </unattend>

    Notice that in above sample answer file, I have used W10 PRO generic product key. Answer file also sets keyboard layout for all system accounts to Finnish (my preferred one), and OS language to be EN-GB. See step 3.5 in following tutorial for locales for other languages: Create media for automated unattended install of Windows 10

    If this same partitioning scheme can be used on all target devices, then you do not have to change it. If different schemes will be required depending on target device, then your plan is good. Create multiple answer files in Windows SIM, adding a number to their names like autounattend1.xml and so on, or even more descriptive names like autounattend_HP_ProBook_Laptop.xml, then rename one of them as autounattend.xml depending on which target device you are working with, and restart booting from USB.


    hsehestedt said:
    Second, since combining a number of different images onto one disk like this will change around the index numbers for my images, should I run Win SIM, generate a new catalog, and update my autounattend.xml files to work on this multiboot disk?
    No need for that. One catalog file works for all editions and versions of Windows.


    hsehestedt said:
    Or, is it possible that you choose the image from the menu first, and only then does it kick off the unattended install?
    It's exactly the opposite: autounattend.xml will partition the disk, then when Windows Setup finds multiple WIM images containing the same edition, user will be asked which one to install (see the screenshot earlier in this post).

    This, let's call it "almost unattended" install requires, as I mentioned before, one single mouse click from the user, the image selection. Everything else will be fully automated, unattended.

    Kari
      My Computer


  6. Posts : 4,187
    Windows 11 Pro, 22H2
       #15

    Thanks so much, Kari. I've also been doing some testing and come up with something that works very well for me. It also confirms exactly items you just noted.

    On an ISO image (used for Virtual machines), my idea of storing and renaing multiple answer files won't work since it is read only media.

    However, since Windows searches for an autounattend.xml in several places - including external media, we can take advantage of that. If you are using a VM such as Hyper-V or VMware you can simply attach a second ISO image that holds the answer file.

    In my testing, I whipped up a quick ISO image that had the 2 different configurations of Win 10 Pro x64, and one Win 10 Home x64. If you boot without an answer file present all 3 options are presented. If I boot with an answer file that I created for Win 10 Pro on a second ISO image, then the Win 10 Home option does not show up in the selection menu just as you had indicated. I can choose either Pro configuation and it will use the answer file.

    So about the only remaining piece for me to figure out is how to make this work with a multiarchitecture boot disk. Hopefully it's as simple as placing an answer file created for x86 or x64 as needed on the media, but testing will reveal whether this is really the case.

    Something else you eluded to - the difference between the autounattend and autounattend. Thanks to your tutorials, I've got a real firm grasp on that. But even with a sysprep installation, I still have a few specific items I like to put in an autounattend.xml. Just a few things to allow me to get it exactly how I want
      My Computers


  7. Posts : 17,661
    Windows 10 Pro
    Thread Starter
       #16

    hsehestedt said:
    On an ISO image (used for Virtual machines), my idea of storing and renaing multiple answer files won't work since it is read only media.
    It's quite fast and easy to create new custom ISO containing everything you need. See Part 5 in this tutorial for re-creating your ISO with OSCDIMG.EXE (part of ADK Deployment Tools): Create Windows 10 ISO image from Existing Installation

    I do it if not daily but at least a couple of times a week.

    Kari
      My Computer


  8. Posts : 4,187
    Windows 11 Pro, 22H2
       #17

    Yeah, I have a routine that I wrote in software to automatically recreate ISO images so it's especially easy. Literally seconds, but this is more of a learning exercise to figure out what the limits are of what I can and cannot do.

    In the meantime, I just built a new image with x86 and x64 images + an answer file and all is working well. Will do more testing to be sure it all works, but as of now, it all looks great.

    BTW, I never was able to get a dual architecture disk to successfully boot in UEFI mode on VMware or my physical machines. I had to modify the procedure to use a dual architecture image from Microsoft as the base. One difference is that it has a separate x86 and x64 folder off of the root, but clearly the boot sector must also be different since images made using it as a base work fine where the other will not.
      My Computers


  9. Posts : 15,480
    Windows10
       #18

    Kari said:
    First, thanks! You made a grown up man blush…

    I share your goal, to do this without obscure third party tools. I am a Windows purist in the sense that I do not use any third party tools for anything that I am able to do either with Windows native tools, or free Microsoft tools not natively available in Windows. Of course there are exceptions, I use for instance Macrium Reflect for backups although native backup still exists, simply because Microsoft itself recommends using third party backup solutions, Windows Backup being deprecated in near future.

    This also means that I simply refuse to use any snake-oil cleaners, tweakers, optimizers and such, and try to do everything image customization, capture and deployment related stuff with native Windows and Microsoft tools.

    Kari
    It is interesting that MS said many builds back, the image backup tool was a deprecated feature but have not done anything about it - indeed, it has not been mentioned for a long time. It is as if they are quietly keeping it.

    Indeed FFU was introduced fairly recently. Mayber that is going to form basis of imaging backup (add a gui or change existing gui to use ffu behind scenes perhap).
      My Computer


  10. Posts : 17,661
    Windows 10 Pro
    Thread Starter
       #19

    This morning, I got a PM from a fellow Ten Forums member, telling me that "Sorry, but the instructions in tutorial to create a multi-architecture single WIM file do not work. I can state with 100% confidence that the procedure as written simply does not work for dual architecture scenarios.".

    As I know for sure that it will work, I did some new tests today to further validate the instructions given in this tutorial. I created a multi-architecture single WIM file, adding both x86 and x64 versions of Windows 10 Version 1909 Pro, Enterprise and Education editions on it.

    I had no issues in using the ISO image created, with this multi-architecture custom install.wim file, in installing any bit version or edition on both a physical, BIOS based machine, as well as Hyper-V Generation 1 virtual machine.

    Some basics about why booting from multi-architecture ISO fails:

    Most common reason is that user has used a 64-bit Windows WIM file as base media. No 32-bit machine can boot from 64-bit install media.

    As told in tutorial, when creating a multi-architecture WIM file, the base WIM used must be 32-bit. This, of course, makes it almost impossible to be used on UEFI systems, because most of UEFI systems can only boot from 64-bit media.

    Summarize the above, the multi-architecture WIM must be based on 32-bit Windows install files, including install.wim file. It can be used as such on any BIOS machine, but to use it on UEFI machine, the machine should be switched to legacy BIOS mode.

    OK, todays test. I created a multi-architecture WIM file exactly as told in this tutorial, with Pro, Enterprise and Education editions of Windows 10 Version 1909. Indexes 1 to 3 are x86, indexes 4 to 6 the same but x64:
    DISM - Create Bootable ISO with Multiple Windows 10 Images-image.png
    (Click to enlarge.)

    Let's compare Pro editions, index 1 being the x86 version (yellow highlight in next screenshot), and index 4 the x64 version (green highlight):
    DISM - Create Bootable ISO with Multiple Windows 10 Images-image.png

    Installing on a BIOS machine, there are no issues, OS selection screen showing available editions and their bit versions:
    DISM - Create Bootable ISO with Multiple Windows 10 Images-image.png

    I've now done 12 clean installs from this media today, installing each of three editions in both bit versions on a physical machine, and on a virtual machine. Absolutely no issues.

    I just want to say that a multi-architecture install media with a single WIM file works exactly as it should work.

    Kari
      My Computer


Tutorial Categories

DISM - Create Bootable ISO with Multiple Windows 10 Images Tutorial Index Network & Sharing Instalation and Upgrade Browsers and Email General Tips Gaming Customization Apps and Features Virtualization BSOD System Security User Accounts Hardware and Drivers Updates and Activation Backup and Restore Performance and Maintenance Mixed Reality Phone


  Related Discussions
Our Sites
Site Links
About Us
Windows 10 Forums is an independent web site and has not been authorized, sponsored, or otherwise approved by Microsoft Corporation. "Windows 10" and related materials are trademarks of Microsoft Corp.

© Designer Media Ltd
All times are GMT -5. The time now is 23:06.
Find Us


Windows 10 Forums