

How to Set Default Windows Subsystem for Linux (WSL) Distro in Windows 10
The Windows Subsystem for Linux (WSL) is a new Windows 10 feature that enables you to run native Linux command-line tools directly on Windows, alongside your traditional Windows desktop and modern store apps.
The default WSL distribution is the one that runs when you run wsl on a command line.
Starting with Windows 10 build 18342 (19H1) and Windows 10 build 18836 (20H1), Microsoft added some new commands that will give you more functionality when using wsl.exe. The commands that existed inside of wslconfig.exe have been added to wsl.exe to allow you to configure your distros more easily.
See also:
This tutorial will show you how to set a default Windows Subsystem for Linux (WSL) distro for your account in Windows 10.
Here's How:
1. Open a command prompt or PowerShell.
2. Copy and paste the command below for your version of Windows 10 into the command prompt or PowerShell, and press Enter. (see screenshots below step 3)
(For Windows 10 version 1903 and later)

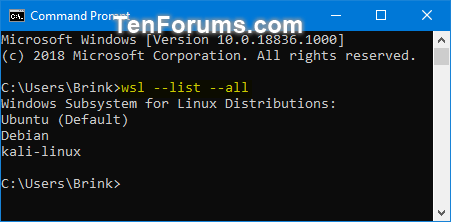
wsl --list --allorwsl -l --all
OR
(For versions earlier than Windows 10 version 1903)
wslconfig /list /allorwslconfig /l /all
3. You will now see a list of the names of all WSL distros available for your account, and (Default) next to the current default WSL distro. Make note of the distro name (ex: "Debian") you want to set as default. (see screenshots below)
4. Enter the command below for your version of Windows 10 into the command prompt, and press Enter. (see screenshots below)
(For Windows 10 version 1903 and later)
wsl -s <DistributionName>ORwsl --setdefault <DistributionName>
OR
(For versions earlier than Windows 10 version 1903)
wslconfig /s <DistributionName>ORwslconfig /setdefault <DistributionName>
Substitute <DistributionName> in the command above with the actual WSL distro name (ex: "Debian") from step 3 you want to set as default.
For example:wsl --setdefault Debian

5. When finished, you can close the command prompt or PowerShell if you like.
That's it,
Shawn
Related Tutorials
- How to Enable or Disable Windows Subsystem for Linux (Bash on Ubuntu) in Windows 10
- How to Install Windows Subsystem for Linux (WSL) Distros in Windows 10
- How to Set Linux Distribution version to WSL 1 or WSL 2 in Windows 10
- How to Update and Upgrade Windows Subsystem for Linux (WSL) Distro Packages in Windows 10
- How to Unregister and Reset Windows Subsystem for Linux (WSL) Distro in Windows 10
- How to Add User to Windows Subsystem for Linux (WSL) Distro in Windows 10
- How to Add, Remove, and List Sudo Users in Windows Subsystem for Linux (WSL) Distro in Windows 10
- How to List Users in Windows Subsystem for Linux (WSL) Distro in Windows 10
- How to Set Default User for Windows Subsystem for Linux (WSL) Distro in Windows 10
- How to Switch User in Windows Subsystem for Linux (WSL) Distro in Windows 10
- How to Change User Password in Windows Subsystem for Linux (WSL) Distro in Windows 10
- How to Reset User Password in Windows Subsystem for Linux (WSL) Distro in Windows 10
- How to Export and Import Windows Subsystem for Linux (WSL) Distro in Windows 10
- How to Add or Remove Open Linux shell here context menu in Windows 10
- How to Add or Remove Linux in Navigation Pane of File Explorer in Windows 10
- How to List All Available Windows Subsystem for Linux (WSL) Distros in Windows 10
- How to List All Running Windows Subsystem for Linux (WSL) Distros in Windows 10
- How to Terminate Running Windows Subsystem for Linux (WSL) Distro in Windows 10
- How to Run a Windows Subsystem for Linux (WSL) Distro in Windows 10
- How to Access Linux Files in a Windows Subsystem for Linux (WSL) Distro from Windows 10
Set Default Windows Subsystem for Linux (WSL) Distro in Windows 10

Set Default Windows Subsystem for Linux (WSL) Distro in Windows 10
How to Set Default Windows Subsystem for Linux (WSL) Distro in Windows 10Published by Shawn BrinkCategory: Apps & Features
11 Sep 2020


Tutorial Categories

Related Discussions
