

How to Install PowerShell Core on Windows
Over the years, there have been many releases of PowerShell. Initially, Windows PowerShell was built on the .NET Framework and only worked on Windows systems.
With the current release, PowerShell Core uses .NET Core 2.x as its runtime. PowerShell Core is a cross-platform (Windows, Linux, and macOS) automation and configuration tool/framework that works well with your existing tools and is optimized for dealing with structured data (e.g. JSON, CSV, XML, etc.), REST APIs, and object models. It includes a command-line shell, an associated scripting language and a framework for processing cmdlets. PowerShell Core is an Open Source project on GitHub.
PowerShell Core is a separate version of PowerShell that does not replace or upgrade the Windows PowerShell included in Windows by default. PowerShell Core can run side-by-side with Windows PowerShell.
For more details about PowerShell Core, see:
- PowerShell Scripting | Microsoft Docs
- GitHub - PowerShell/PowerShell: PowerShell for every system!
- PowerShell Core 6.0: Generally Available (GA) and Supported! | PowerShell Team Blog
- Announcing PowerShell Core 6.1 | PowerShell Team Blog
- Installing PowerShell Core on Windows | Microsoft Docs
- PowerShell/CHANGELOG.md at master PowerShell/PowerShell · GitHub
- What's New in PowerShell Core 6.1 | Microsoft Docs
- What's New in PowerShell Core 6.0 | Microsoft Docs
- PowerShell Core Support Lifecycle | Microsoft Docs
This tutorial will show you how to install the latest release of PowerShell Core in Windows 7, Windows 8, and Windows 10.
You must be signed in as an administrator to install PowerShell Core.
EXAMPLE: PowerShell Core in Windows

Here's How:
1. Go to GitHub (click on link), and download the latest PowerShell Core .msi file (ex: "PowerShell-6.2.0-preview.4-win-x64.msi") for your 32-bit (x86) or 64-bit (x64) Windows. (see screenshot below)
2. Double click/tap on the downloaded .msi file (ex: "PowerShell-6.2.0-preview.4-win-x64.msi")
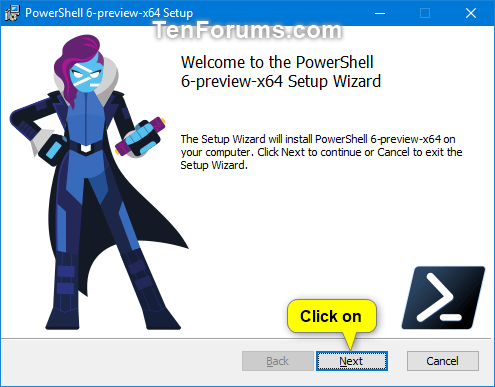
3. Click/tap on Next. (see screenshot below)
4. Check the I accept the terms in the License Agreement box, and click/tap on Next. (see screenshot below)
5. Click/tap on Next. (see screenshot below)
6. Check or uncheck the optional actions you want, and click/tap on Next. (see screenshot below)
7. Click/tap on Install. (see screenshot below)
8. If prompted by UAC, click/tap on Yes.
9. Click/tap on Finish. (see screenshot below)
That's it,
Shawn
Related Tutorials
- How to Check PowerShell Version in Windows
- How to Enable or Disable Windows PowerShell 2.0 in Windows 10
- Enable or Disable Legacy Console for Command Prompt and PowerShell in Windows 10
Install PowerShell Core on Windows

Install PowerShell Core on Windows
How to Install PowerShell Core on WindowsPublished by Shawn BrinkCategory: Apps & Features
03 Feb 2019


Tutorial Categories

Related Discussions
