

How to Enable or Disable Reserved Storage in Windows 10
To make sure your device can successfully update and that it runs its best, Windows reserves a portion of storage space on your device for use by temporary files, caches, and other files. When your device is low on space, Windows will clear reserved storage so it can be used for other processes, like a Windows update. Reserving storage also helps keep disk space usage on your device more predictable and more stable.
Starting with the next major update Microsoft is making a few changes to how Windows 10 manages disk space. Through reserved storage, some disk space will be set aside to be used by updates, apps, temporary files, and system caches. Microsoft's goal is to improve the day-to-day function of your PC by ensuring critical OS functions always have access to disk space. Without reserved storage, if a user almost fills up her or his storage, several Windows and application scenarios become unreliable. Windows and application scenarios may not work as expected if they need free space to function. With reserved storage, updates, apps, temporary files, and caches are less likely to take away from valuable free space and should continue to operate as expected. Reserved storage will be introduced automatically on devices that come with version 1903 pre-installed or those where 1903 was clean installed. You dont need to set anything upthis process will automatically run in the background.
The Reserved Storage feature is available for Windows 10 build 18298 and higher.
How does it work?
When apps and system processes create temporary files, these files will automatically be placed into reserved storage. These temporary files wont consume free user space when they are created and will be less likely to do so as temporary files increase in number, provided that the reserve isnt full. Since disk space has been set aside for this purpose, your device will function more reliably. Storage sense will automatically remove unneeded temporary files, but if for some reason your reserve area fills up Windows will continue to operate as expected while temporarily consuming some disk space outside of the reserve if it is temporarily full.
Windows Updates made easy
Updates help keep your device and data safe and secure, along with introducing new features to help you work and play the way you want. Every update temporarily requires some free disk space to download and install. On devices with reserved storage, update will use the reserved space first.
When its time for an update, the temporary unneeded OS files in the reserved storage will be deleted and update will use the full reserve area. This will enable most PCs to download and install an update without having to free up any of your disk space, even when you have minimal free disk space. If for some reason Windows update needs more space than is reserved, it will automatically use other available free space. If thats not enough, Windows will guide you through steps to temporarily extend your hard disk with external storage, such as with a USB stick, or how to free up disk space.
How much of my storage is reserved?
In the next major release of Windows (19H1), Microsoft anticipates that reserved storage will start at about 7GB, however the amount of reserved space will vary over time based on how you use your device. For example, temporary files that consume general free space today on your device may consume space from reserved storage in the future. Additionally, over the last several releases weve reduced the size of Windows for most customers. Microsoft may adjust the size of reserved storage in the future based on diagnostic data or feedback. The reserved storage cannot be removed from the OS, but you can reduce the amount of space reserved. More details below.
The following two factors influence how reserved storage changes size on your device:
- Optional features - Many optional features are available for Windows. These may be pre-installed, acquired on demand by the system, or installed manually by you. When an optional feature is installed, Windows will increase the amount of reserved storage to ensure there is space to maintain this feature on your device when updates are installed. You can see which features are installed on your device by going to Settings > Apps > Apps & features > Manage optional features. You can reduce the amount of space required for reserved storage on your device by uninstalling optional features you are not using.
- Installed Languages - Windows is localized into many languages. Although most of our customers only use one language at a time, some customers switch between two or more languages. When additional languages are installed, Windows will increase the amount of reserved storage to ensure there is space to maintain these languages when updates are installed. You can see which languages are installed on your device by going to Settings > Time & Language > Language. You can reduce the amount of space required for reserved storage on your device by uninstalling languages you arent using.
See also:
- Managing reserved storage in Windows 10 environments | Windows IT Pro Blog
- How reserved storage works in Windows 10 | Windows Support
- Windows 10 and reserved storage | Storage at Microsoft
This tutorial will show you how to enable or disable the Reserved Storage feature in Windows 10.
You must be signed in as an administrator to enable or disable the Reserved Storage feature.
Contents
- Option One: Check Current State of Reserved Storage to See if Enabled or Disabled in Command Prompt
- Option Two: Check Current State of Reserved Storage to See if Enabled or Disabled in PowerShell
- Option Three: Enable or Disable Reserved Storage in Command Prompt
- Option Three: Enable or Disable Reserved Storage in PowerShell
- Option Five: Enable Reserved Storage using a REG file
- Option Six: Disable Reserved Storage using a REG file
EXAMPLE: Reserved Storage enabled
How to Check Reserved Storage Size for Windows Update in Windows 10

This option is only available in Windows 10 version 2004 and higher.
See also: DISM Reserved Storage Command-line Options | Microsoft Hardware Dev Center
1 Open an elevated command prompt.
2 Copy and paste the command below into the elevated command prompt, and press Enter. (see screenshot below)
DISM /Online /Get-ReservedStorageState
3 You will now see if the current state of reserved storage is enabled or disabled.
This option is only available in Windows 10 version 2004 and higher.
For more Get-WindowsReservedStorageState command usage options, see: Get-WindowsReservedStorageState | Microsoft Docs
1 Open an elevated PowerShell.
2 Copy and paste the command below into the elevated PowerShell, and press Enter. (see screenshot below)
Get-WindowsReservedStorageState
3 You will now see if the current reserved storage state is enabled or disabled.
This option is only available in Windows 10 version 2004 and higher.
See also: DISM Reserved Storage Command-line Options | Microsoft Hardware Dev Center
1 Open an elevated command prompt.
2 Copy and paste the command below you want to use into the elevated command prompt, and press Enter. (see screenshots below)
(Enable reserved Storage - default)
DISM /Online /Set-ReservedStorageState /State:Enabled
OR
(Disable reserved Storage)
DISM /Online /Set-ReservedStorageState /State:Disabled
3 You can now close the elevated command prompt if wanted.

This option is only available in Windows 10 version 2004 and higher.
For more Set-WindowsReservedStorageState command usage options, see: Set-WindowsReservedStorageState | Microsoft Docs
1 Open an elevated PowerShell.
2 Copy and paste the command below you want to use into the elevated PowerShell, and press Enter. (see screenshots below)
(Enable reserved Storage - default)
Set-WindowsReservedStorageState -State Enabled
OR
(Disable reserved Storage)
Set-WindowsReservedStorageState -State Disabled
3 You can now close the elevated PowerShell if wanted.

This is the default setting,
The downloadable .reg files below will modify the DWORD values in the registry key below.
[HKEY_LOCAL_MACHINE\SOFTWARE\Microsoft\Windows\CurrentVersion\ReserveManager]
"MiscPolicyInfo"=dword:00000001
"PassedPolicy"=dword:00000001
"ShippedWithReserves"=dword:00000001
1 Click/tap on the Download button below to download the file below.
2 Save the .reg file to your desktop.
3 Double click/tap on the downloaded .reg file to merge it.
4 When prompted, click/tap on Run, Yes (UAC), Yes, and OK to approve the merge.
5 You can now delete the downloaded .reg file if you like.
6 Your changes will take affect the next time Windows 10 is updated to a new build.
The downloadable .reg files below will modify the DWORD values in the registry key below.
[HKEY_LOCAL_MACHINE\SOFTWARE\Microsoft\Windows\CurrentVersion\ReserveManager]
"MiscPolicyInfo"=dword:00000002
"PassedPolicy"=dword:00000000
"ShippedWithReserves"=dword:00000000
1 Click/tap on the Download button below to download the file below.
2 Save the .reg file to your desktop.
3 Double click/tap on the downloaded .reg file to merge it.
4 When prompted, click/tap on Run, Yes (UAC), Yes, and OK to approve the merge.
5 You can now delete the downloaded .reg file if you like.
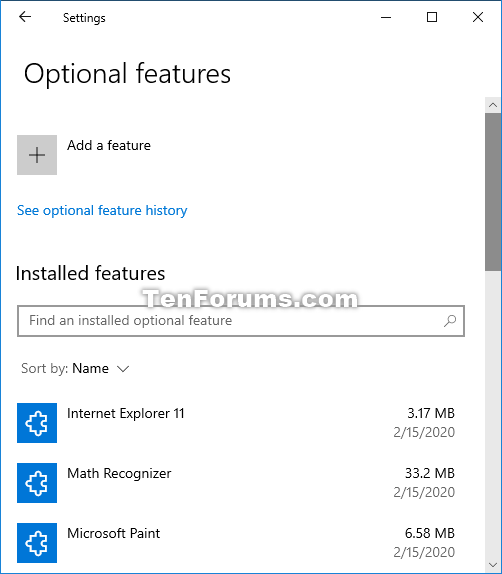
6 Open Settings, click/tap on Apps & features on the left side, and click/tap on the Optional features link on the right side. (see screenshots below)
This will refresh reserved storage to free it up and be available again on the Windows C:\ drive.
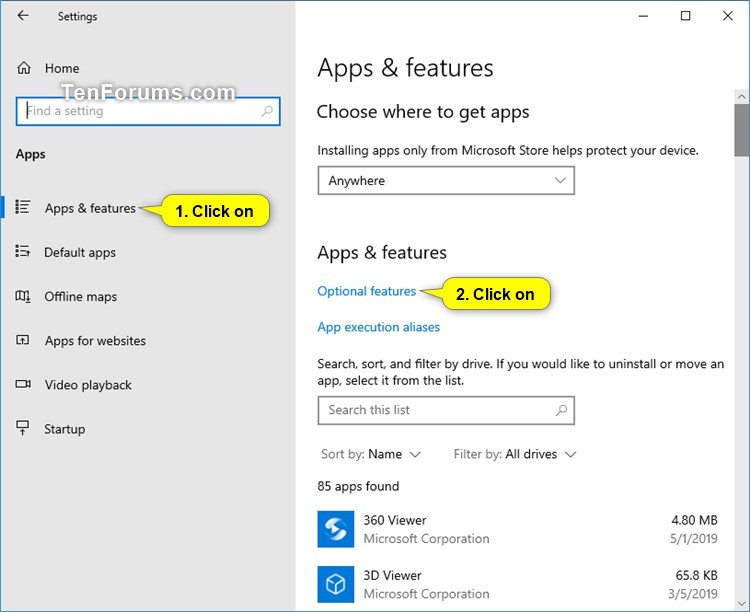
7 You can now close Optional features. If you check Reserved Storage size, it should no longer be reserved like below. (see screenshot below)
That's it,
Shawn
Related Tutorials
- How to Check Reserved Storage Size in Windows 10
- How to Check for and Install Windows Updates in Windows 10
- How to Change Delivery Optimization Max Cache Size for Updates in Windows 10
Enable or Disable Reserved Storage in Windows 10
-
New #1
I had enabled it on both Fast and Skippy builds, and just noticed today after build 18323 these tidbits.
An 8GB VHDX (Virtual Hard Drive) allocated consuming almost no space. Just ID data.
How it appears in Defrag and Optimize:

How it appears in Disk Management and MiniTool Partition Wizard:

-
-
-
-
-
New #6
Then next question would be what indicates to you that you have the 8GB reserved? Check this Reg key (from Shawn's tut above)
HKEY_LOCAL_MACHINE\SOFTWARE\Microsoft\Windows\CurrentVersion\ReserveManager
ShippedWithReserves DWORD
0 = Disable (default)
1 = Enable
If you just did this, in this build, it will will not appear until the next build update.
-
-
-
-
New #9
Loads of free space but it could be the MBR/BIOS partition limitations? Just a guess. Will try and tidy up those two recovery partitions. Macrium backup first though!Last edited by Fabler2; 26 Jan 2019 at 08:58. Reason: added info
Enable or Disable Reserved Storage in Windows 10
How to Enable or Disable Reserved Storage in Windows 10Published by Shawn BrinkCategory: General Tips
06 May 2020


 Quote
Quote


Tutorial Categories

Related Discussions
