

How to Add Secure Delete to Context Menu in Windows 10
When you delete a file or folder in Windows, the item(s) get placed in the Recycle Bin by default until you empty the Recycle Bin to permanently delete them if you didn't want to restore them.
If you permanently delete a file or folder, the item(s) will bypass the Recycle Bin and be immediately permanently deleted instead.
However, permanently deleting a file or folder doesn't secure delete them.
Secure Delete will delete and overwrite a file or folder to securely erase any data that exists in the unallocated portions of a disk for the deleted file or folder so it gone forever and cannot be recovered.
If you like, you can add a Secure Delete context menu that will secure erase selected files and folders.
The Secure Delete context menu will perform 3 passes to securely erase the selected file(s) and/or folder(s). If you would prefer to have more passes, then please post a reply in this tutorial requesting it, and I'll post an updated .reg file for it.
The Secure Delete context menu will not be available when you right click or press and hold on any drive, the C:\Program Files folder, the C:\Program Files (x86) folder, the C:\ProgramData folder, the C:\Users folder, the C:\Windows folder, and the C:\Windows.old folder. This was done by design to prevent deleting these critical Windows system folders by mistake.
You will still be able to use the Secure Delete context menu on files and folders inside the folders above though.
This tutorial will show you how to add Secure Delete to the context menu of files and folders for all users in Windows 7, Windows 8, and Windows 10.
While you must be signed in as an administrator to add or remove the context menu, all users will be able to use the context menu.
The first time you use the context menu, SDelete may prompt you to Agree to the license terms before continuing. You will not see the prompt again afterwards.
Contents
- Option One: Add "Secure Delete" to Context Menu of Files and Folders
- Option Two: Remove "Secure Delete" from Context Menu of Files and Folders
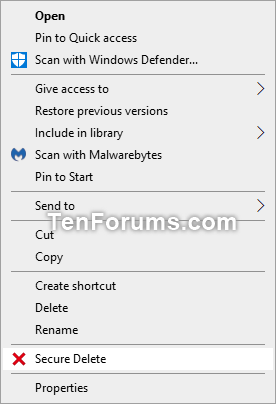
EXAMPLE: "Secure Delete" context menu
1 Download the latest version of SDelete by Mark Russinovich from Microsoft Sysinternals below.
2 Save the SDelete.zip file to your desktop.
3 Unblock the downloaded SDelete.zip file.
4 Open the SDelete.zip file.
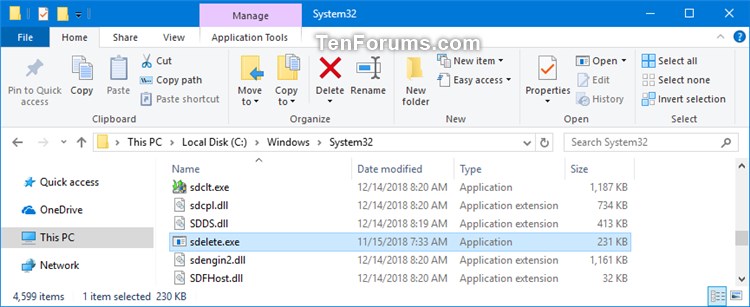
5 Open the C:\Windows\System32 folder in a separate File Explorer (Win+E) window.
6 Copy and paste (drag and drop) the sdelete.exe file from the SDelete.zip file into the C:\Windows\System32 folder. (see screenshots below)

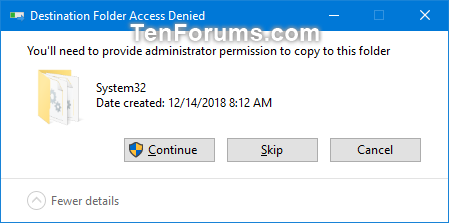
7 When prompted, click/tap on Continue to approve. (see screenshot below)
8 You can now close the ZIP and File Explorer windows if you like.
9 Click/tap on the Download button below to download the file below.
10. Save the .reg file to your desktop.
11 Double click/tap on the downloaded .reg file to merge it.
12 When prompted, click/tap on Run, Yes (UAC), Yes, and OK to approve the merge.
13 You can now delete the downloaded .reg file if you like.
This is the default setting.
1 Click/tap on the Download button below to download the file below.
2 Save the .reg file to your desktop.
3 Double click/tap on the downloaded .reg file to merge it.
4 When prompted, click/tap on Run, Yes (UAC), Yes, and OK to approve the merge.
5 You can now delete the downloaded .reg file if you like.
That's it,
Shawn
Related Tutorials
- How to Add Secure Delete to Recycle Bin Context Menu in Windows 10
- How to Add Permanently Delete to Context Menu in Windows 10
- How to Add or Remove Empty Folder context menu in Windows 10
- How to Delete a Folder in Windows 10
- How to Delete a File in Windows 10
- How to Use Cipher Command to Overwrite Deleted Data in Windows
Add Secure Delete to Context Menu in Windows 10
-
Posts : 5,048 Windows 10/11 Pro x64, Various Linux Builds, Networking, Storage, Cybersecurity Specialty.
-
-
New #3
"The Secure Delete context menu will perform 3 passes to securely erase the selected file(s)"
which method is used to perform the other 2 passes? random data or 0 fill?
lastly... is it really safe for an usb flash drive in terms of % of success to permanently delete files... or it's adviceable to use another program ?
-
-
New #5
Thanks for this, works very fast. Much easier than opening 3rd party tool. Added to Recycle bin context too.
-
New #6
it is useful for usb flash drives not encrypted... but if you use an encrypted OS drive or usb flash drive, it is useless to securely delete a file being already protected by encryption. just to remember....... to those readers who maybe think that a secure erase is still needed for encrypted drive.
-
-
-
-
New #9

Add Secure Delete to Context Menu in Windows 10
How to Add Secure Delete to Context Menu in Windows 10Published by Shawn BrinkCategory: Customization
09 Apr 2020


 Quote
Quote
Tutorial Categories

Related Discussions
