

Information
In earlier versions of Microsoft Office, users could select Install options and customize the installation by installing only selected Office applications, or select an application to be installed on first use, or completely disable an application. Later on, this could be changed, other Office applications installed or disabled.
In Office 2016 and later, including Office 365, this is no longer possible. Full Office suite of applications will be installed, be it an MSI installation from ISO or Click-to-Run installation, and it is no longer possible to remove or add individual Office applications.
The Office Deployment Tool (ODT) is a command-line tool that you can use to deploy (install) Office to your computers. Using ODT, you can select which Office suite applications will be installed or removed. You can also add or remove additional languages and edit various options.
ODT needs a configuration script (XML file), which can be created with Office Customization Tool or manually.
This tutorial will show how to create or modify a configuration script and use it with ODT to custom install Office or modify an existing installation.
Part One: Microsoft Office Editions Part Two: Configure install options with Office Customization Tool Part Three: Configure and edit install options manually Part Four: Run Setup to install Office Part Five: Change existing Office installation
Please notice: screenshots can be expanded by clicking them.
1.1) To use ODT, configuration script requires information about which edition (Product ID) to install. Installing wrong edition might make activating Office impossible.
Always use the correct Product ID corresponding with your O365 subscription plan, product key or volume license.
1.2) Table of editions. In Activation column available activation methods for each edition:
- P = Retail product key
- S = O365 Personal, Home, Business or Enterprise subscription / license
- V = Volume licensing (KMS or MAK)
Edition Product ID Activation O365 Home and Student HomeStudentRetail P O365 Home and Business HomeBusinessRetail P Office 2016 Personal PersonalRetail P O365 Personal O365PersonalRetail S O365 Home O365HomePremRetail S O365 ProPlus O365ProPlusRetail V O365 Enterprise E3, E4, E5 O365ProPlusRetail S V O365 Business O365BusinessRetail S O365 Business Premium O365BusinessRetail S O365 Small Business Premium O365SmallBusinessRetail S O365 ProPlus 2019 VL ProPlus2019Volume V O365 Standard 2019 VL Standard2019Volume V Office 2019 Home & Student HomeStudent2019Retail P Office 2019 Home & Business HomeBusiness2019Retail Office 2019 Personal Personal2019Retail Office 2019 Professional Professional2019Retail Office 2019 ProPlus ProPlus2019Retail
2.1) Using ODT requires a configuration file in XML format. When setup is run, it reads installation options from this file. Office Customization Tool is a web based application to create ODT configuration files with a few mouse clicks.
2.2) Go to Office Configuration Tool
Note
EDIT MAY 2019:
Microsoft has changed the Office Configuration Tool sign-in requirements, using a Microsoft account is no longer possible. Sign-in now requires an Azure AD account (so called work or school account).
If you do not have a valid Azure AD account, please post in this tutorial thread telling the exact Office version and edition you have (see Microsoft Docs) or want to install, and which Office applications you want to include in installation, which to exclude.
I will then make the configuration script for you.
2.3) Expand Products and releases:
2.4) Select bit architecture (#1), Office edition from Office Suites (#2), which Office applications you want to install and which to exclude (#3), your preferred update channel (#4), and which version you want to install (#5):
Edition selection (#2 in screenshot):
- Office Customization tool lets you choose O365 ProPlus, O365 Business, Office 2019 Standard VL or Office 2019 ProPlus VL edition.
- If you are installing any other edition, select O365 ProPlus and edit configuration script in Notepad when configuration file is ready and downloaded to change edition product ID to correct one. See step 3.3 about how to edit configuration script.
Excluded applications (#3 in screenshot):
- Business and ProPlus editions, exclude OneDrive Desktop. OneDrive is built-in and preinstalled in Windows 10 and does not need to be installed with Office.
- OneDrive (Groove) is SharePoint. Exclude if not required.
- If your organization has already switched to Microsoft Teams, exclude Skype for Business.
Channel selection (#4 in screenshot):
- Monthly Targeted = Office Insider, weekly updates, shown as Channel="Insiders" in script
- Monthly = Monthly updates, shown as Channel="Monthly" in script
- Semi-Annual = Updated twice a year, in January and July, shown as Channel="Broad" in script
- Semi-Annual Targeted = Preview of Targeted, twice a year March and September, shown as Channel="Targeted" in script
2.5) Click Next or expand Language . Select the primary installation language, and additional languages you want to install. In additional languages you can select Full to install a complete language pack. If a full language pack is not available in your language, select Partial to see list of partially translated languages. Proofing shows you languages which do not have a full or partial language pack but with Office proofing tools available.
In this example, I selected English as primary language, and Finnish, Swedish and German language packs.
2.6) Click Next or expand Installation. Select from where Office will be installed. Office Content Delivery Network (CDN) always downloads Office installation files from cloud (recommended, no source path required), Local source downloads Office setup files to a network share or local folder, and installation is run from this folder. The share or folder must exist when setup is run.
In case you select Local source, setup checks what content is already available on given share or folder, and only downloads what is missing. When setup is run first time, content not excluded in configuration script will be downloaded and saved on given Source path. This saves time and bandwidth in case you have multiple computers; use a network share as Source path, download is only done once and Office can be deployed from that share to all computers.
The same if you want to modify existing Office installation. Let's say I originally installed Finnish Office, excluding Access and Publisher. Now I want to add Swedish language pack, Access and Publisher to my existing installation. As setup already finds downloaded Office core and most of the applications from my source, a network share, it only needs to download those components I added.
Turn Show installation to user off if you want no information or progress bars about running installation shown to user. I recommend always turning it ON.
2.7) Click Next or expand Update and upgrade. Select if you want future updates and upgrades being installed from CDN or local source (see 2.6 for difference). Turn automatic updates on or off, select if you want any possible remnants from earlier MSI installation removed before installing Click-to-Run version of Office:
2.8) Click Next or expand Licensing and activation. In case you selected a volume licensed edition of Office in step 2.4, select your volume licencing method. For all editions, select Automatically accept the EULA. Do not turn Autoactivate on:
2.9) Click Next or expand General. This step is optional, but if you want to you can add your name or name of an organization and remarks to be saved in configuration file:
2.10 Click Next or expand Application preferences. This step is optional, you can pre-set a lot of general Office preferences here if you so prefer.
Click a preference to change it, and set the value as you want to:
A pop-up opens to let you change preferences:
2.11) All done. You can now export (download) the configuration file:
2.12) In this example, I created a configuration script to install O365 ProPlus, excluding OneDrive, Publisher and Skype for Business (shown as "Lync" in script). Primary language is US English, additional languages Finnish, Swedish and German, Monthly update channel. No set up progress shown to user:
PHP Code:<Configuration>
<Info Description="This configuration file will install 32-bit O365 ProPlus. Excluded applications: OneDrive, SharePoint (Groove), Publisher and Skype for Business (Lync). " />
<Add OfficeClientEdition="32" Channel="Monthly" AllowCdnFallback="TRUE" ForceUpgrade="TRUE">
<Product ID="O365ProPlusRetail">
<Language ID="en-us" />
<Language ID="fi-fi" />
<Language ID="de-de" />
<Language ID="sv-se" />
<ExcludeApp ID="Groove" />
<ExcludeApp ID="OneDrive" />
<ExcludeApp ID="Lync" />
<ExcludeApp ID="Publisher" />
</Product>
</Add>
<Property Name="SharedComputerLicensing" Value="0" />
<Property Name="PinIconsToTaskbar" Value="TRUE" />
<Property Name="SCLCacheOverride" Value="0" />
<Updates Enabled="TRUE" />
<RemoveMSI All="TRUE" />
<AppSettings>
<Setup Name="Company" Value="Ten Forums" />
<User Key="software\microsoft\office\16.0\common\toolbars" Name="screentipscheme" Value="0" Type="REG_DWORD" App="office16" Id="L_ShowScreenTips" />
</AppSettings>
</Configuration>
Another sample script to install 32-bit O365 Home in English, no additional languages. Update channel Semi-Annual, automatic updates turned off, setup progress shown to user and EULA automatically accepted. Office setup files will be downloaded to network share \\W10PC\OfficeSetup and Office installed from there:
PHP Code:<Configuration>
<Add OfficeClientEdition="32" Channel="Broad" SourcePath="\\W10PC\OfficeSetup" AllowCdnFallback="TRUE" ForceUpgrade="TRUE">
<Product ID="O365HomePremRetail">
<Language ID="en-us" />
</Product>
</Add>
<Property Name="SharedComputerLicensing" Value="0" />
<Property Name="PinIconsToTaskbar" Value="TRUE" />
<Property Name="SCLCacheOverride" Value="0" />
<Updates Enabled="FALSE" />
<AppSettings>
<Setup Name="Company" Value="Ten Forums" />
</AppSettings>
<Display Level="Full" AcceptEULA="TRUE" />
</Configuration>
Notice that Semi-Annual channel is shown as "Broad" in script above. Monthly Targeted will show as "Insiders", Monthly as "Monthly", and Semi-Annual Targeted as "Targeted".
3.1) The configuration XML files can be created and edited manually. Sample files in step 2.12 are a good base, showing some most common options. See full list of options and commands: Configuration options for the Office Deployment Tool | Microsoft Docs
3.2) Configuration file can be created in any text editor and named as you prefer. It must be saved as an XML file with extension .xml
3.3) See the second of sample script in step 2.12. As Office Customization Tool did not allow me to select O365 Home edition, I used O365 ProPlus instead when creating the script, therefore the Product ID when I exported the script to my PC was <Product ID="O365ProPlusRetail">. I changed this manually in Notepad to <Product ID="O365HomePremRetail">.
I also edited the script to exclude Publisher, change install source from network share to cloud (CDN), to change update channel to Monthly, and to add Finnish language pack.
This is the original configuration script I exported (downloaded) from Office Customization Tool:
PHP Code:<Configuration>
<Add OfficeClientEdition="32" Channel="Broad" SourcePath="\\W10PC\OfficeSetup" AllowCdnFallback="TRUE" ForceUpgrade="TRUE">
<Product ID="O365ProPlusRetail">
<Language ID="en-us" />
</Product>
</Add>
<Property Name="SharedComputerLicensing" Value="0" />
<Property Name="PinIconsToTaskbar" Value="TRUE" />
<Property Name="SCLCacheOverride" Value="0" />
<Updates Enabled="FALSE" />
<AppSettings>
<Setup Name="Company" Value="Ten Forums" />
</AppSettings>
<Display Level="Full" AcceptEULA="TRUE" />
</Configuration>
And here the same after my manual edits:
PHP Code:<Configuration>
<Add OfficeClientEdition="32" Channel="Monthly" AllowCdnFallback="TRUE" ForceUpgrade="TRUE">
<Product ID="O365HomePremRetail">
<Language ID="en-us" />
<Language ID="fi-fi" />
<ExcludeApp ID="Publisher" />
</Product>
</Add>
<Property Name="SharedComputerLicensing" Value="0" />
<Property Name="PinIconsToTaskbar" Value="TRUE" />
<Property Name="SCLCacheOverride" Value="0" />
<Updates Enabled="FALSE" />
<AppSettings>
<Setup Name="Company" Value="Ten Forums" />
</AppSettings>
<Display Level="Full" AcceptEULA="TRUE" />
</Configuration>
4.1) Download ODT:
Download
4.2) Create a folder on root of C: drive, name it as O365 (suggestion, you can name the folder as you prefer).
4.3) Unblock (tutorial) the downloaded EXE file, then run it. The file name is officedeploymenttool_12345-67890.exe, where 12345-67890 is current version number. At the moment of writing this, the ODT version is 11107-33602.
4.4) Accept the license, click Continue:
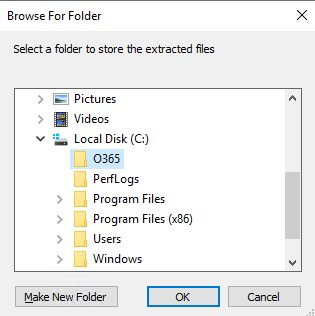
4.5) To extract ODT, select the folder you created in step 4.2 and click OK:
4.6) Copy your XML configuration file to same folder.
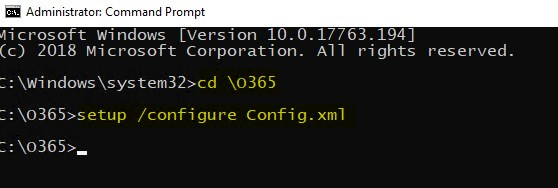
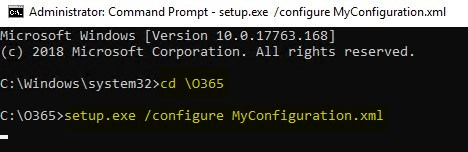
4.7) Open an elevated Command Prompt, move to O365 folder with following command:
cd \O365
4.8) If you selected cloud (CDN) as source in step 2.6, enter following command:
setup.exe /configure YourConfigurationFile.xml
4.9) Office will be installed as configured in configuration script.
4.10) If you selected a local folder or network share as Source path in step 2.6, Office setup files need to be downloaded first once with following command:
setup.exe /download YourConfigurationFile.xml
4.11) When downloaded, you can install Office from your local source with command in step 4.8
Notice that when installing from network share, ODT must be run on the computer on which you want to install Office. However, the configuration file and Source path for downloaded Office setup files can be located on a network share.
To download:
setup.exe /download \\ServerName\O365Share\YourConfigurationFile.xml
To install:
setup.exe /configure \\ServerName\O365Share\YourConfigurationFile.xml
5.1) You can change your existing Office installation whenever you want to. You can create a new script, or edit existing as told in step 3.3
5.2) Run the modified script with /configure switch as shown in step 4.8 or step 4.11, depending on if the configuration script is saved locally or on network share.
5.3) Office installation will be modified, features removed or added as told in configuration file.
That's it, geeks!
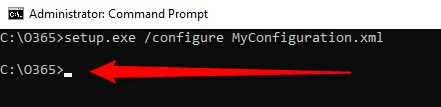
Depending on selected options, using ODT to install or modify Office can be confusing because sometimes no indicator about progress is shown.
Even if you can see no progress, keep Command Prompt running until setup is ready, until you can see that Office Setup has finished running. Cursor shown under your command on column 1, setup is still running, either downloading or installing Office:
Setup ready, a prompt will be shown:
Kari
Custom install or change Microsoft Office with Office Deployment Tool
-
New #1
A friend just installed Office 365 yesterday on his computer to be able to work from home. The license belongs to his employer's Office tenant. When signing in to Office portal with his workplace Office credentials and installing, it installed the whole Office business suite.
He wrote:
I couldn't change what installs as I did when they purchased me Office 365 previously, it installs everything Access, Skype, Publisher, Note, etc. Currently I only use Word, Excel and Outlook.
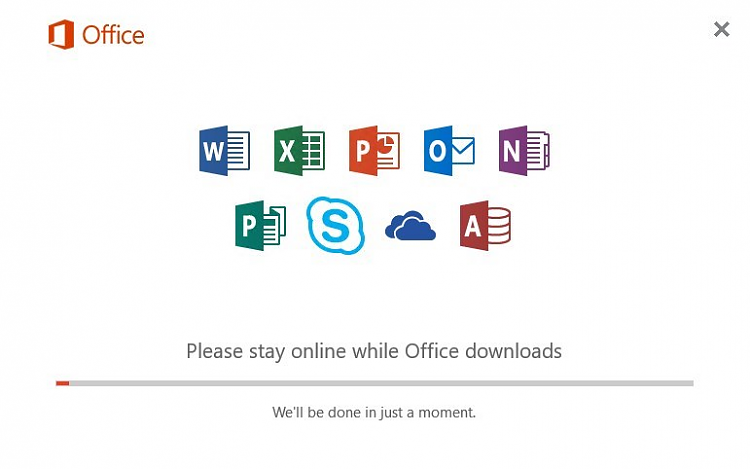
When installing Office 2016 or later, you can no longer customize installation, select what applications to install. In my friend's case, the installation screen would have looked something like this:
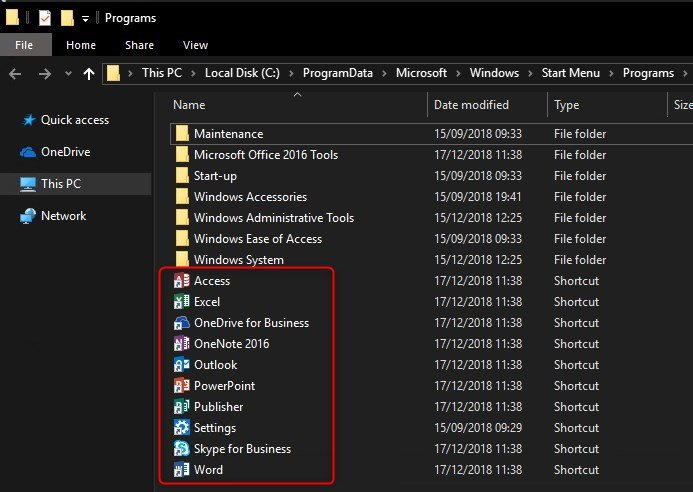
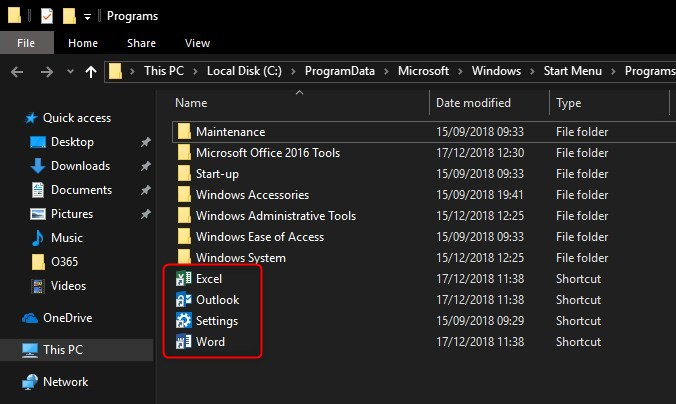
Checking the Start > Programs folder shows that each and every Office application was installed:
Luckily, using Office Deployment Tool (ODT), it is easy to configure the installation by removing unwanted Office applications.
This is how it's done, easy and takes only a few minutes.
First, in case you don't already have this information from your employer's Office admin, you need to check the Office edition (SKU) which is based on type of your O365 license, its bit version and update channel. To do this, open any Office app and select File > Account:
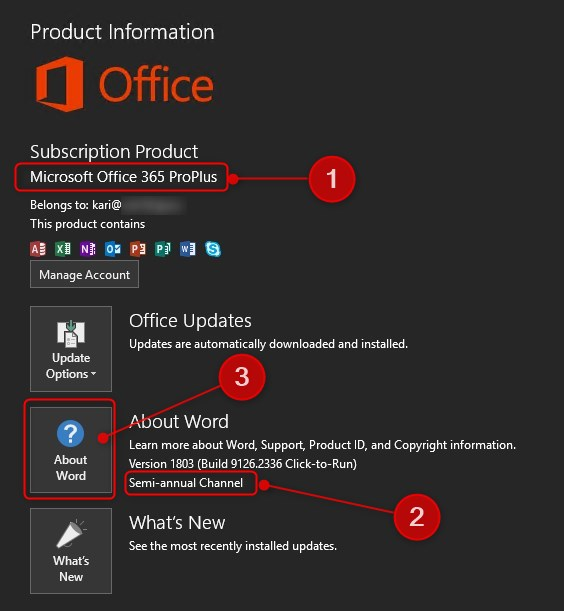
Note the edition (#1 in screenshot) and update channel (#2). Now click the About button (#3) and check the bit version:

Now we know that the Office license is O365 Enterprise (see product ID table in tutorial step 1.2), the update channel is Semi-Annual ("Broad") and bit version is 32. Time to create installation / configuration script.
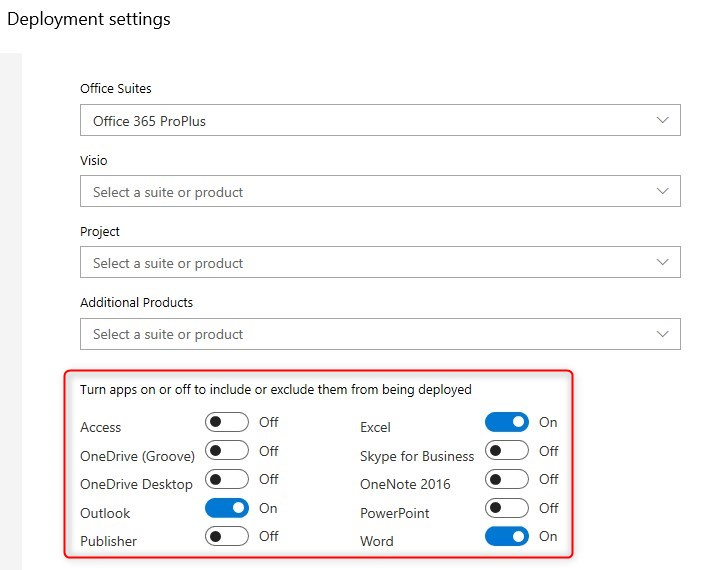
Go to Office Customization Tool (tutorial step 2.2), create and export the script (steps 2.3 through 2.11). In step 2.4, we will exclude everything else than Word, Excel and Outlook:
Script ready and exported to local PC, it looks like this:
PHP Code:<Configuration>
<Add OfficeClientEdition="32" Channel="Broad" AllowCdnFallback="TRUE" ForceUpgrade="TRUE">
<Product ID="O365ProPlusRetail">
<Language ID="en-us" />
<ExcludeApp ID="Groove" />
<ExcludeApp ID="OneDrive" />
<ExcludeApp ID="Access" />
<ExcludeApp ID="Publisher" />
<ExcludeApp ID="Lync" />
<ExcludeApp ID="OneNote" />
<ExcludeApp ID="PowerPoint" />
</Product>
</Add>
<Property Name="SharedComputerLicensing" Value="0" />
<Property Name="PinIconsToTaskbar" Value="TRUE" />
<Property Name="SCLCacheOverride" Value="0" />
<Updates Enabled="TRUE" />
<Display Level="Full" AcceptEULA="TRUE" />
<Logging Level="Off" />
</Configuration>
OK, only thing missing is to run the script with ODT. Download, install and run ODT in an elevated Command Prompt as told in tutorial Part Four. In this example, ODT was extracted / installed in C:\O365 folder and script saved in same folder as Config.xml. First CD to O365 folder, then run ODT with /configure switch and the configuration script:
Office Setup will run, removing (uninstalling) all other Office applications only leaving Word, Excel and Outlook, as can be seen in installation screen:

When done and checking Start > Programs folder, we can see that only those three Office apps are present, everything else removed (uninstalled):
That's it. O365 installation was changed as the use prefers, unwanted / unnecessary Office applications uninstalled.
KariLast edited by Kari; 17 Dec 2018 at 10:36. Reason: Fixed some typos
-
New #2
Additional instructions
Hi all,
I just struggled with this for the office 2019 Professional Plus Retail version which I bought through the Home Use Program, so I wanted to post the slight tweaks in what I had to do to make this work.
1. Download an offline installer from the microsoft website
- https://account.microsoft.com/services/
- Click Install -> Other options -> Check Download an offline installer
- you will download a .img file
2. Change the installer extension to .iso
3. Right click the installer and extract files to a folder of your choice (using 7zip, winrar, etc)--hereafter called FolderX
4. Download the ODT tool from https://www.microsoft.com/en-us/down....aspx?id=49117
5. Copy and paste the ODT setup.exe file into FolderX
- you will replace the existing setup.exe file and that's okay
6. Create a configuration.xml file containing the following:
- Note: I only wanted Word, Excel, and Powerpoint so delete whatever "<ExcludeApp ID=..." you want to keep for installationCode:<Configuration> <Add OfficeClientEdition="64" Channel="Current" > <Product ID="ProPlus2019Retail" > <Language ID="en-us" /> <ExcludeApp ID="Access" /> <ExcludeApp ID="Groove" /> <ExcludeApp ID="Lync" /> <ExcludeApp ID="OneDrive" /> <ExcludeApp ID="OneNote" /> <ExcludeApp ID="Outlook" /> <ExcludeApp ID="Publisher" /> <ExcludeApp ID="InfoPath" /> <ExcludeApp ID="Project" /> <ExcludeApp ID="Visio" /> <ExcludeApp ID="Skype" /> <ExcludeApp ID="Skypeforbusiness" /> <ExcludeApp ID="Onedriveforbusiness" /> </Product> </Add> </Configuration>
- Note 2: I also probably went overkill on the ExcludeApp codes--I think some of these aren't even included for the Professional Plus 2019 retail version so you may have to modify some of this
7. Open CMD as an administrator
8. Change directory to FolderX
9. Type : "setup.exe /configure configuration.xml"
10. Hit Enter
- installation will begin and you should only see the icons for the products you wanted installed
- installation may take forever--it will finish eventually
This was helpful because the Office Configuration Tool isn't setup to create configuration xml files for retail version products--and you'll see that in my code, the <Add ...> piece is a little bit different.
Hope that helps other people. It is definitely possible to custom install office 2019--it just takes some work.
-
New #3
First, of course the Office Customization Tool (OCT), as it's called, can create configuration files for any version of Office 2016, 2019 and Office 365, regardless if product license is retail, volume or subscription. Only con in OCT is that to use it, you must have a so called work or school (Azure AD) account. That's the reason my post contains sample configuration files and all product ID codes to let you to edit the sample files as necessary.
Second, steps 2 and 3 in your instructions are completely unnecessary. You can just right click the Office IMG file and select Mount to mount it as virtual DVD drive. No need to change extension and extract the files, just mount and copy.
Last, everything you did, including downloading the Office IMG file, you did it for nothing. Because source path was not mentioned in your configuration file, you in fact downloaded Office again, second time from Microsoft cloud, and installed it from there.
Your ADD tags look like this:
<Add OfficeClientEdition="64" Channel="Current" >
If you want to use local install files which are copied from IMG file to let's say folder OfficeSetup on drive X;, then the command would be as shown here:
<Add OfficeClientEdition="64" Channel="Current" SourcePath="X:\OfficeSetup" >
When no source path is mentioned, Office will always be downloaded and installed from Microsoft cloud, not using your local files.
Kari
-
New #4
Hi would someone be able to create a script for me please?
I have Office365 Home (Code = S) I would like the 64-bit versions of Word, Excel, PowerPoint and Outlook. I would like the updates to be whatever the standard is for O365 Home - Monthly? Language - English (UK)
Thanks
-
New #5
Unfortunately, Office is only available in colonial English (EN-US), real English (EN-GB) is not available. Having said that, here's the script for you for O365 Home. It installs 64-bit versions of Word, Excel, PowerPoint and Outlook, uninstalling any other possibly existing Office desktop applications:
Code:<Configuration ID="bac65c59-2300-469a-9260-3db5b78b955c"> <Add OfficeClientEdition="64" Channel="Monthly" ForceUpgrade="TRUE"> <Product ID="O365HomePremRetail"> <Language ID="en-us" /> <ExcludeApp ID="Access" /> <ExcludeApp ID="Groove" /> <ExcludeApp ID="Lync" /> <ExcludeApp ID="OneDrive" /> <ExcludeApp ID="OneNote" /> <ExcludeApp ID="Publisher" /> <ExcludeApp ID="Teams" /> </Product> </Add> <Property Name="SharedComputerLicensing" Value="0" /> <Property Name="PinIconsToTaskbar" Value="FALSE" /> <Property Name="SCLCacheOverride" Value="0" /> <Property Name="AUTOACTIVATE" Value="0" /> <Property Name="FORCEAPPSHUTDOWN" Value="FALSE" /> <Property Name="DeviceBasedLicensing" Value="0" /> <Updates Enabled="TRUE" /> <AppSettings> <User Key="software\microsoft\office\16.0\excel\options" Name="defaultformat" Value="51" Type="REG_DWORD" App="excel16" Id="L_SaveExcelfilesas" /> <User Key="software\microsoft\office\16.0\powerpoint\options" Name="defaultformat" Value="27" Type="REG_DWORD" App="ppt16" Id="L_SavePowerPointfilesas" /> <User Key="software\microsoft\office\16.0\word\options" Name="defaultformat" Value="" Type="REG_SZ" App="word16" Id="L_SaveWordfilesas" /> </AppSettings> <Display Level="Full" AcceptEULA="TRUE" /> <Logging Level="Off" /> </Configuration>
Copy the above code, paste in Notepad or any other text editor. Save as an XML file, for instance YourConfigurationFile.xml, and continue from tutorial step 4.1.
Kari
-
New #6
-
-
New #8
-
-

Custom install or change Microsoft Office with Office Deployment Tool
How to use Office Deployment Tool to custom install Microsoft Office 365, or change existing Office installation.Published by Kari "Kalsarikänni" FinnCategory: Apps & Features
27 Aug 2019


 Quote
QuoteTutorial Categories

Related Discussions
