

How to Enable or Disable Offline Files in Windows
Offline Files is a feature of Sync Center that makes network files available to a user, even if the network connection to the server is unavailable.
Users can use offline files (if enabled) to make their network files always available offline to keep a copy of the files stored on the network on your computer. This allows users to work with them even when they are not connected to the network or a server is unavailable. The next time the user connects to the network or the server is available, their offline files on your computer will automatically sync to the network files on the server to update.
See also:
- Folder Redirection, Offline Files, and Roaming User Profiles overview | Microsoft Docs
- Work Folders and Offline Files support for Windows Information Protection | Storage at Microsoft
This tutorial will show you how to enable or disable offline files for all users on the computer in Windows 7, Windows 8, and Windows 10.
You must be signed in as an administrator to enable or disable offline files.
In Windows 7, the offline files feature is only available in the Professional, Ultimate, and Enterprise editions.
In Windows 8, the offline files feature is only available in the Pro and Enterprise editions.
In Windows 10, the offline files feature is only available in the Pro, Enterprise, and Education editions.
Contents
- Option One: Enable or Disable Offline Files in Sync Center
- Option Two: Enable or Disable Offline Files using a REG file
- Option Three: Enable or Disable Offline Files via Policy in Local Group Policy Editor
- Option Four: Enable or Disable Offline Files via Policy using a REG file
EXAMPLE: Sync Center notification area icon available when Offline Files is enabled
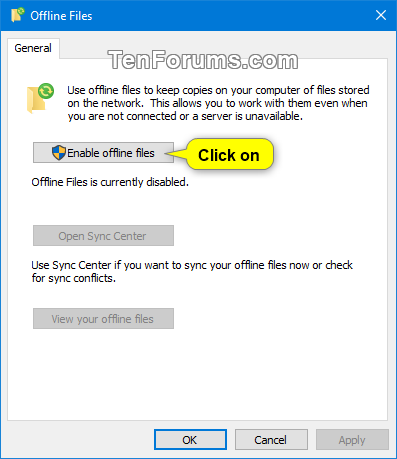
1 Open the Control Panel (icons view), and click/tap on the Sync Center icon.
2 Click/tap on the Manage offline files link on the left side of Sync Center. (see screenshot below)
3 Do step 4 (enable) or step 5 (disable) below for what you want to do.
A) Click/tap on the Enable offline files button. (see screenshot below)
B) Click/tap on OK, and go to step 6 below. (see screenshot below)
This is the default setting.
A) Click/tap on the Disable offline files button. (see screenshot below)
B) Click/tap on OK, and go to step 6 below. (see screenshot below)
6 When ready, click/tap on Yes to restart the computer to apply. (see screenshot below)
The downloadable .reg files below will modify the DWORD values in the registry keys below.
HKEY_LOCAL_MACHINE\SYSTEM\CurrentControlSet\Services\CSC
Start DWORD
1 = Enable
4 = Disable
HKEY_LOCAL_MACHINE\SYSTEM\CurrentControlSet\Services\CscService
Start DWORD
2 = Enable
4 = Disable
1 Do step 2 (enable) or step 3 (disable) below for what you want to do.
A) Click/tap on the Download button below to download the file below, and go to step 4 below.
Enable_Offline_Files.reg
Download
This is the default setting.
A) Click/tap on the Download button below to download the file below, and go to step 4 below.
Disable_Offline_Files.reg
Download
4 Save the .reg file to your desktop.
5 Double click/tap on the downloaded .reg file to merge it.
6 When prompted, click/tap on Run, Yes (UAC), Yes, and OK to approve the merge.
7 When ready, restart the computer to apply.
8 If you like, you can delete the downloaded .reg file.
If enabled or disabled, this option will override Option One and Option Two.
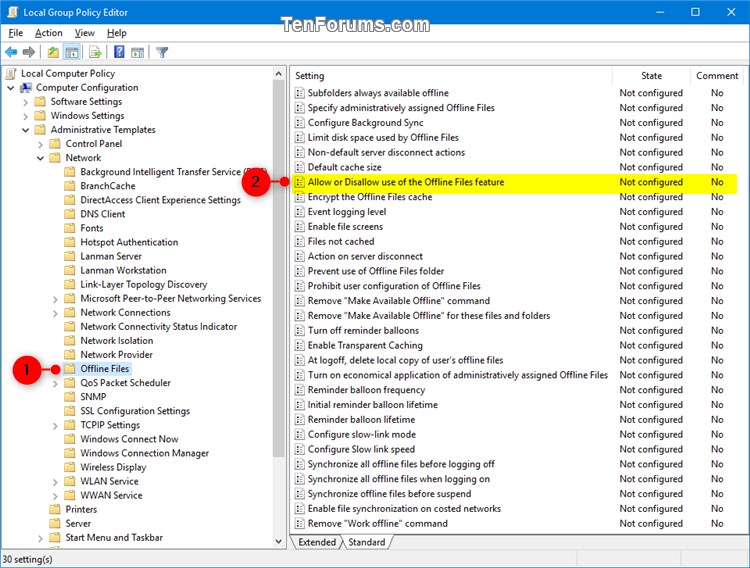
1 Open the Local Group Policy Editor.
2 Navigate to the key below in the left pane of the Local Group Policy Editor. (see screenshot below)
Computer Configuration\Administrative Templates\Network\Offline Files
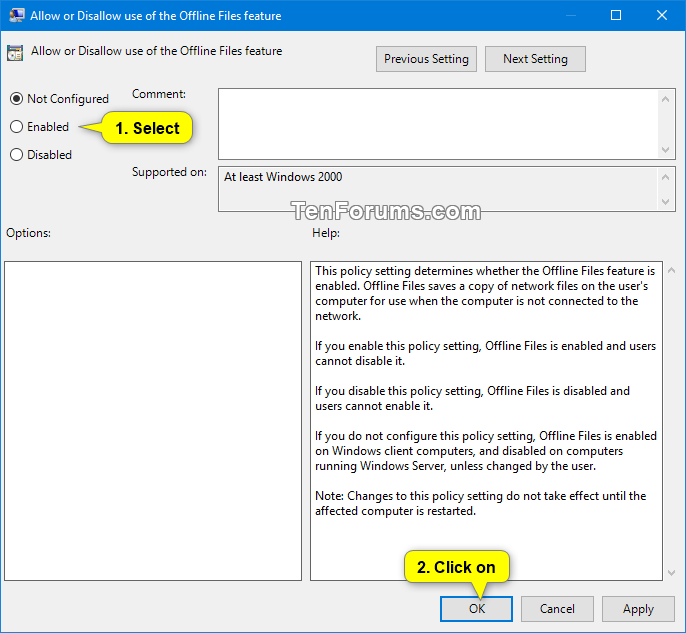
3 In the right pane of Offline Files in Local Group Policy Editor, double click/tap on the Allow or Disallow use of the Offline Files feature policy to edit it. (see screenshot above)
4 Do step 5 (enable), step 6 (disable), or step 7 (default) below for what you would like to do.
A) Select (dot) Enabled, click/tap on OK, and go to step 8 below. (see screenshot below)
A) Select (dot) Disabled, click/tap on OK, and go to step 8 below. (see screenshot below)
8 When finished, close the Local Group Policy Editor.
9 When ready, restart the computer to apply.
If enabled or disabled, this option will override Option One and Option Two.
The downloadable .reg files below will modify the DWORD value in the registry key below.
HKEY_LOCAL_MACHINE\SOFTWARE\Policies\Microsoft\Windows\NetCache
Enabled DWORD
(delete) = Default
0 = Disable
1 = Enable
1 Do step 2 (enable), step 3 (disable), or step 4 (disable) below for what you want to do.
A) Click/tap on the Download button below to download the file below, and go to step 5 below.
Enable_Offline_Files_via_policy.reg
Download
A) Click/tap on the Download button below to download the file below, and go to step 5 below.
Disable_Offline_Files_via_policy.reg
Download
A) Click/tap on the Download button below to download the file below, and go to step 5 below.
Default_Offline_Files_policy.reg
Download
5 Save the .reg file to your desktop.
6 Double click/tap on the downloaded .reg file to merge it.
7 When prompted, click/tap on Run, Yes (UAC), Yes, and OK to approve the merge.
8 When ready, restart the computer to apply.
9 If you like, you can delete the downloaded .reg file.
That's it,
Shawn
Related Tutorials
- How to Share Files and Folders Over a Network in Windows 10
- How to Add Sync Center Context Menu in Windows
- How to Set or Unset Network Files as Always Available Offline in Windows
- How to Encrypt or Unencrypt Offline Files Cache in Windows
- How to Create Offline Files Folder Shortcut in Windows
- How to Change Offline Files Disk Usage Limits in Windows
- How to Manually Sync Offline Files in Windows
- How to Create New Offline Files Sync Schedule in Windows
- How to Delete Offline Files Sync Schedule in Windows
- How to Edit Offline Files Sync Schedule in Windows
- How to Add or Remove Offline Files tab in Network File and Folder Properties in Windows 10
- How to Add or Remove Always Available Offline Context Menu in Windows
Enable or Disable Offline Files in Windows
-
New #1
Hi,
I set the " Allow or Disallow use of the Offline Files feature " Intune policy to disabled, but the users can able to click to "always available offline" on the shared file-right click in file explorer.
Could you please help me how is it working the policy?
Because, I think the HKEY_LOCAL_MACHINE\SYSTEM\CurrentControlSet\Services\CscService and
HKEY_LOCAL_MACHINE\SYSTEM\CurrentControlSet\Services\CSC
"Start" Dword needs to be set to disabled via script, because did not find any policy which can configure them.
Or, do you have any idea which is the best way to set disable the offline file sync without data-loss for 1500 users if the users already use this feature? Because when I tried on my test device sometimes the offline files disappeared after I set the csc and cscservice\start value to 4 disabled
Thank you!
-
New #2
Hello Sunyix, and welcome.
You could use the method in the tutorial below to remove the Always available offline context menu.
How to Add or Remove Always Available Offline Context Menu in Windows
-
New #3
Hello,
Thank you very much for your fast answer.
So, I have a test machine and tried the remove the Always available offline context menu as you mentioned.
In this case the "always available offline" menu was disappeared successfully. But I have some files where the offline file sync already set, these files status is still with green circle icon, so the offline file sync is still active.
Could you please help me which is the best method for remove the offline file sync for all users' devices without data-loss?
Current status:
-Users set manually the offline file sync for network files and folders
I would like to implement the following:
-I want to remove the offline file sync for these files and folders
I found your tutorial (it is very good) and tried on my test device these:
-Disabled the offline file feature with Intune policy, this policy set this registry as you mentioned:
HKEY_LOCAL_MACHINE\SOFTWARE\Policies\Microsoft\Windows\NetCache\ Enabled - 0
After this modification, grayed out the "Enabled offline files" in the Sync Centre, but the "Always available offline" menu stayed on the files (right click on the file)
But, the already offline files stayed with the same status. (green circle icon)
The CSC status stayed 1 (enabled) and CSCService status stayed 2 (enabled)
and the Sync Centre is stay available.
After it, I tried to set to disable via registry:
HKEY_LOCAL_MACHINE\SYSTEM\CurrentControlSet\Services\CSC\ -start - 4
HKEY_LOCAL_MACHINE\SYSTEM\CurrentControlSet\Services\CscService -start - 4
In this case the Sync centre disappeared, "Always available offline" menu disappeared and the offline file green icon disappeared from files, but some of the files were missing. (maybe these file created on the local machine and stay in the offline file cache database)
When I set the csc reg keys to enabled again these missing files reappeared.
I do not understand this topic and currently I have no idea how is it possible to remove this feature if already in used.
-
New #4
@Sunyix,
Offline Files basically just allows you to have shared network files available even when offline.
You could disable Offline Files using option 3 or 4 in this tutorial in the first post to no longer have it available for all users. The network files will still be available, but only while online.

Enable or Disable Offline Files in Windows
How to Enable or Disable Offline Files in WindowsPublished by Shawn BrinkCategory: Network & Sharing
24 Aug 2020


 Quote
QuoteTutorial Categories

Related Discussions
