

How to Enable or Disable Storage Sense to Delete Temporary Files in Windows 10
Starting with Windows 10 build 15014, Microsoft has added a new Automatically free up space with Storage Sense option in Storage Settings to automatically get rid of the files you dont need to save you an extra step when low on disk space. Currently this is only supported for unused temporary files, files in your recycle bin over 30 days, and files in your Downloads folder that haven't changed for over 30 days.
Starting with Windows 10 build 17720, Storage Sense can now run when your device is low on storage space by default. Once activated, Storage Sense will intelligently run whenever your device runs low on storage space and clear temporary files that your device and applications no longer need.Storage Sense looks for and will remove the following types of files:
- Temporary setup files
- Old indexed content
- System cache files
- Internet cache files
- Device Driver packages
- System downloaded program files
- Dated system log files
- System error memory dump files
- System error minidump files
- Temporary system files
- Dated Windows update temporary files
- and more.
When Storage Sense is turned on or enabled, it can delete temporary files that user's apps aren't using.
Starting with at least Windows 10 build 18282, you can now configure a group policy to enable or disable allowing Storage Sense (if turned on or enabled) to delete temporary files for all users on the computer.
This tutorial will show you how to enable or disable allowing Storage Sense to delete temporary files for your account or all users in Windows 10.
- Option One: Enable or Disable Storage Sense to Delete Temporary Files for Current User in Settings
- Option Two: Enable or Disable Storage Sense to Delete Temporary Files for Current User using a REG file
- Option Three: Enable or Disable Storage Sense to Delete Temporary Files for All Users in Local Group Policy Editor
- Option Four: Enable or Disable Storage Sense to Delete Temporary Files for All Users using a REG file
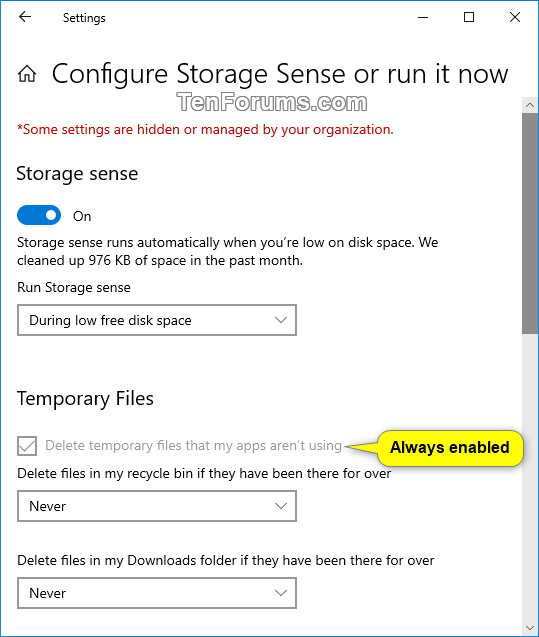
EXAMPLE: Storage Sense delete temporary files disabled and always enabled for all users

1. Open Settings, and click/tap on the System icon.
2. Click/tap on Storage on the left side, turn on Storage sense on the right side, and click/tap on the Configure Storage Sense or run it now link. (see screenshot below)
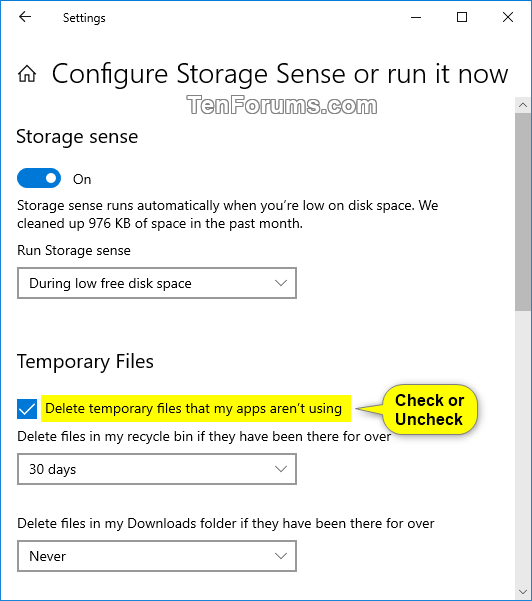
3. Under Temporary Files, check (enable - default) or uncheck (disable) Delete temporary files that my apps aren't using for what you want. (see screenshot below)
4. You can now close Settings if you like.
The downloadable .reg files below will modify the DWORD value in the registry key below.
HKEY_CURRENT_USER\Software\Microsoft\Windows\CurrentVersion\StorageSense\Parameters\StoragePolicy
04 DWORD
0 = Disable
1 = Enable
1. Do step 2 (enable) or step 3 (disable) below for what you want to do.
A) Click/tap on the Download button below to download the file below, and go to step 4 below.
Enable_Storage_Sense_to_delete_temporary_files_for_current_user.reg
Download
A) Click/tap on the Download button below to download the file below, and go to step 4 below.
Disable_Storage_Sense_to_delete_temporary_files_for_current_user.reg
Download
4. Save the .reg file to your desktop.
5. Double click/tap on the downloaded .reg file to merge it.
6. When prompted, click/tap on Run, Yes (UAC), Yes, and OK to approve the merge.
7. If you like, you can delete the downloaded .reg file if you like.
You must be signed in as an administrator to do this option
If enabled or disabled, this option will override Option One and Option Two for all users on the computer.
The Local Group Policy Editor is only available in the Windows 10 Pro, Enterprise, and Education editions.
All editions can use Option Four.
1. Open the Local Group Policy Editor.
2. Navigate to the key below in the left pane of the Local Group Policy Editor. (see screenshot below)
Computer Configuration\Administrative Templates\System\Storage Sense
3. In the right pane of Storage Sense in Local Group Policy Editor, double click/tap on the Allow Storage Sense Temporary Files cleanup policy to edit it. (see screenshot above)
4. Do step 5 (enable), step 6 (disable), or step 7 (default) below for what you would like to do.
A) Select (dot) Enabled, click/tap on OK, and go to step 8 below. (see screenshot below)
A) Select (dot) Disabled, click/tap on OK, and go to step 8 below. (see screenshot below)
A) Select (dot) Not Configured, click/tap on OK, and go to step 8 below. (see screenshot below)
8. When finished, you can close the Local Group Policy Editor if you like.
You must be signed in as an administrator to do this option
If enabled or disabled, this option will override Option One and Option Two for all users on the computer.
The downloadable .reg files below will modify the DWORD value in the registry key below.
HKEY_LOCAL_MACHINE\SOFTWARE\Policies\Microsoft\Windows\StorageSense
AllowStorageSenseTemporaryFilesCleanup DWORD
(delete) = Default
0 = Disable
1 = Always enable
1. Do step 2 (enable), step 3 (disable), or step 4 (default) below for what you want to do.
A) Click/tap on the Download button below to download the file below, and go to step 5 below.
Always_enable_Storage_Sense_to_delete_temporary_files_for_all_users.reg
Download
A) Click/tap on the Download button below to download the file below, and go to step 5 below.
Disable_Storage_Sense_to_delete_temporary_files_for_all_users.reg
Download
A) Click/tap on the Download button below to download the file below, and go to step 5 below.
Default_user_choice_Storage_Sense_to_delete_temporary_files.reg
Download
5. Save the .reg file to your desktop.
6. Double click/tap on the downloaded .reg file to merge it.
7. When prompted, click/tap on Run, Yes (UAC), Yes, and OK to approve the merge.
8. If you like, you can delete the downloaded .reg file if you like.
That's it,
Shawn
Related Tutorials
- How to Enable or Disable Storage Sense to Automatically Free Up Space in Windows 10
- How to Turn On or Off Storage Sense to Automatically Free Up Space in Windows 10
- How to Specify when to Run Storage Sense in Windows 10
- How to Free Up Disk Space Now with Storage Sense in Windows 10
- How to Specify when Storage Sense Automatically Make OneDrive Files On-Demand Online-only in Windows 10
- How to Specify when Storage Sense Delete Files in Recycle Bin in Windows 10
- How to Specify when Storage Sense Delete Files in Downloads Folder in Windows 10
Enable or Disable Storage Sense Delete Temporary Files in Windows 10
Enable or Disable Storage Sense Delete Temporary Files in Windows 10
How to Enable or Disable Storage Sense to Delete Temporary Files in Windows 10Published by Shawn BrinkCategory: Performance & Maintenance
28 Nov 2018


Tutorial Categories

Related Discussions
